This is called Million Dollar Bacon for good reason. It consists of yummy pieces of thick bacon covered in brown sugar, spices, and maple syrup—the perfect mix of sweet, spicy, and salty.

This is called Million Dollar Bacon for good reason. It consists of yummy pieces of thick bacon covered in brown sugar, spices, and maple syrup—the perfect mix of sweet, spicy, and salty.
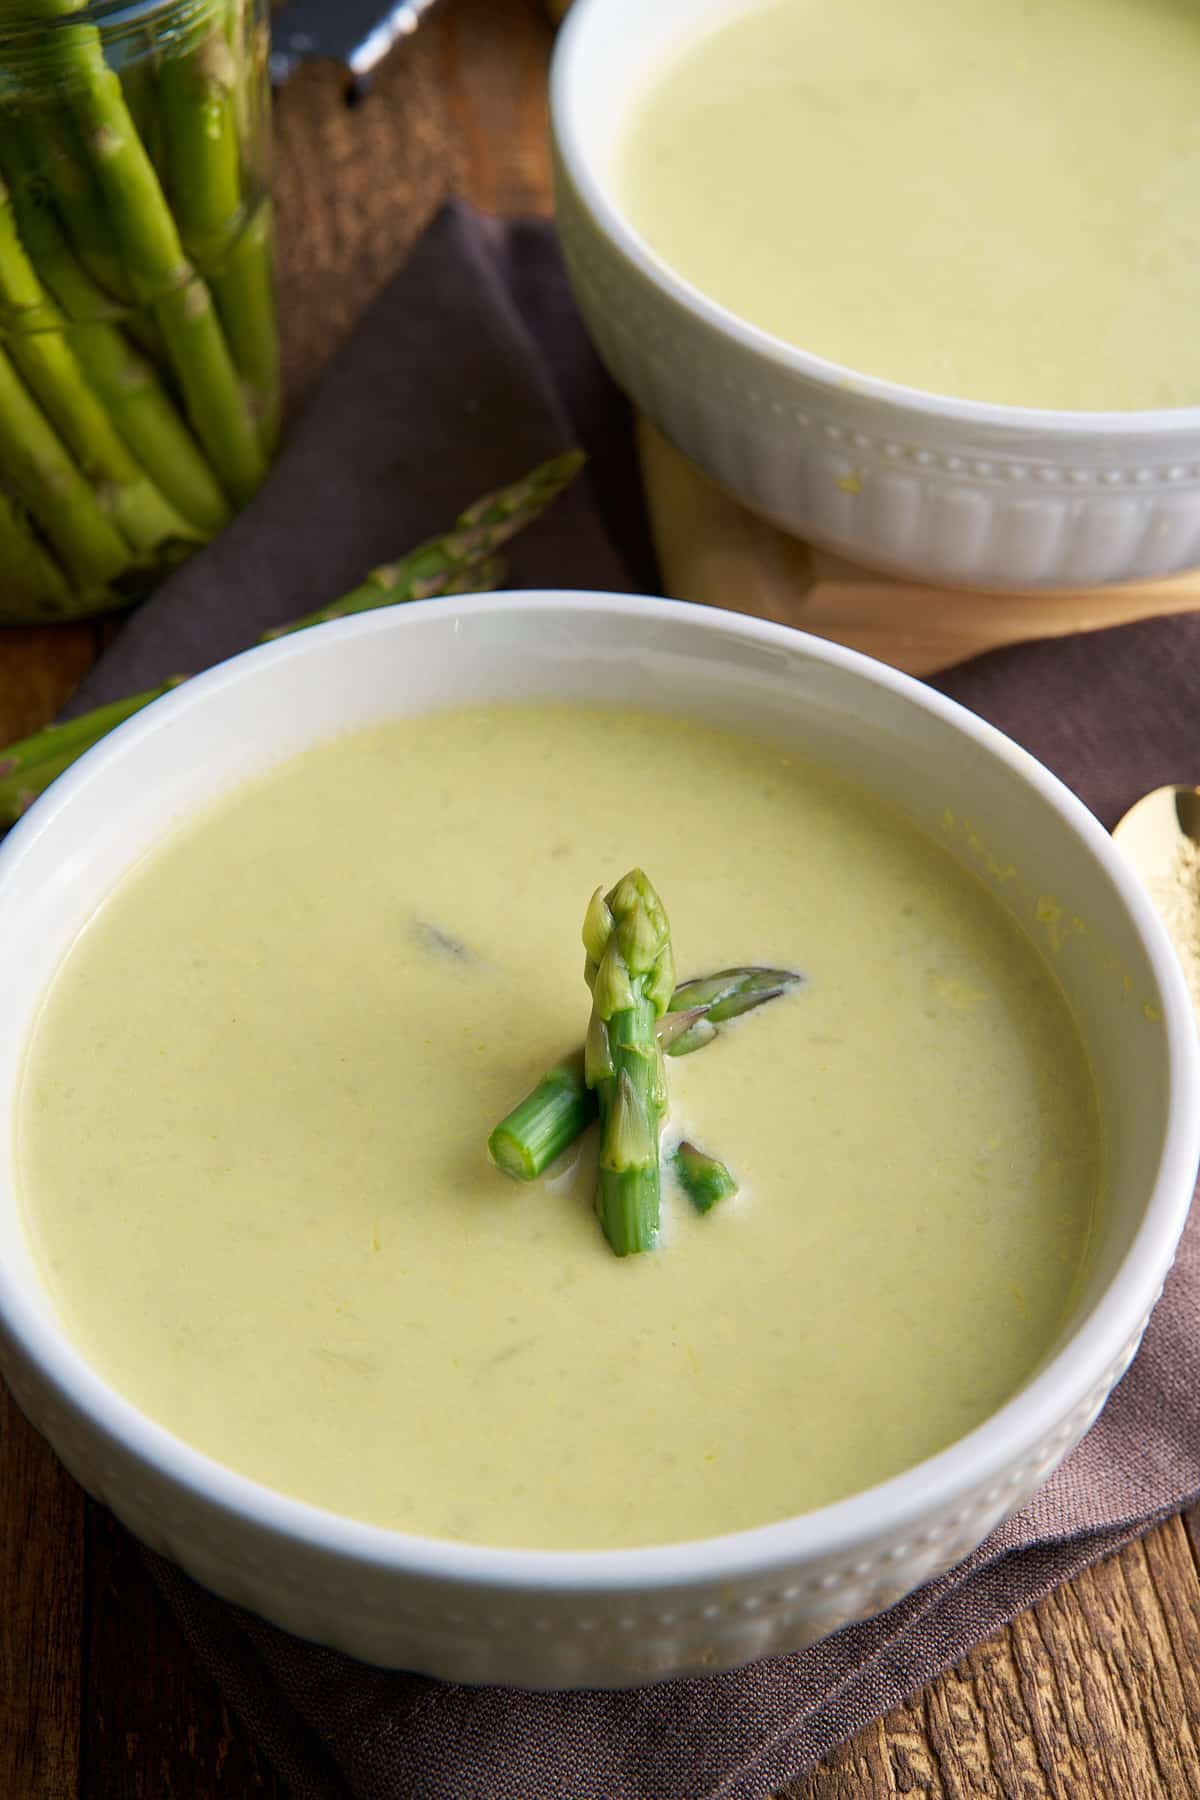
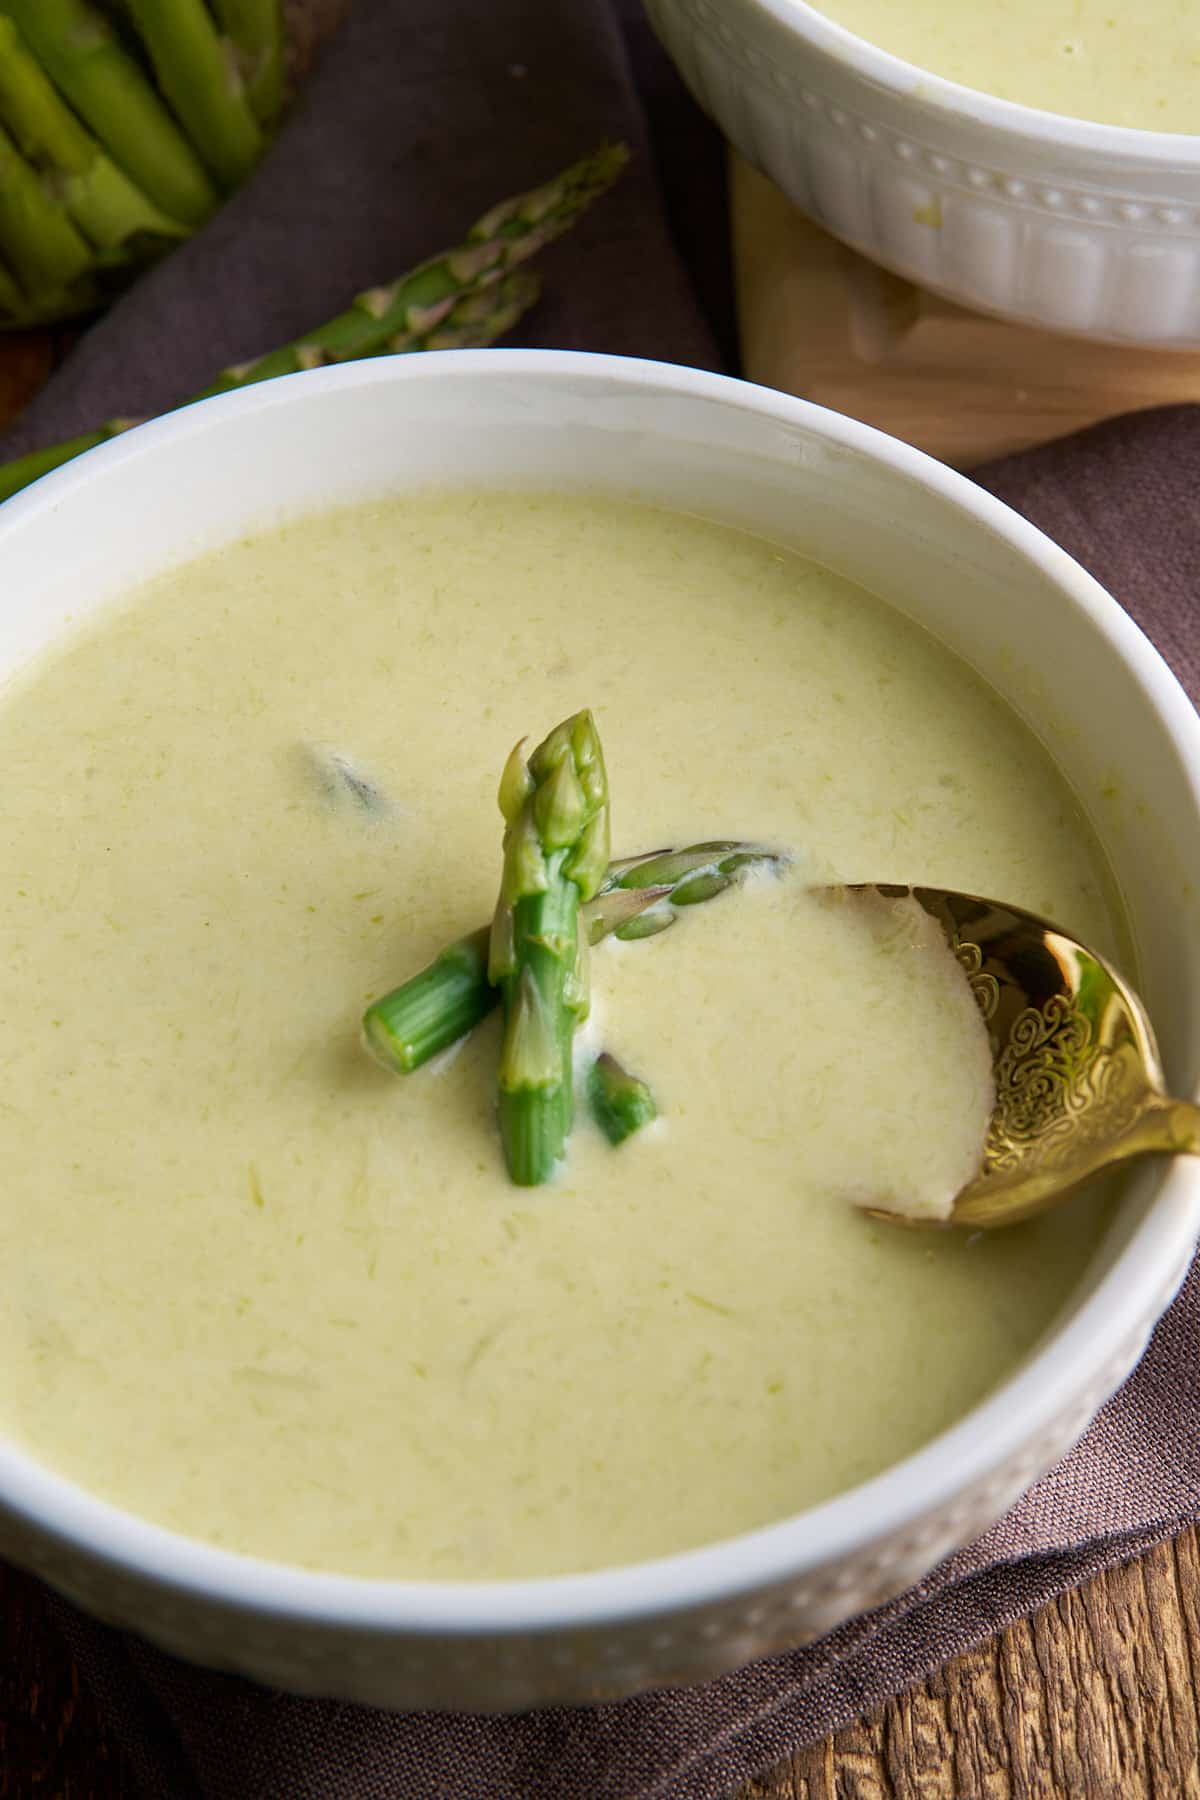
This Cream of Asparagus Soup is bursting with fresh flavor! Ready in under an hour, it's perfect for a light and satisfying lunch or dinner.
This post contains affiliate links, please read my full disclaimer here.
You’ll find the full recipe with ingredient amounts and instructions in the recipe card at the bottom of this post. Be sure to check out the blog post itself for extra tips and tricks!
I'm a year-round soup kind of gal, and I love to eat this asparagus soup when Spring arrives. It's pretty easy to make and comes out nice, creamy, and flavorful. I follow a few steps to ensure the soup stays creamy. I also add a green asparagus garnish to each bowl.
This cream of asparagus soup recipe can be ready in less than an hour. For the best results, I suggest prepping all your ingredients before you start cooking.
If you enjoy creamy soups, check out some others I have, like this popular cream of mushroom soup or my yellow squash soup.

Begin by taking a few asparagus tips and blanching them in boiling water for 1-2 minutes. Then, remove them, drain them, and set them aside.
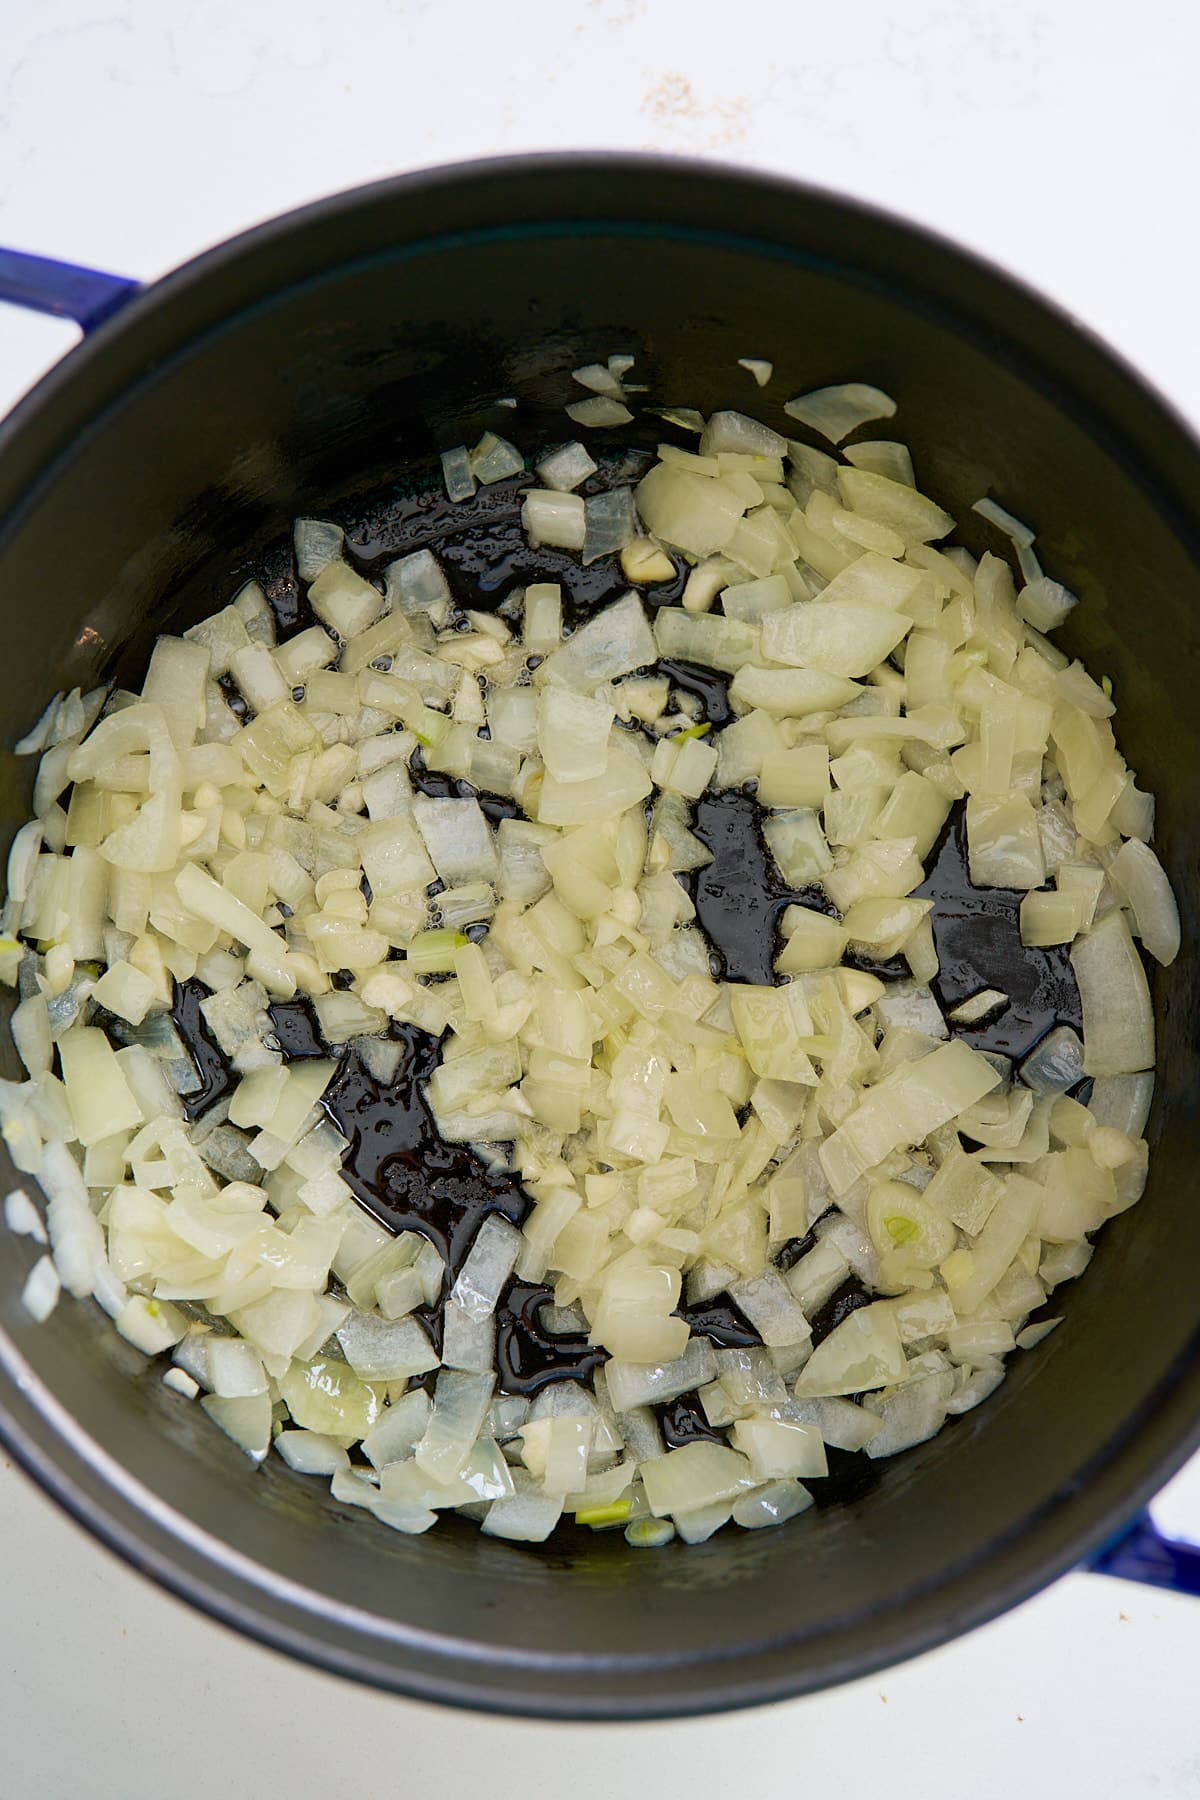
Melt butter in a large pot over medium-low heat. Add the chopped onion and sauté until softened and translucent, about 8 minutes. Then add the garlic and sauté for an additional 30 seconds.
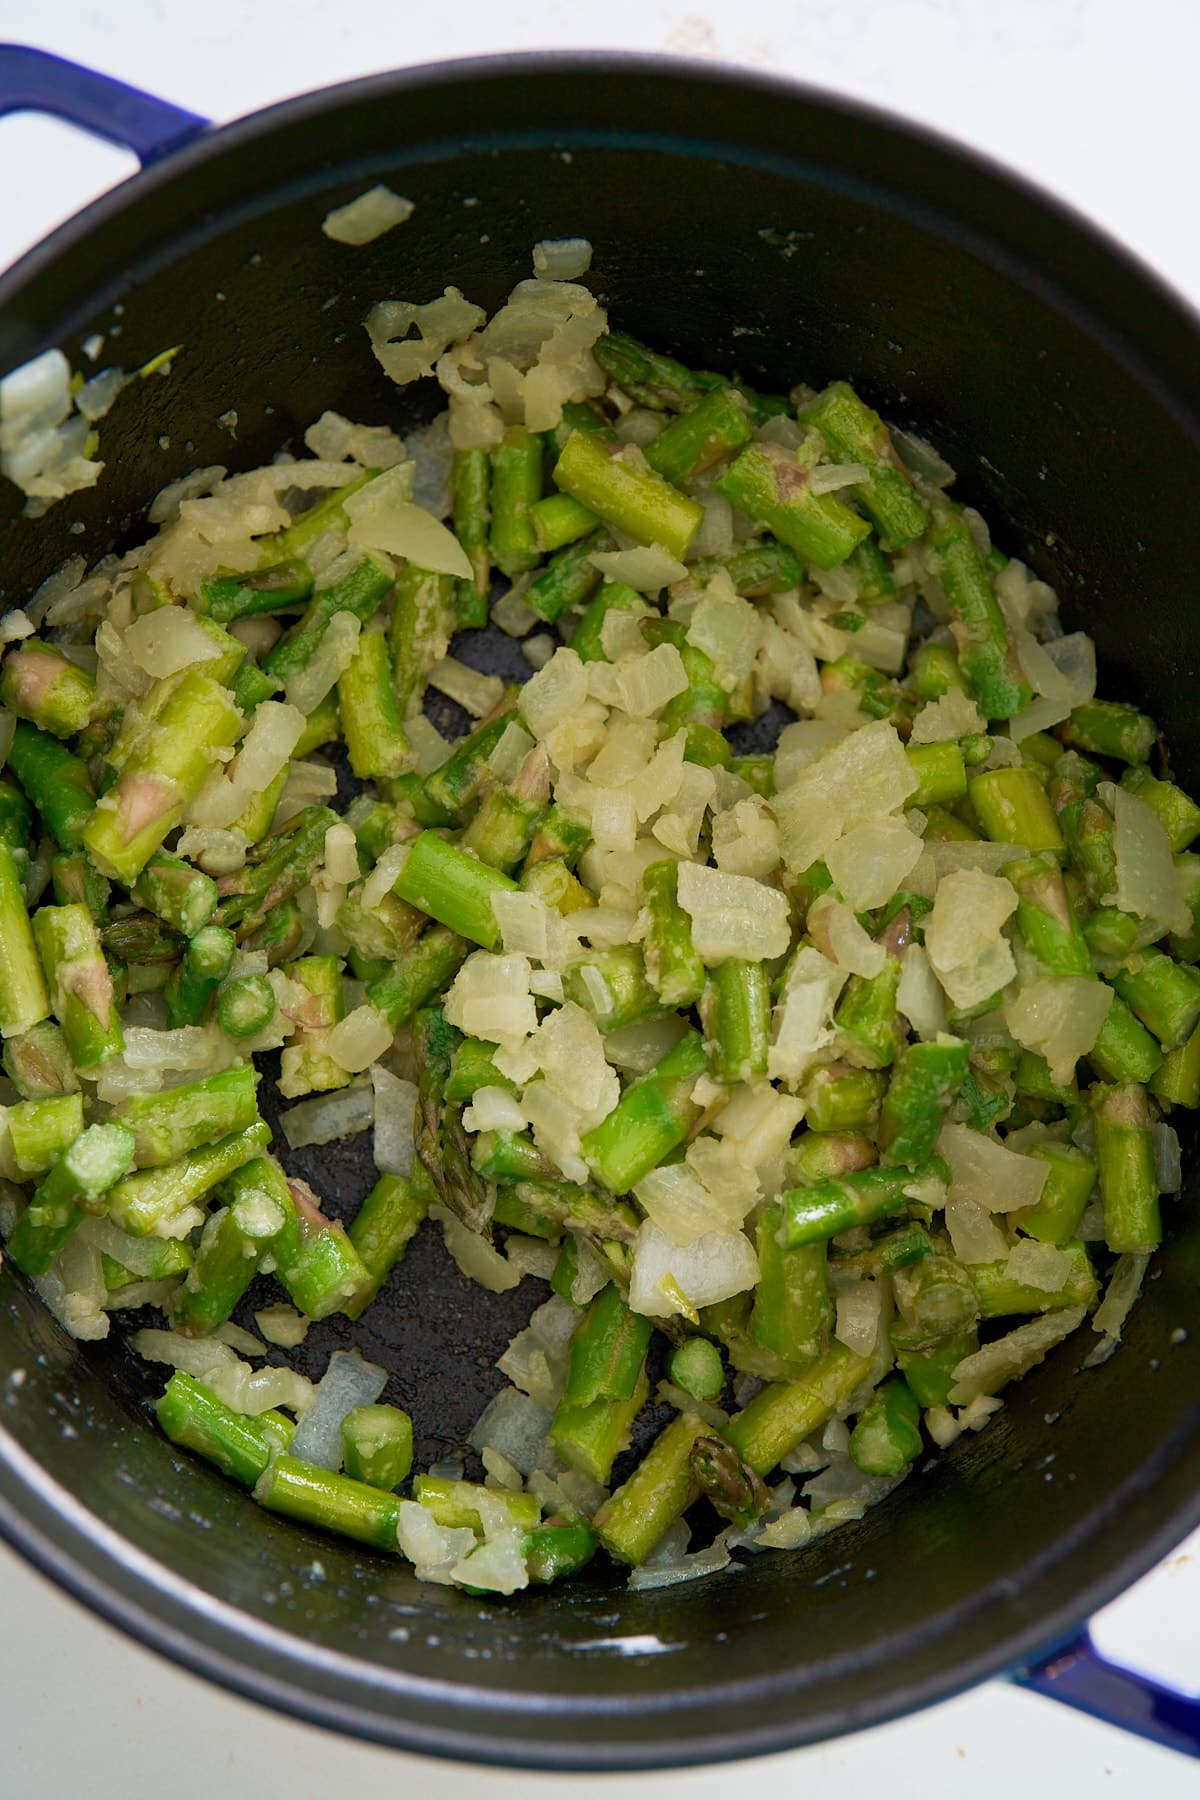
Turn up the heat to medium, put the chopped asparagus in the pot (except the blanched tips), and cook for 3 minutes until they begin to soften.
Sprinkle the flour in the pot, and stir, cooking the flour and vegetables for about 1-2 minutes.
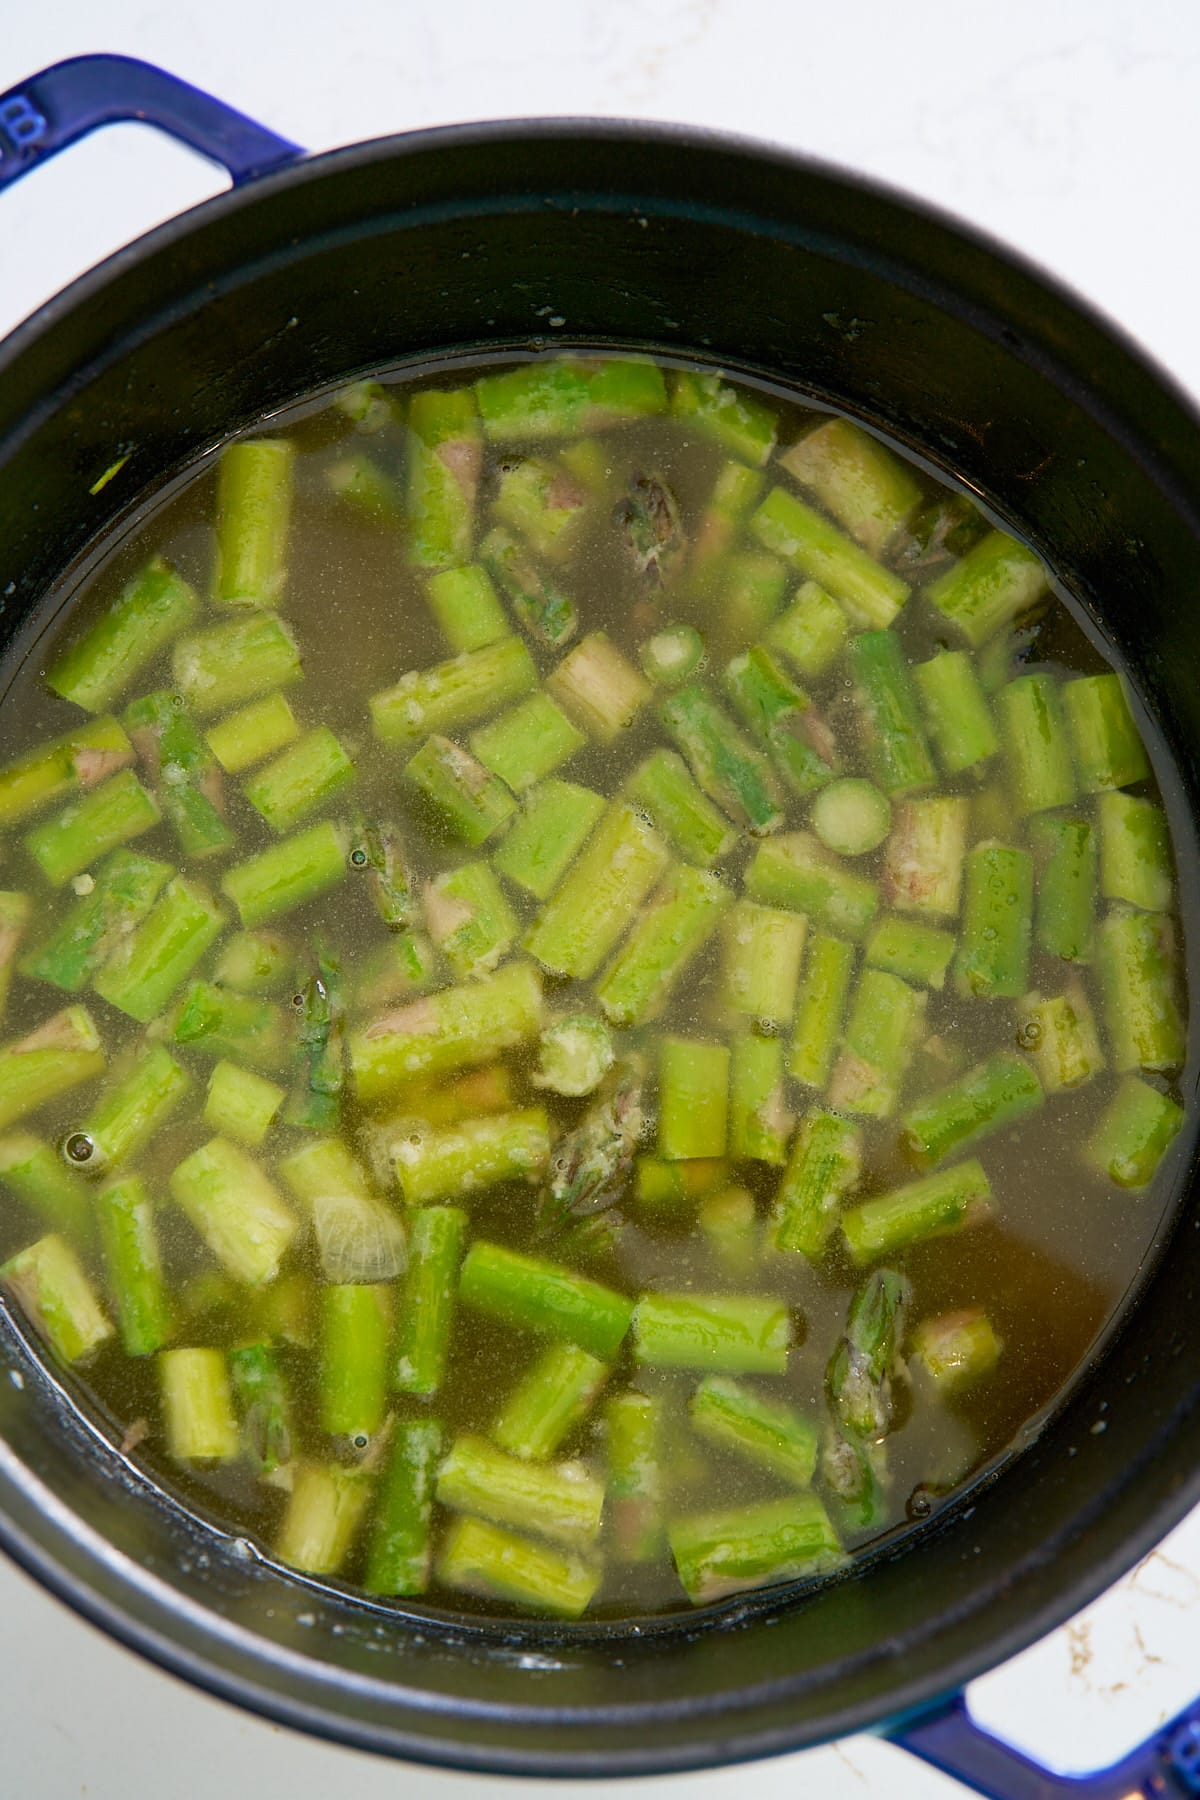
Pour in the broth, increase the heat to medium-high, and bring the mixture to a simmer. Reduce the heat to medium and simmer, uncovered, for about 10 minutes or until the asparagus pieces are tender.
Remove from heat. Use an immersion blender to puree the asparagus and broth mixture directly in the pot until smooth. You can also blend the soup in small amounts using a regular blender, being careful with the hot liquid.
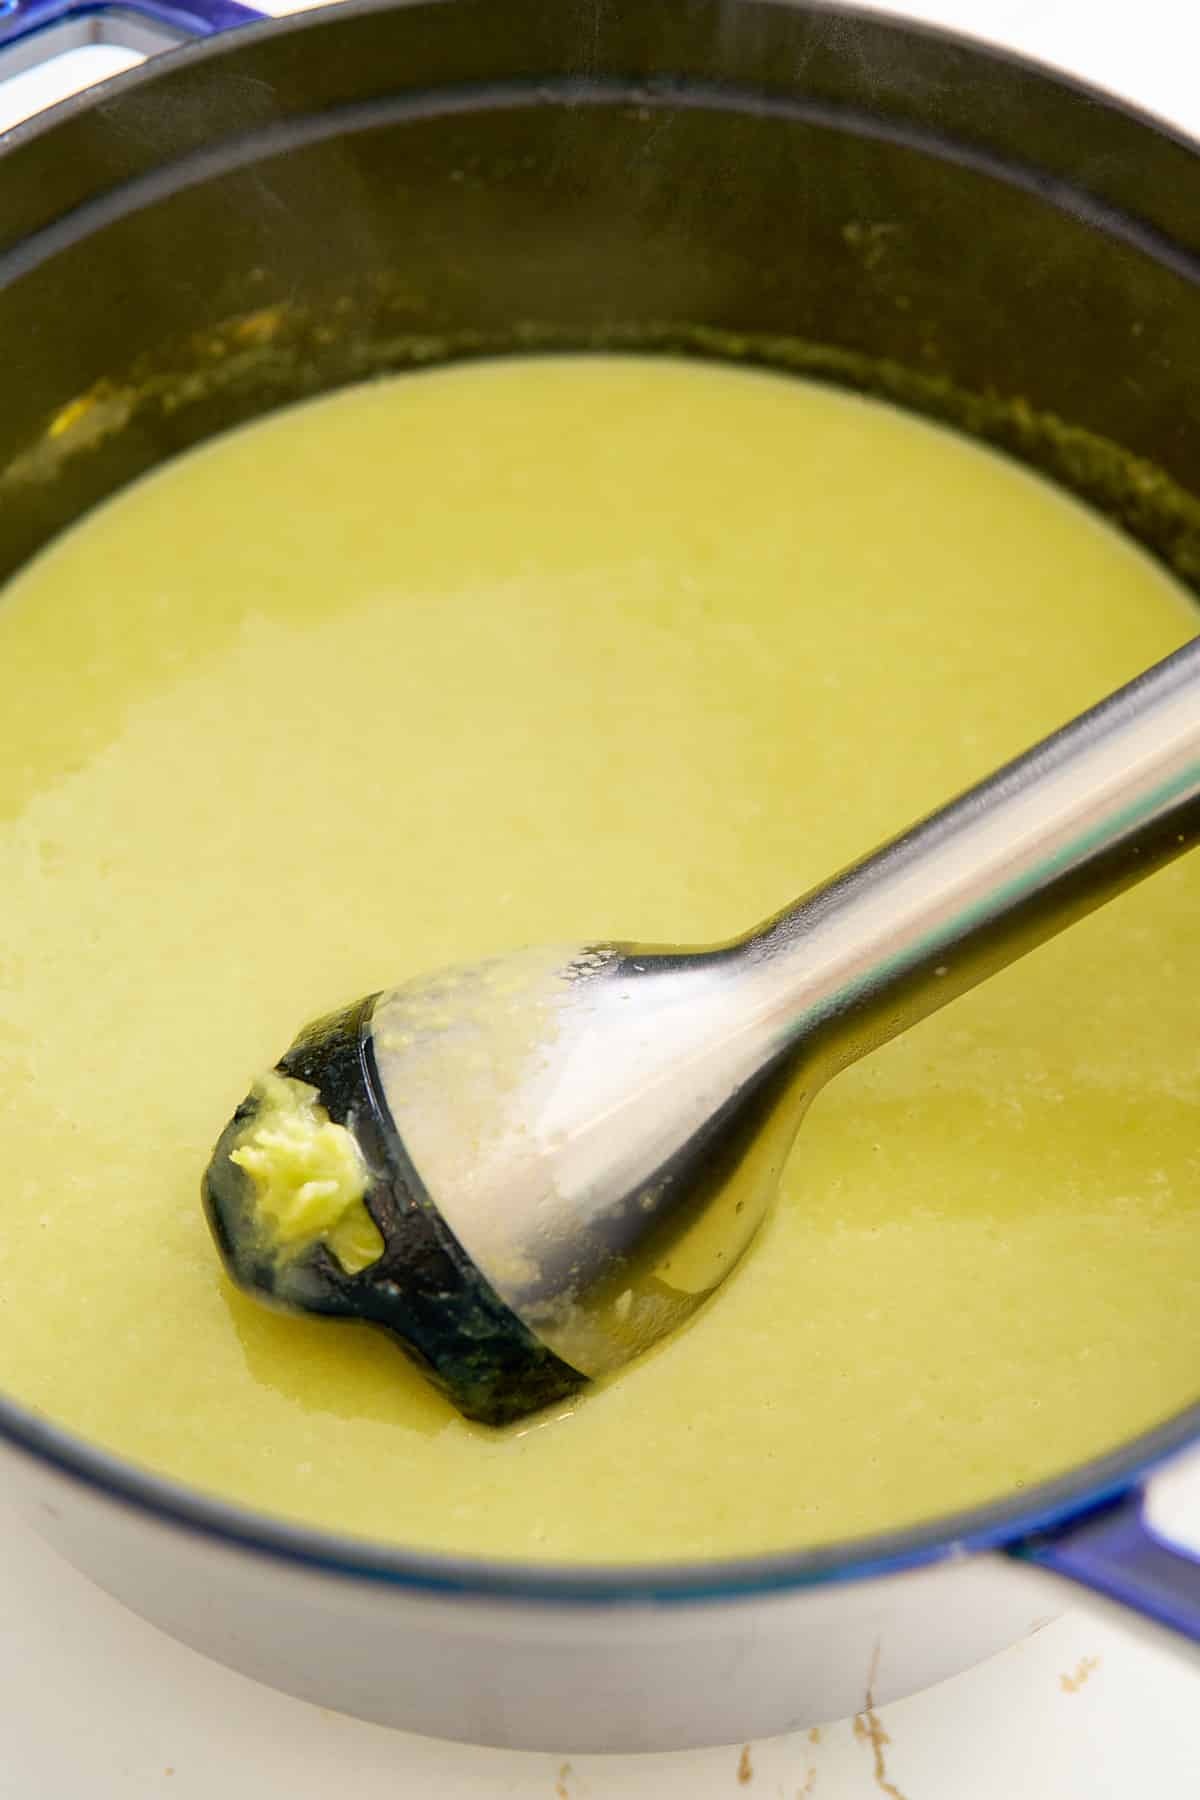
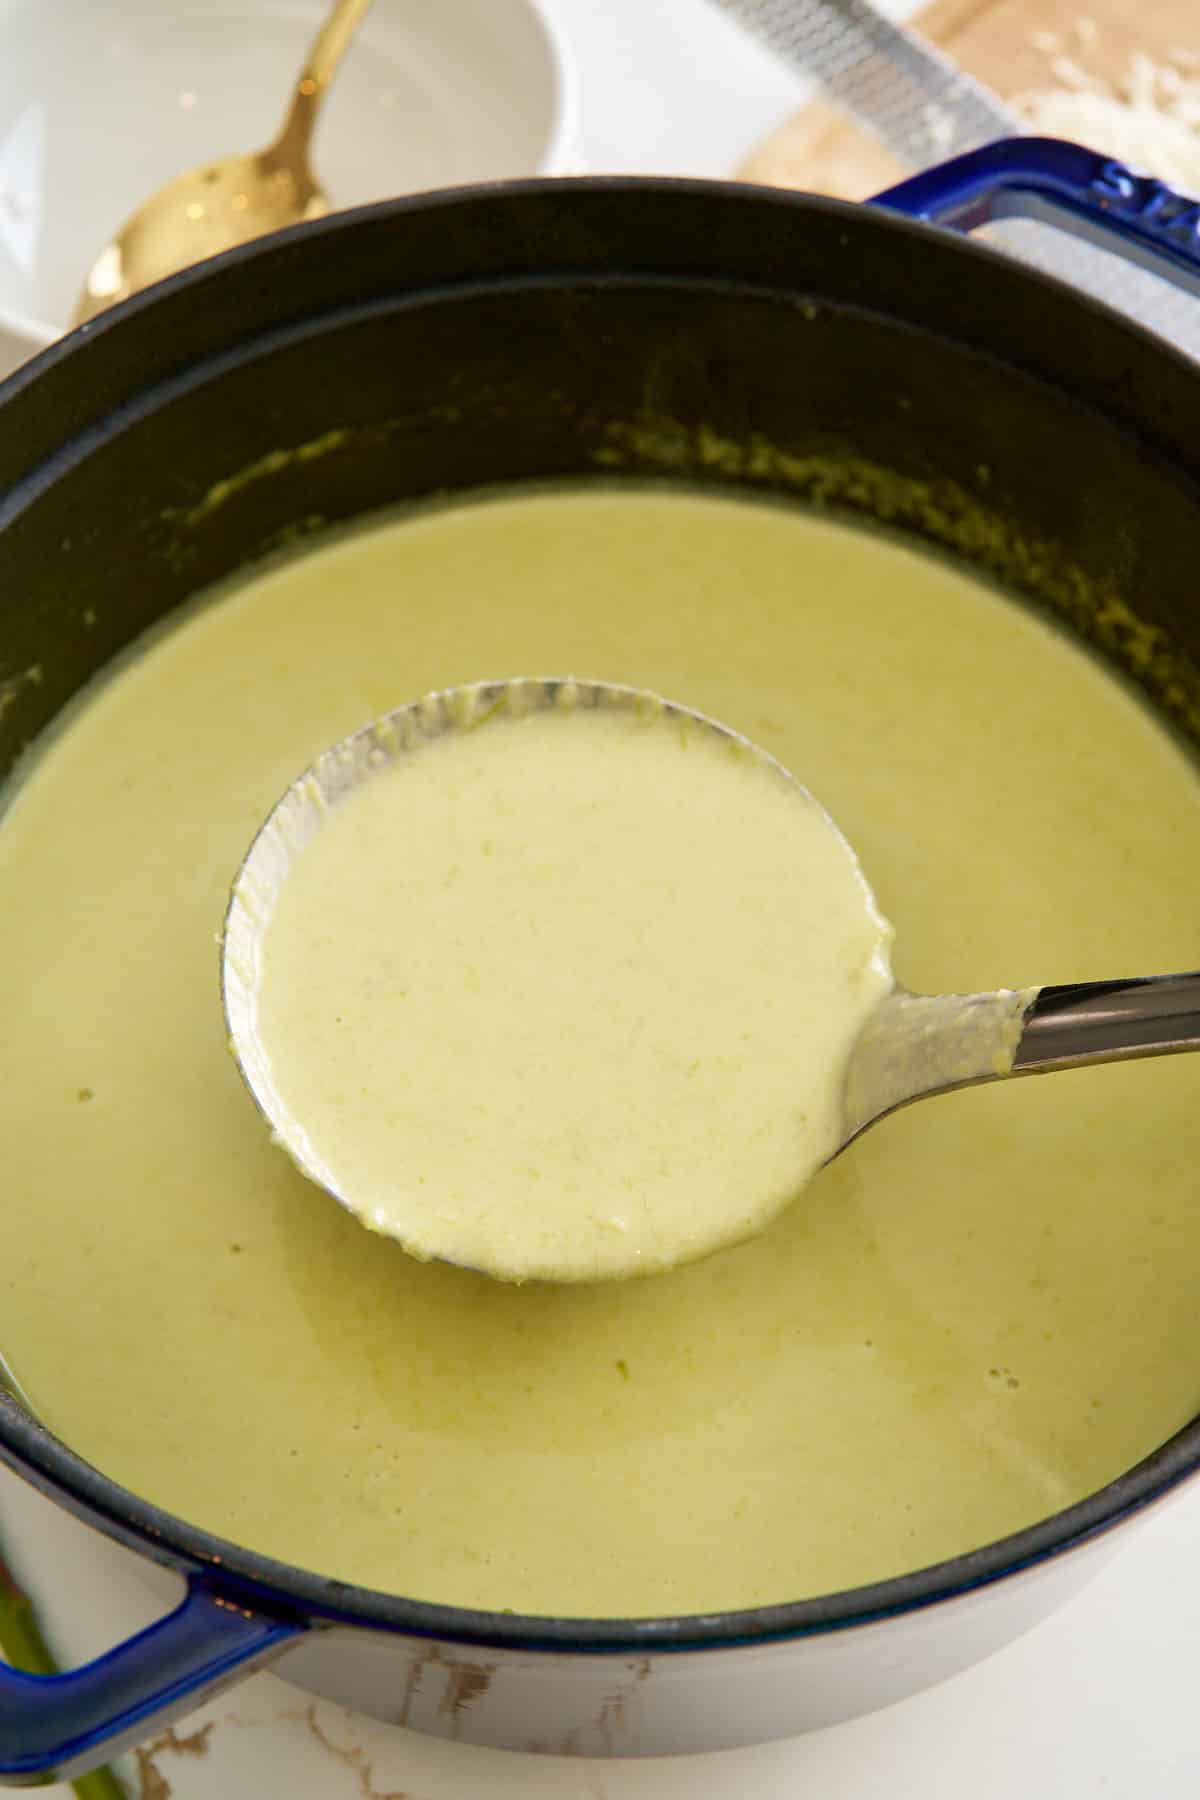
Add the heavy cream to the pureed soup in the pot. Stir well to combine. Warm the soup over medium heat, but do not allow it to boil after adding the cream. Add the parmesan cheese and stir until incorporated—season with salt and pepper.
Don't cover the pot when boiling the asparagus. Boiling green vegetables like asparagus without a lid keeps them bright green by stopping enzymes that make them dull.
Recipe Variations:
To store, transfer the asparagus soup to an airtight container and refrigerate it for 3-4 days. To store longer, freeze it in a freezer-safe container for up to 3 months. Thaw in the fridge overnight before reheating.
To reheat, reheat gently on the stovetop over low heat, stirring frequently to prevent scorching.
Yes, use vegetable broth and substitute the cream with plant-based milk and a thickener like cornstarch or nut butter.
Yes! For an ultra-smooth texture, you can strain the blended soup through a fine-mesh sieve to remove any remaining fibrous parts.
Looking for more soup recipes? Try these out:
I hope you enjoy this cream of asparagus soup as much as we do. If you tried a recipe from my blog, please leave a rating and comment on how it turned out. Your feedback is appreciated!
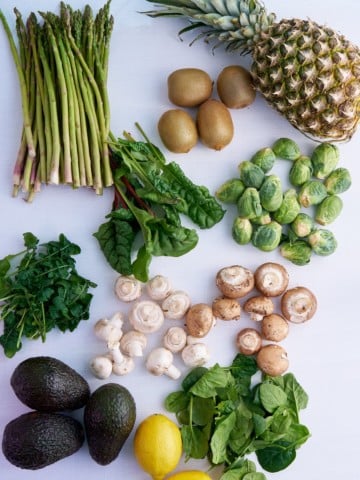
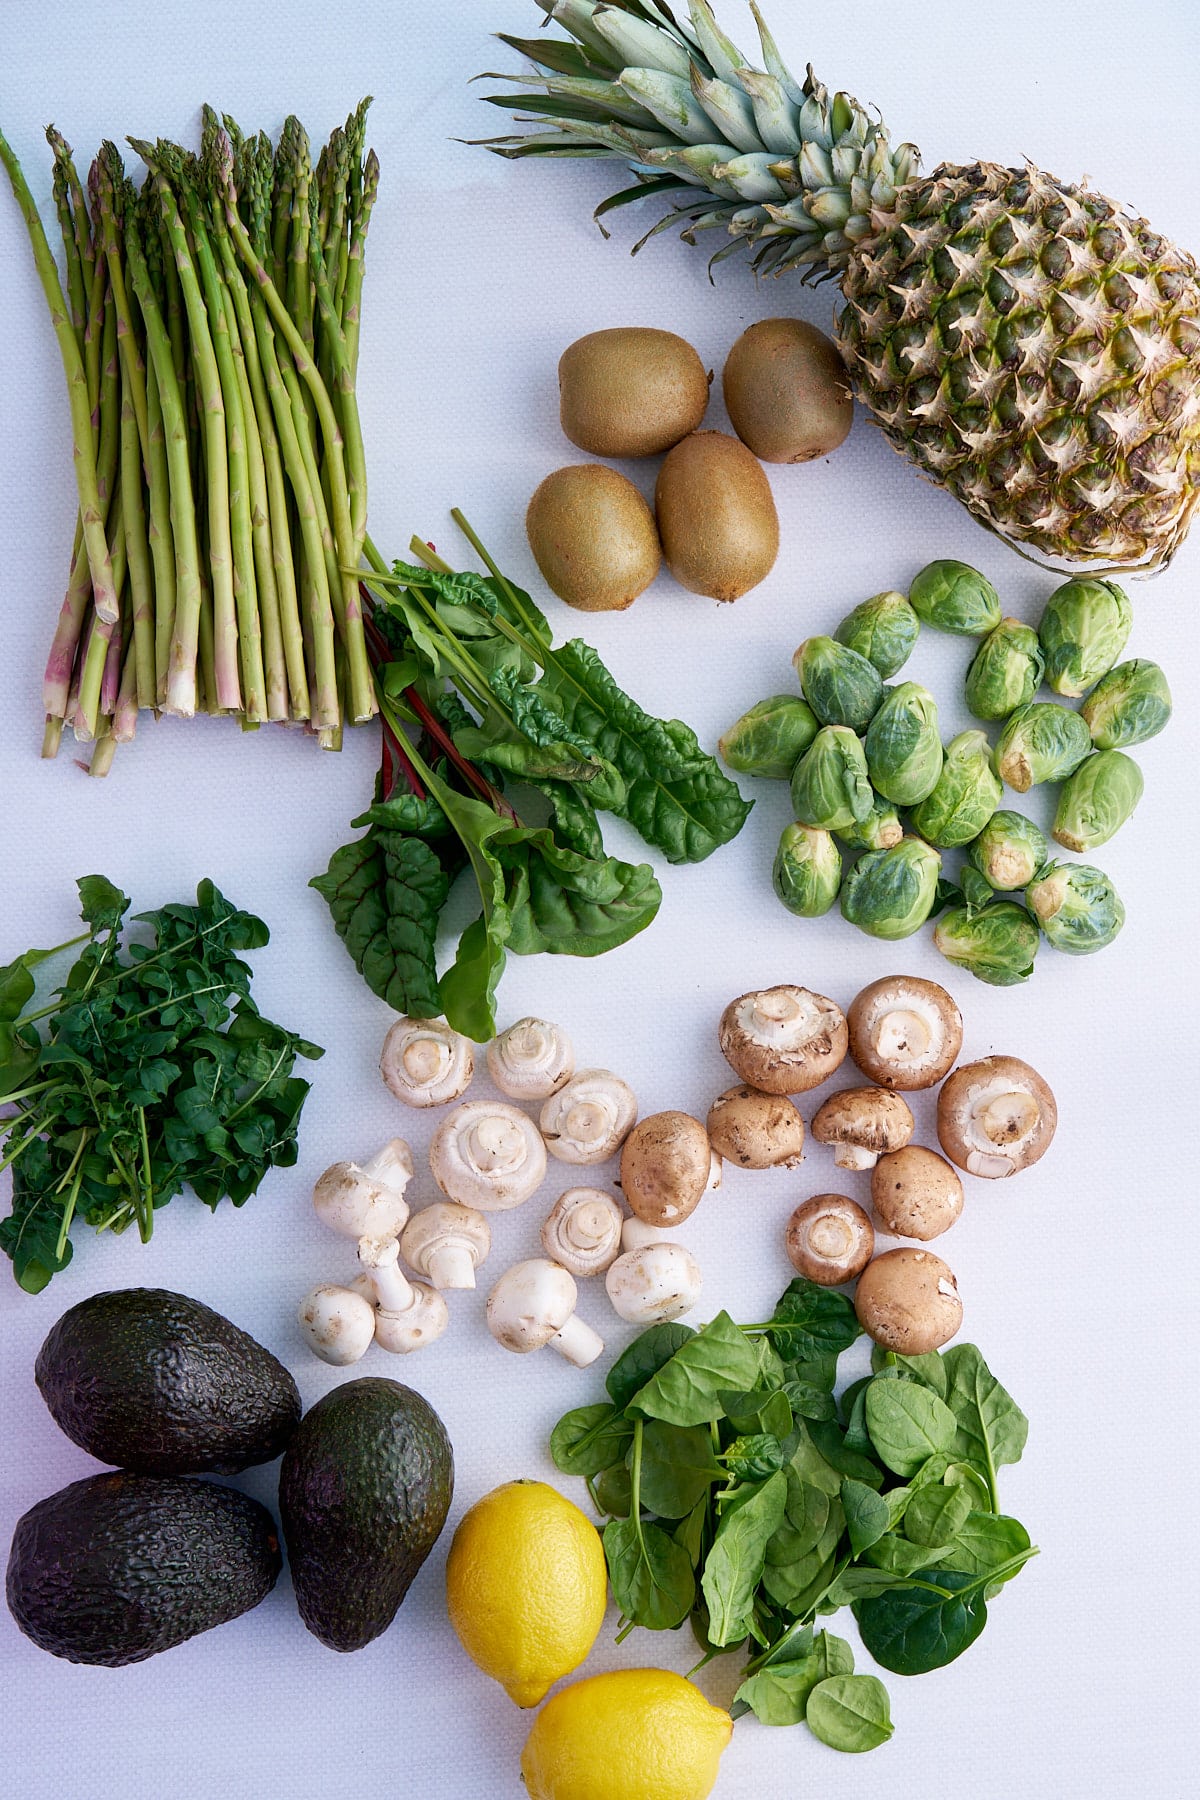
If, like me, you like to eat seasonally, then here's a look at what fruits and vegetables are in season in March here in the United States. As winter passes and we move into spring, the temperatures start to rise we can enjoy a vast array of wonderful new produce.
This post contains affiliate links, please read my full disclaimer here.
March is a great month for new varieties fresh produce. As the weather starts to warm up after the cooler winter month, we see lots of tropical fruits as well as tender leafy greens and salad vegetables starting to appear in our local stores.
What’s in season in March depends on the locality. Remember, seasonal produce can vary based on local climate and location. To best understand what fruits and vegetables are in season in your area, I suggest checking out a National Seasonal Food Guide and looking for your particular area.
I love to eat fruits and vegetables in season, enjoying fresh produce when it is at it's very best and most flavorful. In season produce is often the freshest and most nutrient rich, it tastes better and it is also a more cost effective option, rather than out-of-season produce which is often imported.
A great way to eat seasonally is to check out your local farmers markets to see what they are growing and harvesting, which ensures peak freshness. This also means you can help reduce your environmental footprint, eliminating the need to transport produce from faraway locations.
I currently live in North Carolina, so I look for seasonality in my state. This guide will help you decide which fruits and vegetables are available during the months of spring. Continue reading to learn more about the great produce in season in March.
Pineapples have a wonderful tropical flavor, with a sweet and slightly sour acidity that makes them perfect for both sweet and savory dishes. They are great for brightening dishes in early spring.
When it comes to savory dishes, think fresh tasting pineapple salsas with a squeeze of lime juice and a hit of red chili. It also pairs very well with chicken, pork and vegetable based main dishes.
If you enjoy baking then sliced pineapple makes the perfect upside down cake. Or pair it with other fruits like cherries in my Cherry Pineapple Dump Cake which is a super simple bake.
The sweetness that comes from pineapple juice makes it the perfect addition to my favorite Jamaican Rum Punch cocktail, or for something non alcoholic try my Green Sherbet Punch.
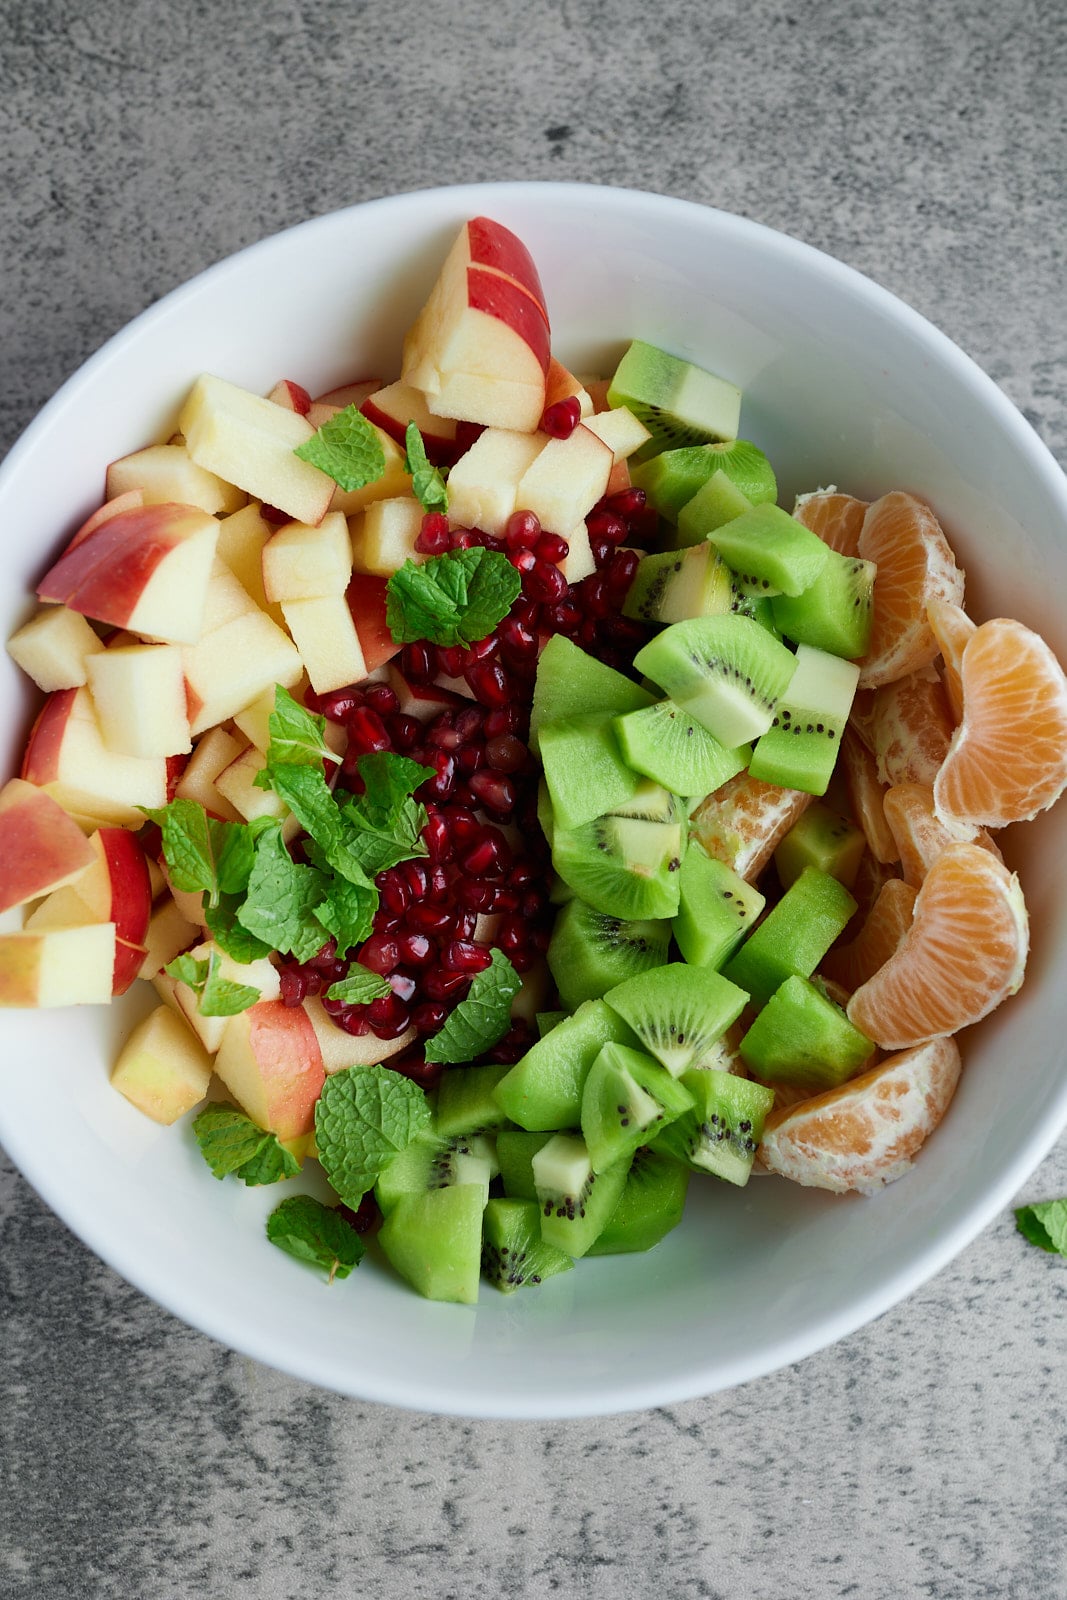
Kiwi fruits (also known as Chinese gooseberries) are small fruits that pack a tart and sweet taste. This sweet and slightly acidic flavor works particularly well in my Winter Fruit Salad or tropical fruit salads and fruit smoothies. They also make a great tasting fruit snack, their small size makes them perfect for lunch boxes.
Mangoes are starting to come into season and depending on the variety, some mangoes are in season in March. Varieties like Haden mangoes, Keitt mangoes and Tommy Atkins are available in March.
Mangoes are a stone fruit that offer a sweet, tropical flavor that, like pineapple, is versatile in both sweet and savory dishes. Mango works particularly well with chicken, fish and shellfish. Pair diced mango with lime, red chili and cilantro and serve it as a salsa alongside my Air Fryer Lemon Garlic Shrimp.
The sweetness of mango works to perfection in a variety of baked foods and desserts. Think mango sorbet, mango ice cream, mango cheesecake. The options are endless. Mango also works really well in tropical fruit smoothies.
If you have an abundance of mangoes, try making my Dried Mangoe Slices which are a great snack and an easy way to enjoy mango long after they are in season.
Avocados are well documented for their health benefits, rich in heart healthy fats and high in fiber. These versatile pears are a fruit that I will happily enjoy at any meal, morning, noon and night. Slice or spread crushed avocado over toasted sourdough, topped with a poached egg for a delicious breakfast.
With their rich and creamy texture avocados are great in salads, sandwiches, and as guacamole. One of my favorite salads is this easy Quinoa Avocado Salad, which makes a great lunch or light dinner option.
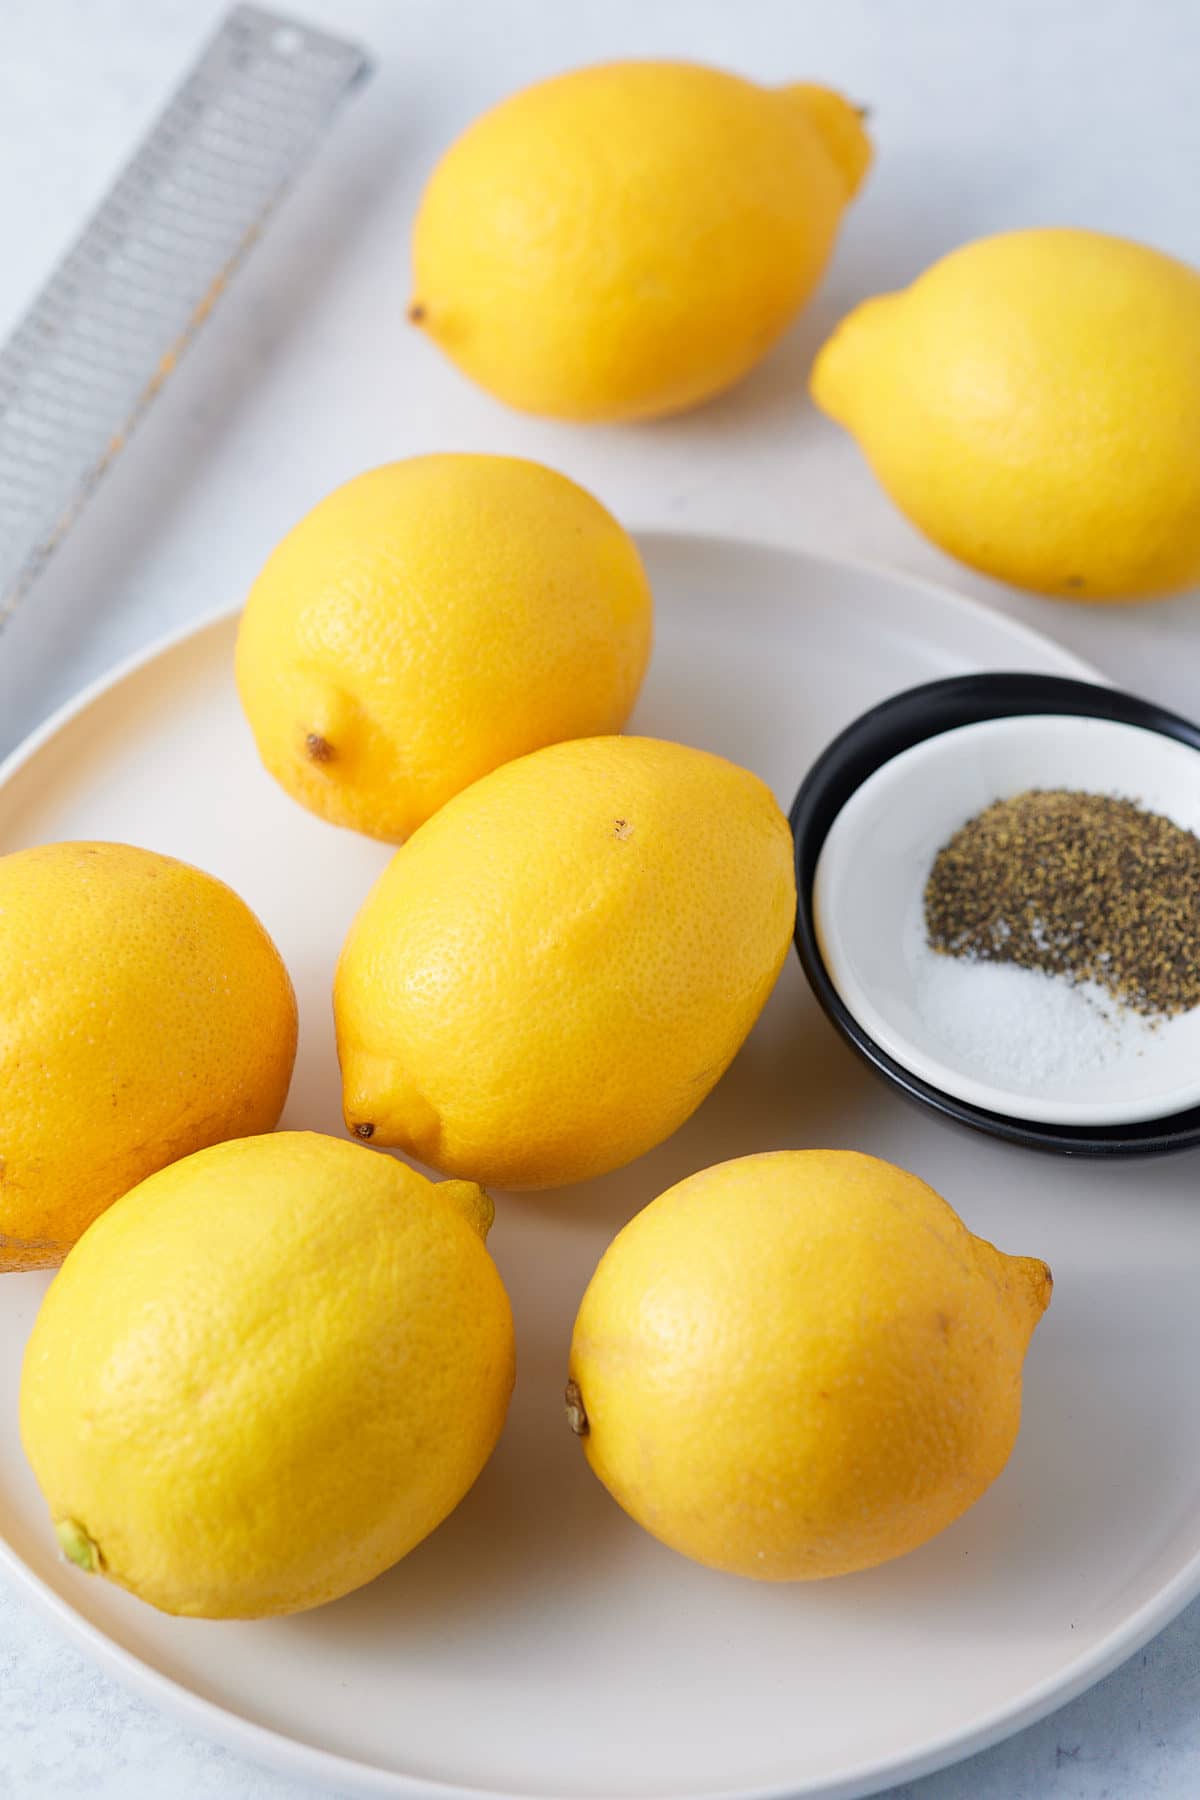
When it comes to cooking, the family of citrus fruits works harder than most. Whether it's lemon, orange, lime or grapefruit, they all offer a different flavor, but always add a refreshing zest to any dish. Some citrus like lemon or grapefruit tend to be slightly more sour than say lime or sweet orange. However, they are versatile and can be added to both sweet and savory dishes.
Citrus works well with a variety of savory dishes, pairing well with beef, chicken, pork seafood and a variety of other fruits and vegetables. Try my Lemon Pepper Chicken Wings or Indoor Grill Chili Lime Shrimp. I also love to to make my own Lemon Pepper Seasoning which is a great way to add zing to dishes. It also stores well for 3 months.
Citrus works well in sweet dishes, like sorbets and ice creams, and also in baked goods like me Orange Poppy Seed Bundt Cake and this delicious Grapefruit Cake.
If you have an abundance of limes you can also make Homemade Dehydrated Limes. Once made these slices can be stored for up to 1 year. Add the slices to drinks, teas, cocktails and mocktails. Or grind up the slices to make a lime powder that can be rubbed over chicken or seafood, or added to soups and stews.
March marks the beginning of the artichoke season. Artichokes don't have a very strong flavor, but rather a mild, fresh and earthy taste. This makes them ideal for steaming, braising or grilling and you can also stuff them. I love adding grilled artichoke to salads, or to top bruschetta or a pizza, along with a drizzle of extra virgin olive oil, a spritz of lemon juice and a grating of lemon zest.
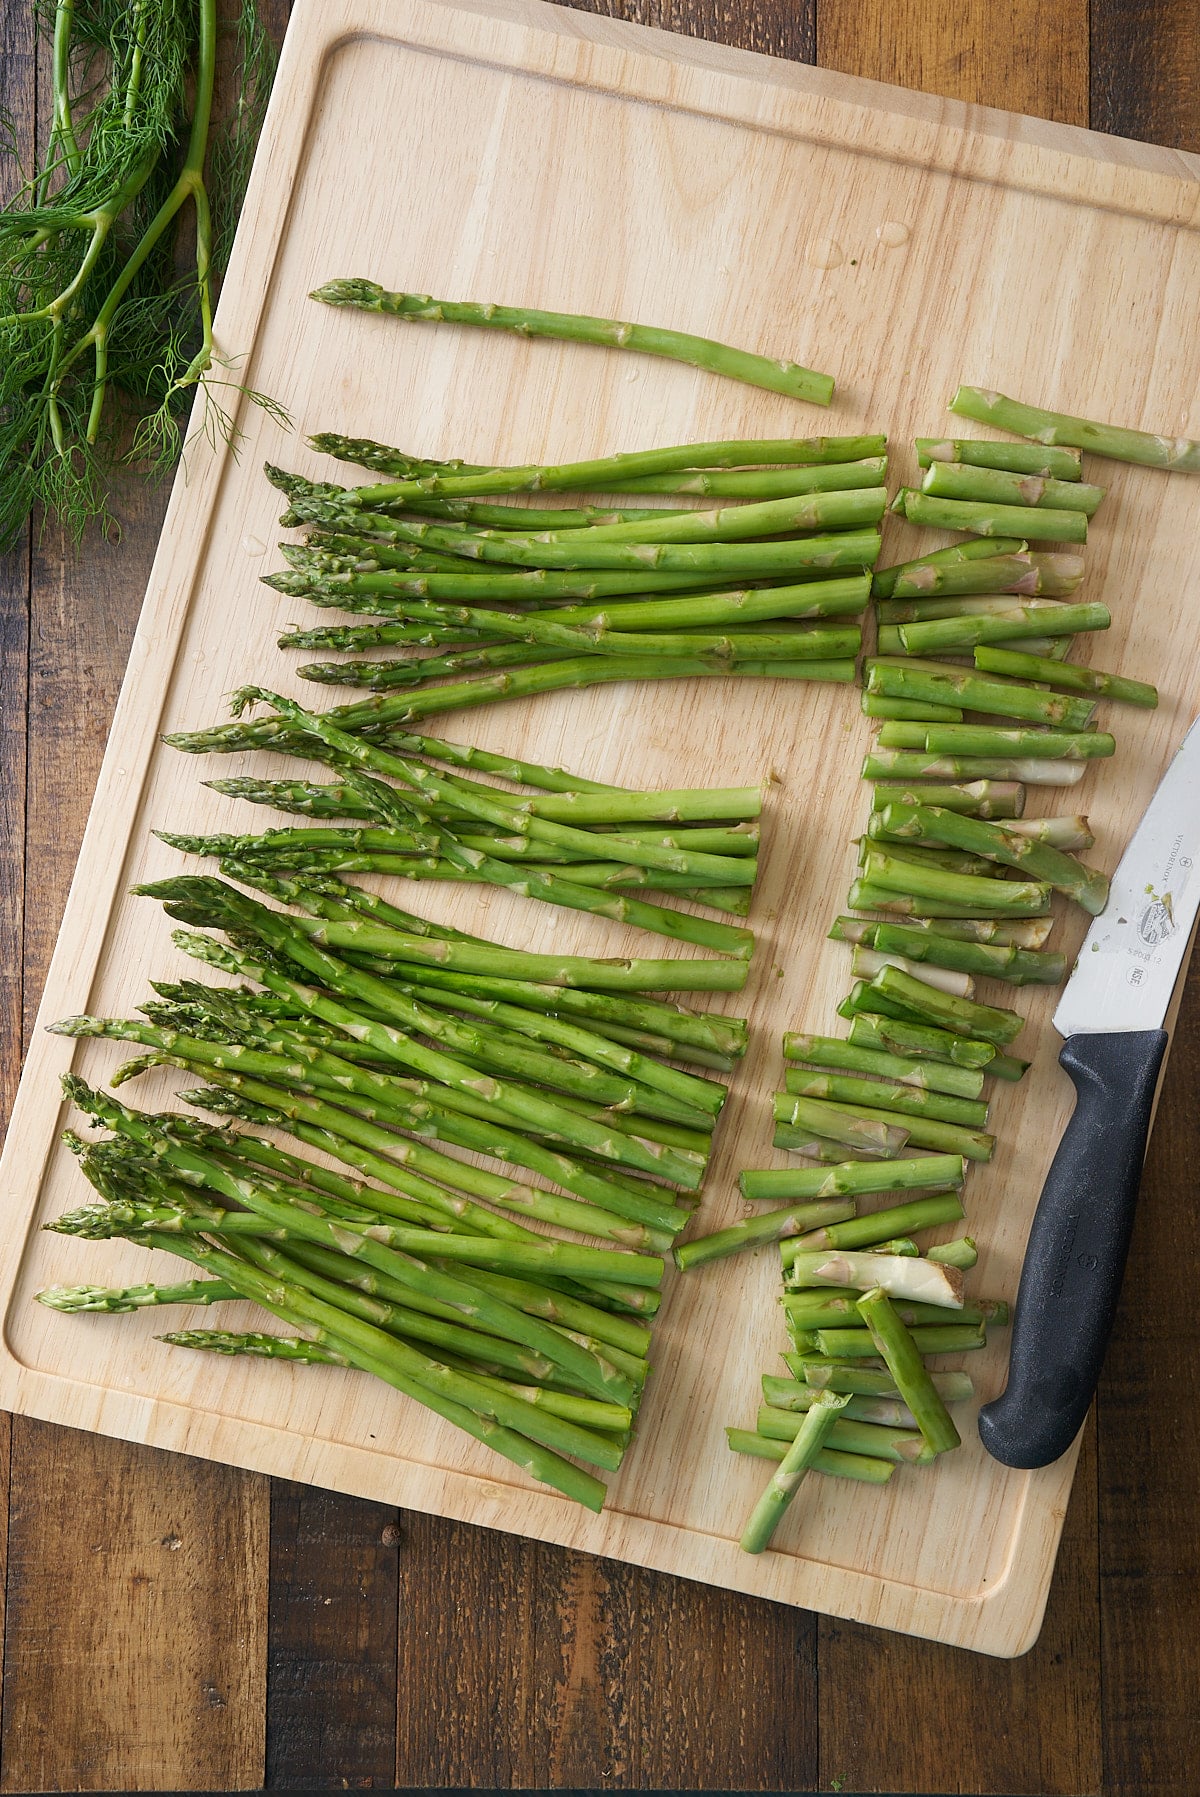
Asparagus is a springtime favorite, and it is a joy to see these tender stems appear in our local stores and farmers markets. With its sweet, fresh and slightly bitter flavor, it pairs really well with egg, a variety of different cheeses, chicken, pork, smoked fish and shell fish. Asparagus is a tender vegetable and perfect for light sautés or oven roasts.
Roasting asparagus is a great way to cook it, bringing out the natural sweetness in the vegetable. Try my Seasoned Air Fryer Asparagus which I've roasted with garlic, lemon pepper and salt, which I love to top with a poached egg and some shredded Parmesan cheese.
If you have an abundance of asparagus growing in your own garden, try making my Quick Pickled Asparagus which brings a different profile altogether, perfect for adding a touch of acidity to any salad.
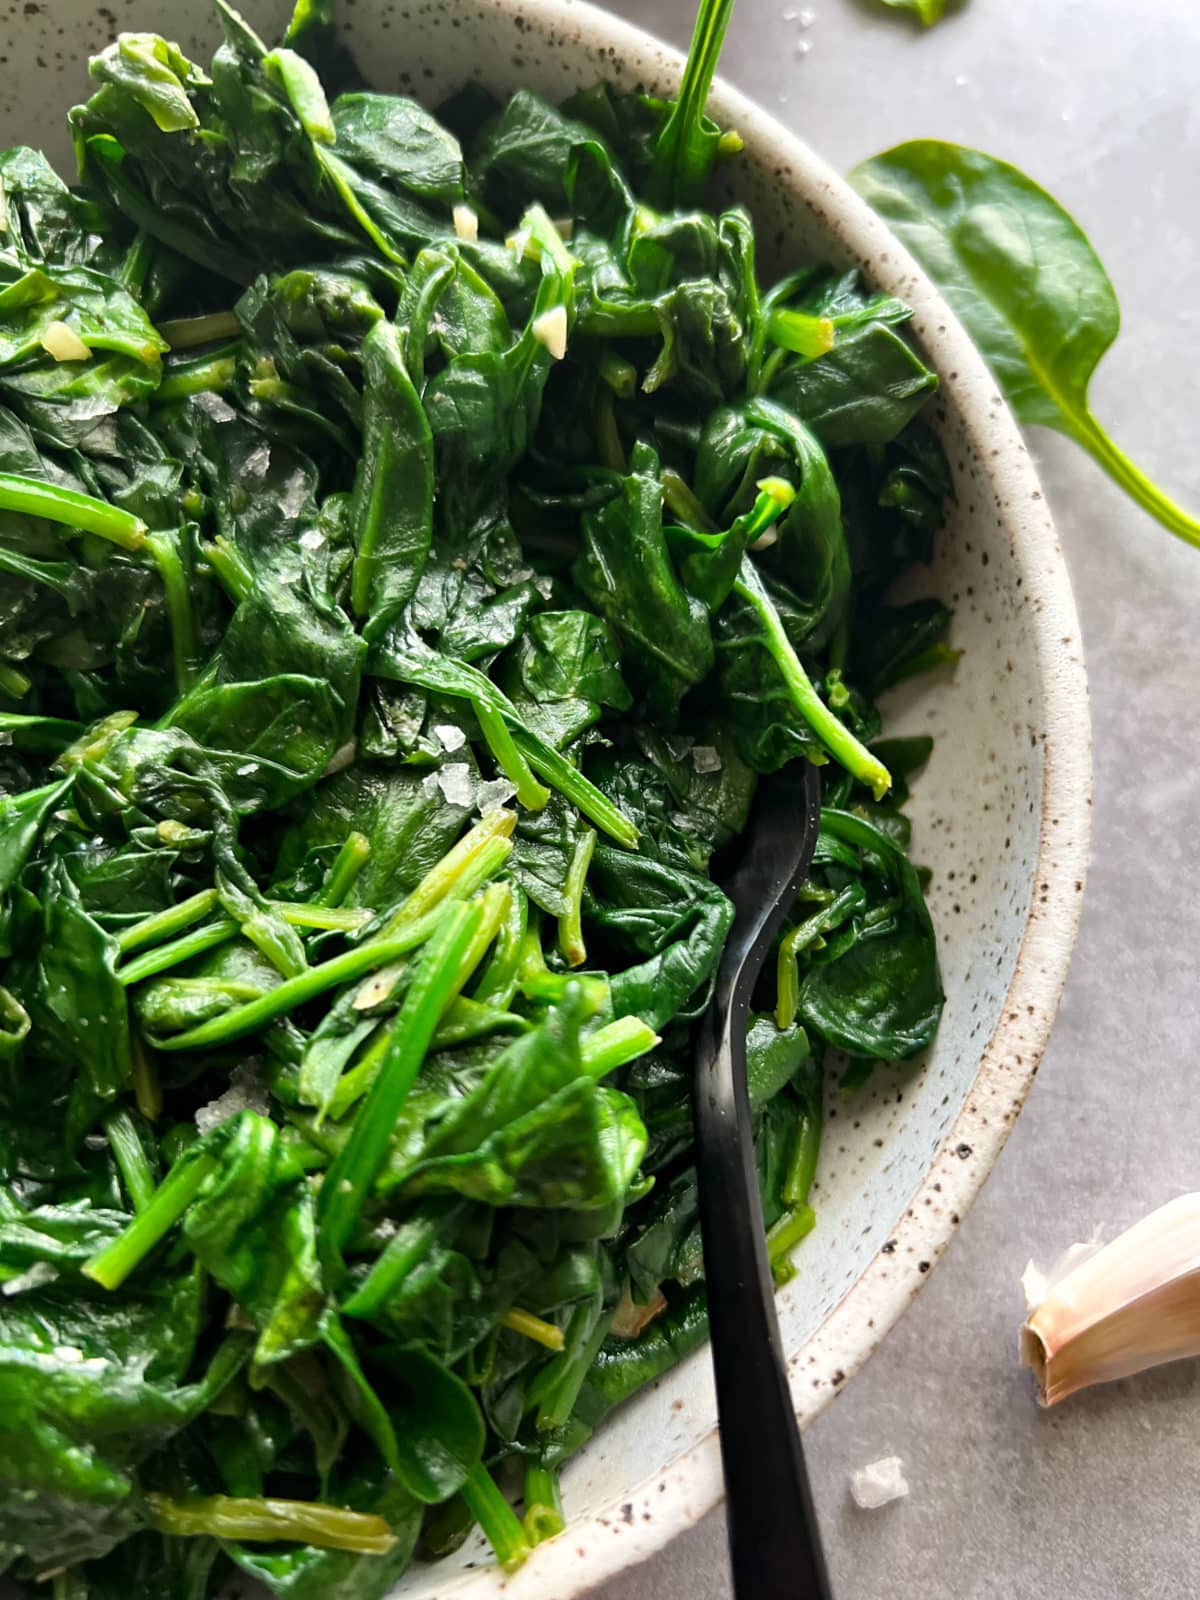
When it comes to the versatility of leafy greens, you really can't beat spinach. With its peak season in spring, spinach is versatile and nutrient-rich, suitable for adding to sandwiches or salads like this Shrimp & Bacon Spinach Salad. You can also add to cooked dishes, and don't forget it makes a great addition to a healthy green smoothies.
Steakhouse Creamed Spinach is a great tasting side dish that can be made in a skillet in minutes and a great accompaniment to any main dish.
Add a handful to soups, stews and curries, or make it the hero ingredient as I've done here in this Lentil Spinach Soup. You can also use it as a key ingredient in main dishes like my Spinach Stuffed Chicken Breasts, Mini Spinach & Mozzarella Stuffed Meatloaf or this delicious Salmon Wellington.
Arugula (also known as rocket) is a leafy, peppery green salad vegetable. With its fresh, peppery, mustard like flavor it is the perfect additional to add a kick to salads and sandwiches, to top your favorite pizza or to stir through some pasta. Try it in my Beet and Orange Salad which is topped with feta cheese and walnut.
Chard is a leafy green vegetable that comes in many varieties, with a leafy green top and colorful stems ranging from white, to yellow, pink and red. This nutrient rich vegetable has a slightly bitter, earthy taste, which makes it great for sautéing, it works really well in a stir-fry, or adding to soups and stews. You can use chard in place of other similar leafy greens like spinach, collards or kale.
Ahead of the arrival of seasonal green peas we can enjoy the arrival of pea shoots. Pea shoots (also known as pea tendril) are the tender leafy part at the tip of the pea vine. Their sweet, fresh, mild pea flavor make them the ideal additional to salads or to garnish spring dishes like an asparagus or green pea risotto.
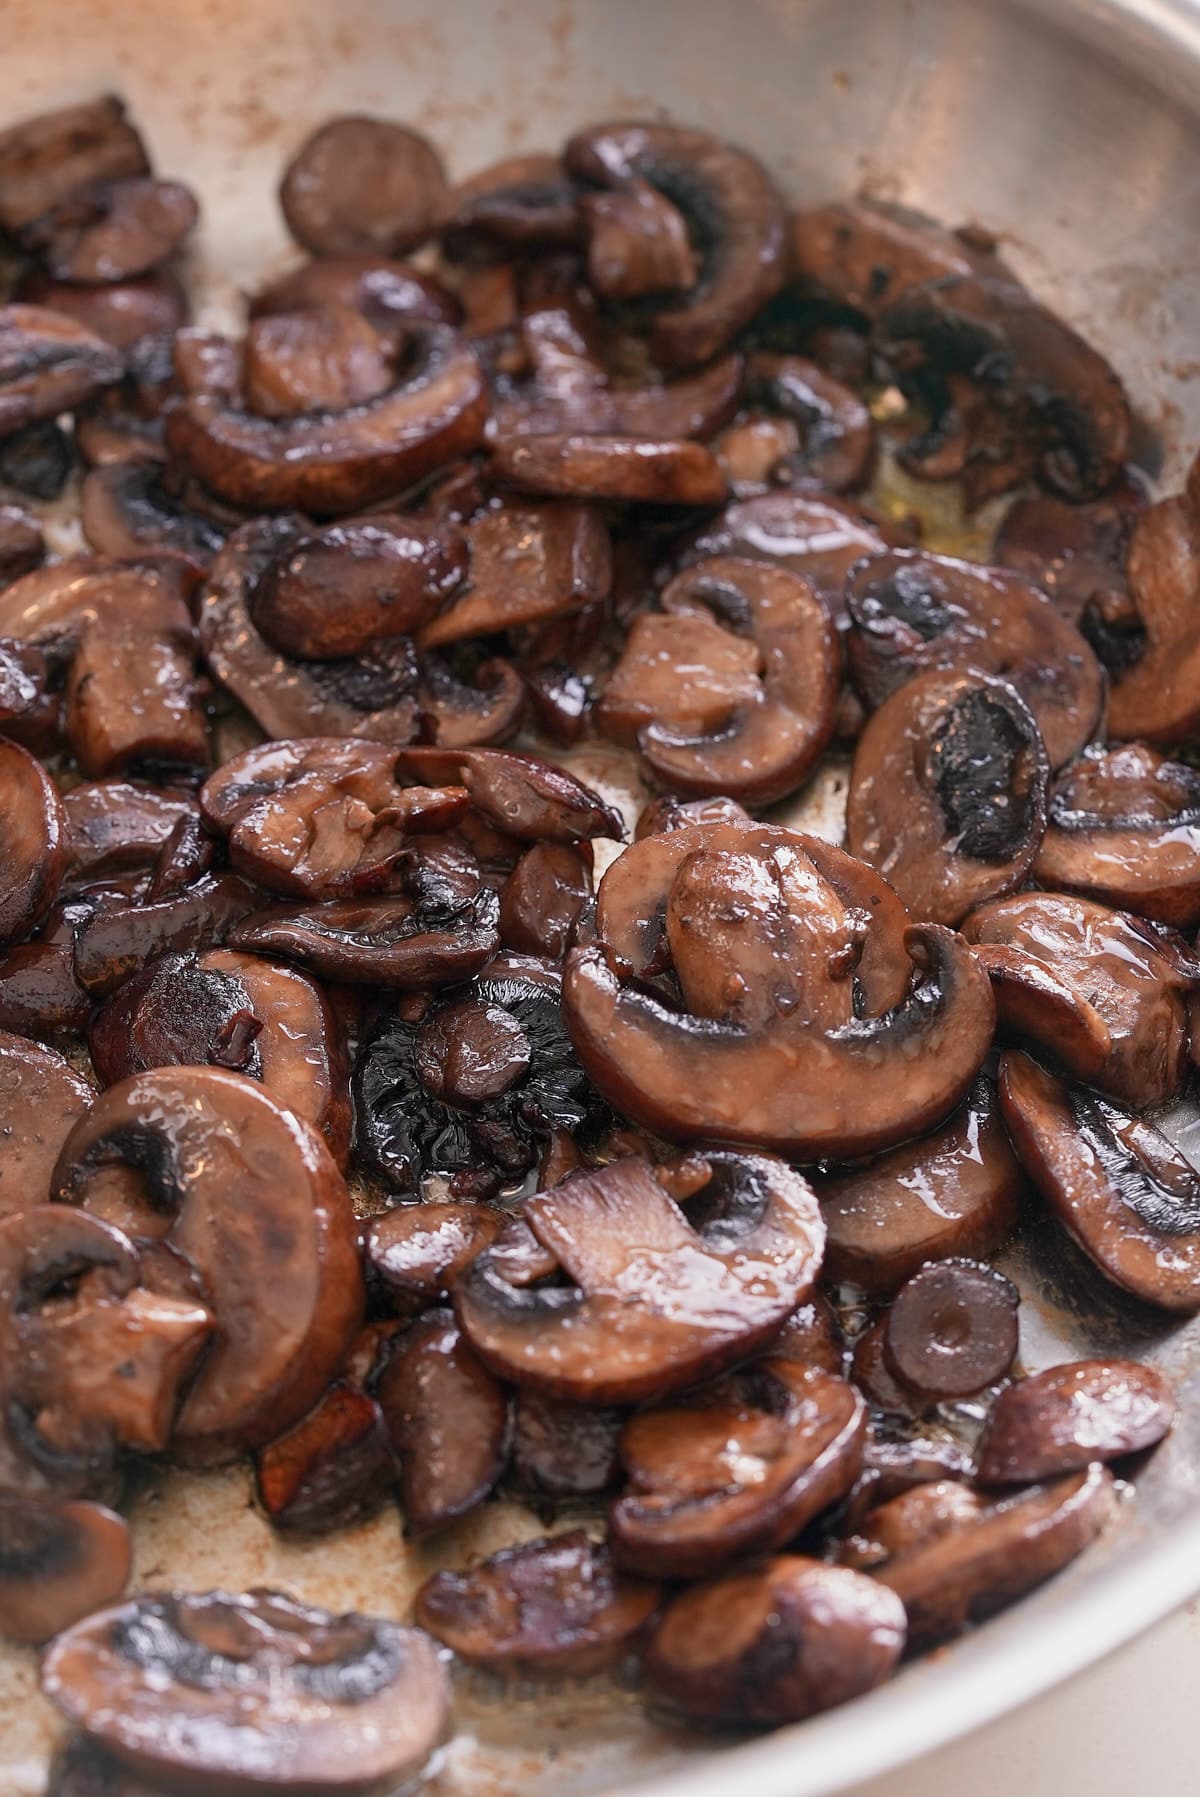
Mushrooms are in season in March and if you are looking for versatility, the mushroom family has to be one of the hardest working. The variety of mushrooms available is wide and varied, everything from white, crimini and large portabella to the more exotic shiitake, oyster, king trumpet and wild mushroom mixes.
Mushrooms have a meaty texture and a wonderful earthy flavor, with a rich umami flavor that makes them suitable for a variety of culinary uses from grilling to sautéing, roasting to braising. Mushrooms are naturally absorbent taking on all the flavors you add to them, and their meaty texture makes them a great option for vegetarian and vegan diners.
Serve mushrooms as an easy side dish, adding seasoning and other flavors as I've done here in my Slow Cooker Garlic Herb Mushrooms and Air Fryer Fried Mushrooms. They are also great to add to soups and sauces. try my Cream of Mushroom Soup, Creamy Mushroom Sauce or my Salisbury Steak with Mushroom Gravy.
Or hero the mushroom, making it the star of the show with my Cream Cheese Stuffed Mushrooms, Mushroom Tart, or Creamy Mushroom & Parmesan Risotto.
Mushrooms pair particularly well with chicken, it is a great flavor combination, so try my Baked Italian Chicken with Mushrooms or Zucchini Mushroom Chicken.
Brussels sprouts are small, round vegetables resembling miniature cabbages, that come into their prime in March. Known for their bitter, nutty, slightly earthy flavor, they are a member of the Brassica family, which includes broccoli, cauliflower, and kale.
Like most brassicas they are really versatile in how you can cook them, steam, braise, sautéed or roasted, they taste delicious. The bitterness in Brussels sprouts can be easily tempered by adding other flavors to this vegetable. They pair particularly well with a variety of meats so feature heavily as a side. They also hold up well to the addition of other strong flavors like bacon, dry spices, chili, ginger and garlic.
Keep things simple and serve my Air Fryer Brussels Sprouts topped with a knob of butter, or my Sautéed Shredded Brussels Sprouts. Or for something a little bit different try my Sweet & Spicy Air Fryer Brussels Sprouts which I've tossed in a Korean Gochujang sauce.
Radishes are a great spring salad vegetable that have a mild, slightly peppery flavor. Their crisp texture make them ideal for adding crunch to salads, slaws and sandwiches, or to use as a garnish. However, you can also cook radishes, it like to sauté which brings out their natural sweetness.
If you have enjoyed this guide then have a look at my other seasonal guides, Seasonal Produce in January, Seasonal Produce in February and also check out my How to Store Fresh Herbs guide.
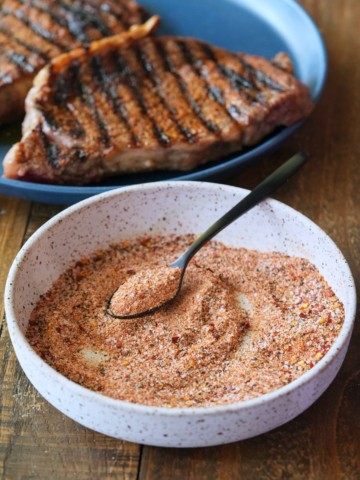
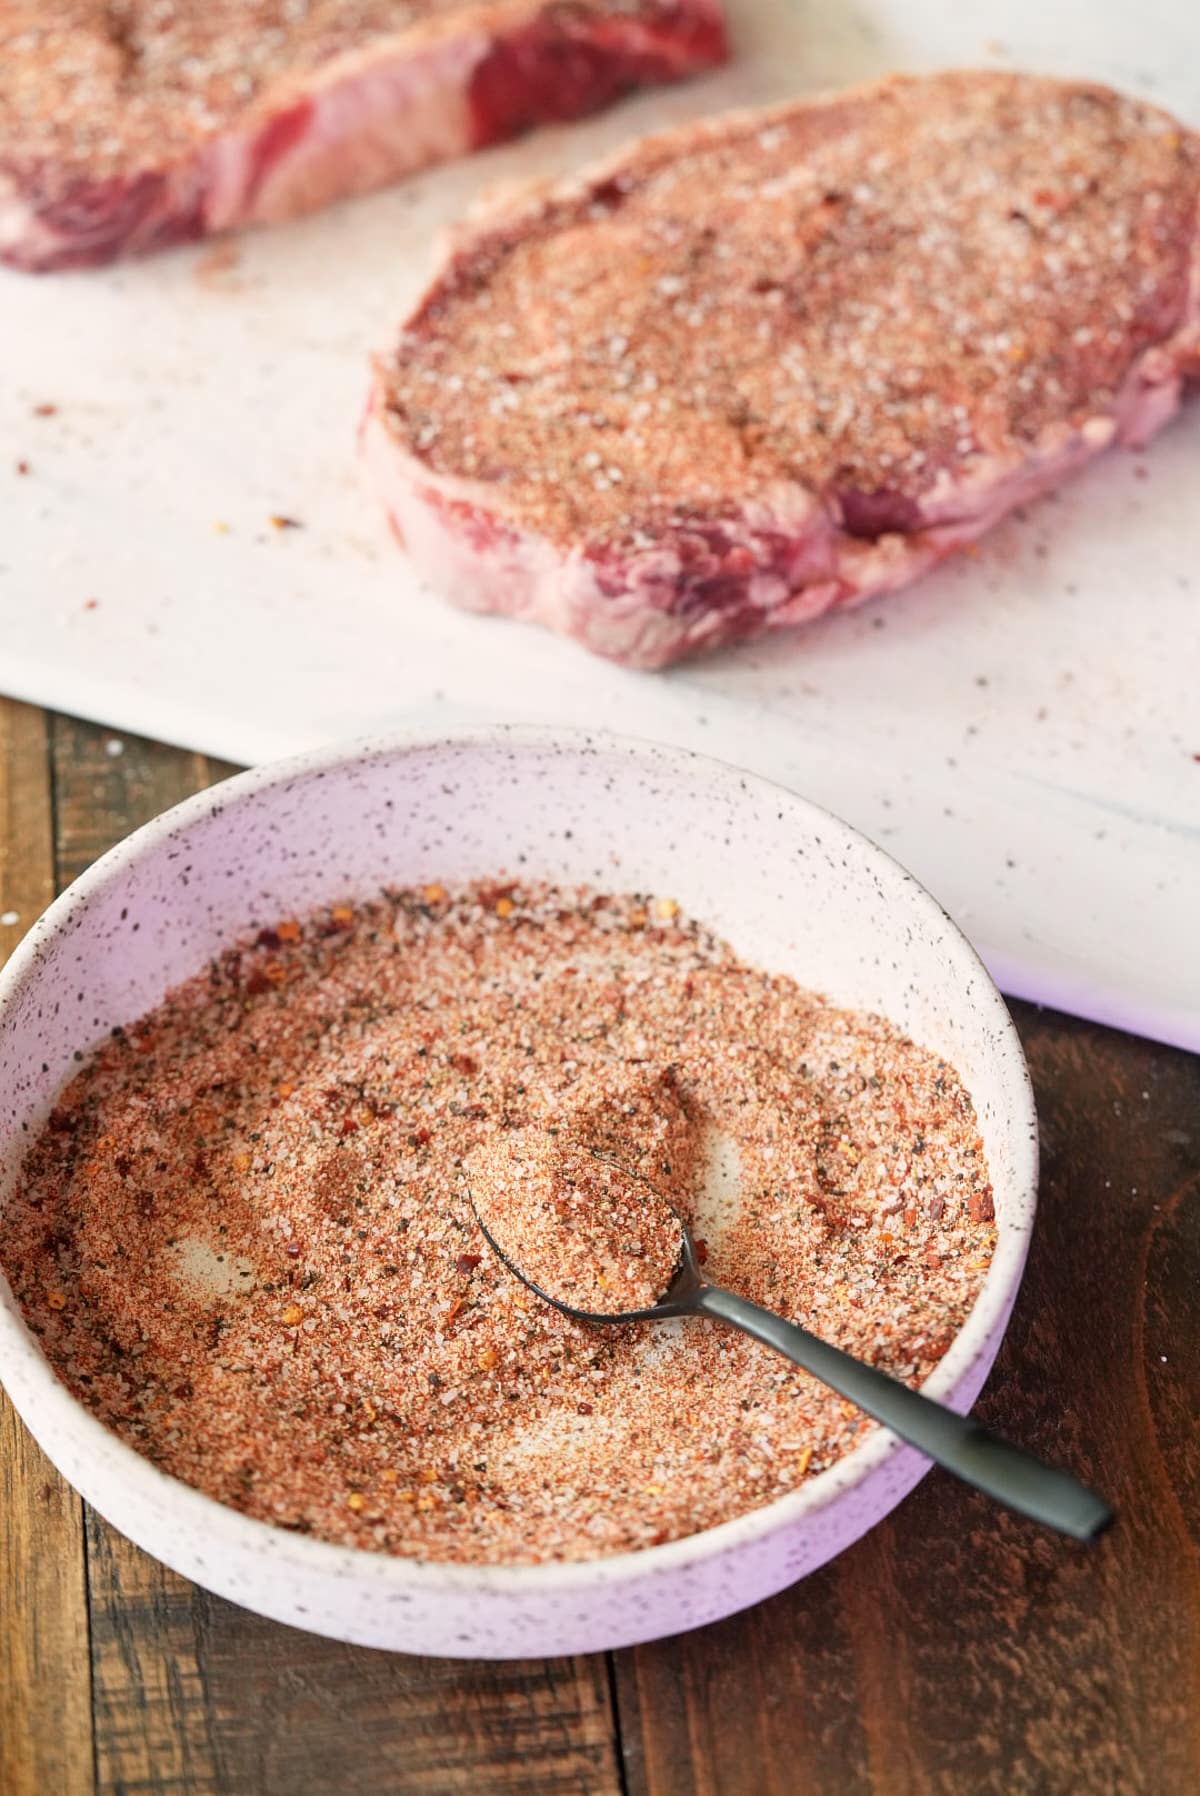
I love making my spice blends, and this homemade steak seasoning is perfect for cooking steak. Using basic ingredients that most of you will have in your stores at home, you can whip up this simple steak seasoning in just 5 minutes.
This post contains affiliate links, please read my full disclaimer here.
You’ll find the full recipe with ingredient amounts and instructions in the recipe card at the bottom of this post. Be sure to check out the blog post itself for extra tips and tricks!
My best steak seasoning recipe is the healthy option, as there are no excess salt, sugar, or unnecessary additives and preservatives in this spice blend.
This simple seasoning for steak is also a lot less expensive than store bought blends as you will like have all the ingredients in your stores at home. You can also adjust the flavors to suit your own tastes!
This best steak seasoning can be used with a variety of dishes, including my Pan Seared Steak, Oven Baked Beef Ribs, or Boneless Roast Beef.
If you would like to make your own spice blends at home, try some of my favorite homemade seasoning recipes, my Pork Chop Seasoning, Homemade Cajun Seasoning, Homemade Fajita Seasoning, Hamburger Seasoning, Lemon Pepper Seasoning Recipe or my Homemade Blackened Seasoning.
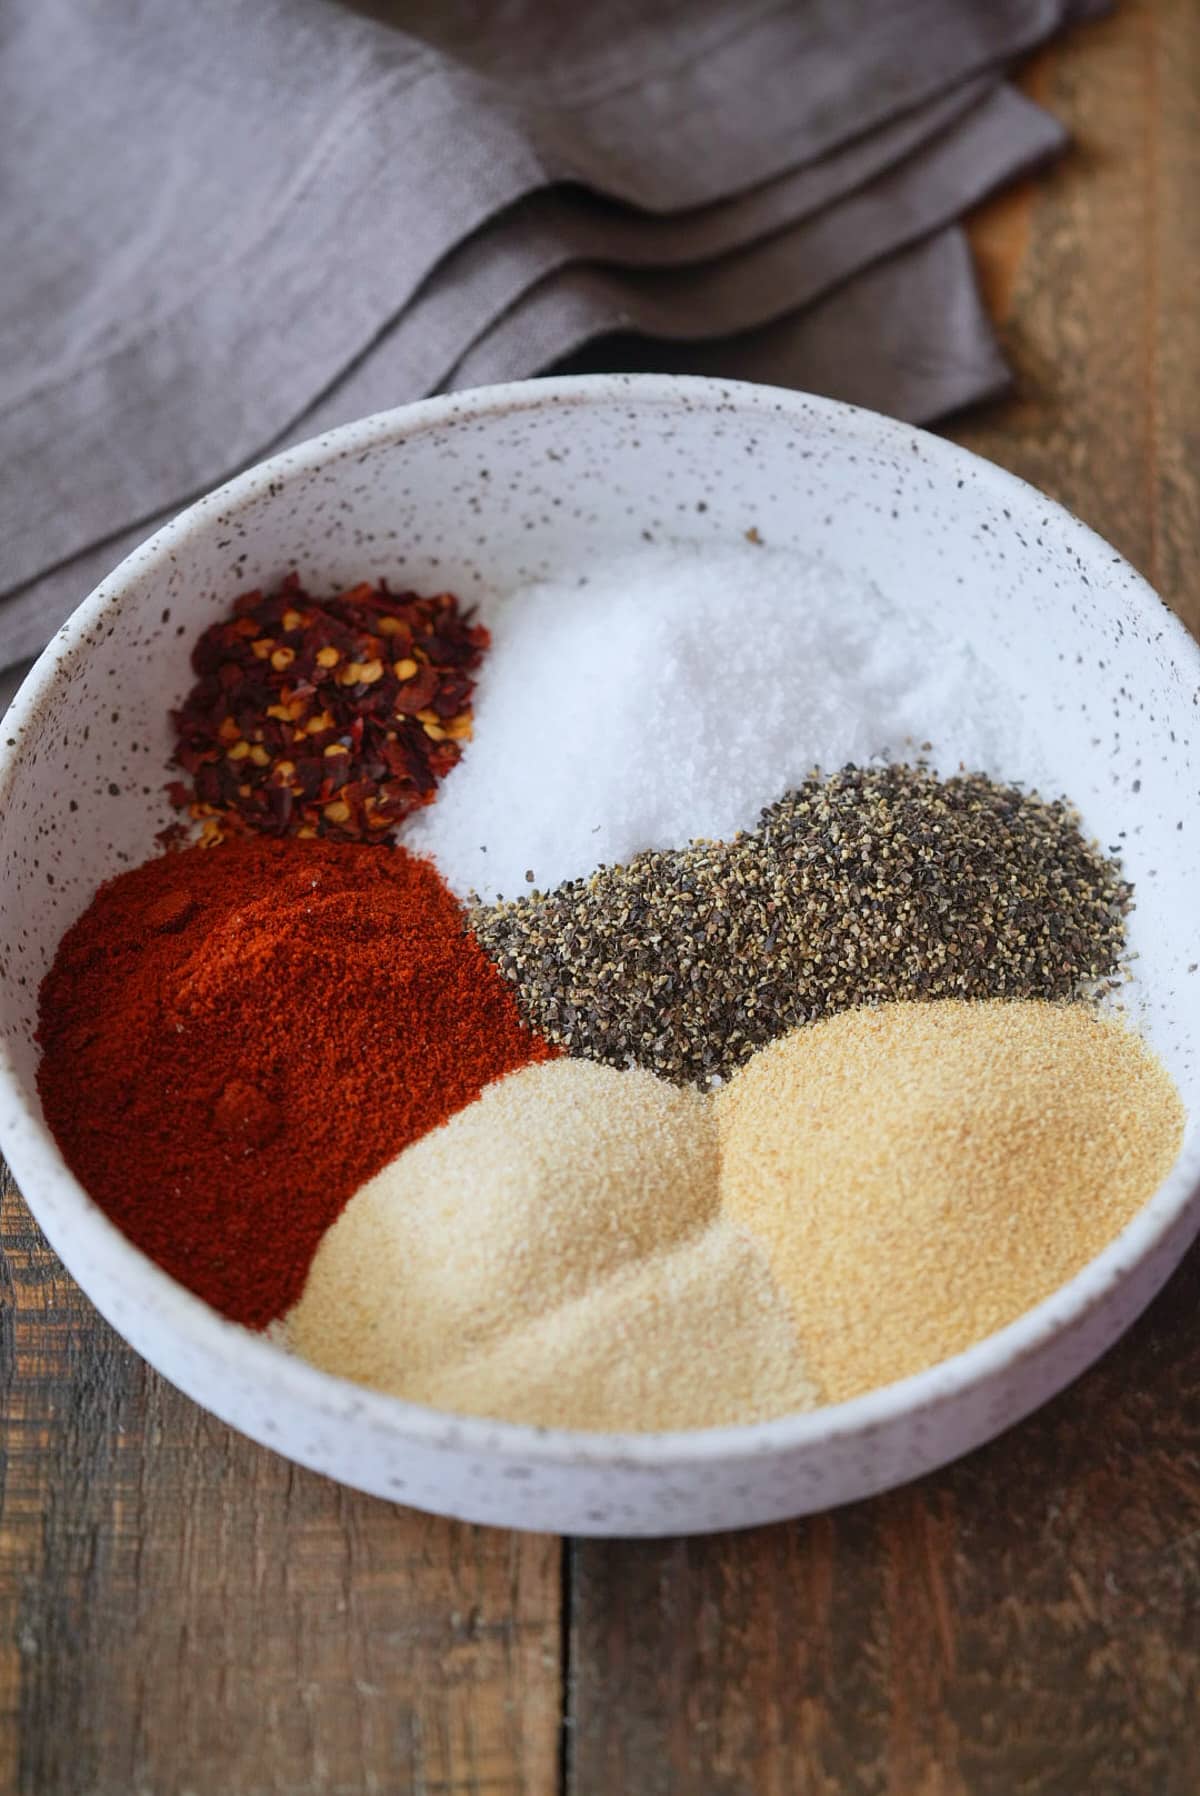
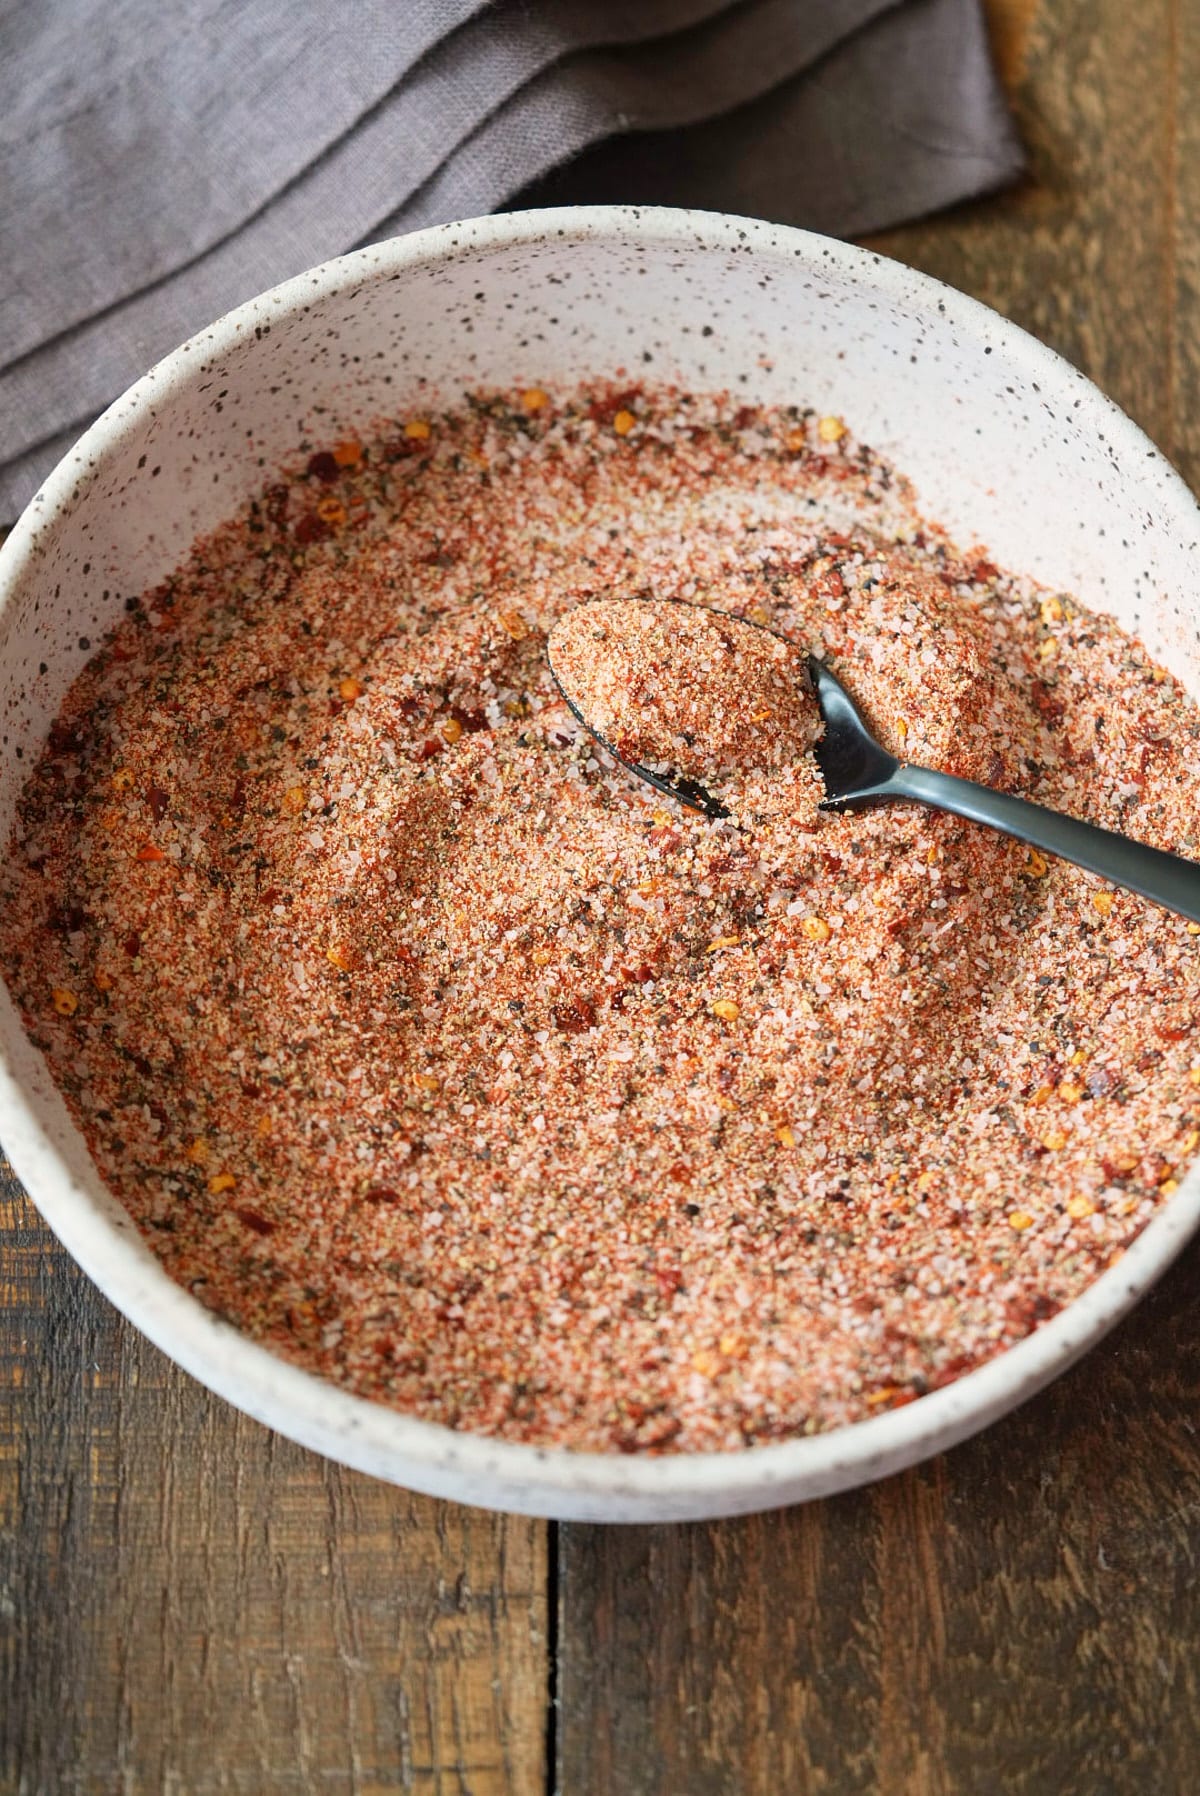
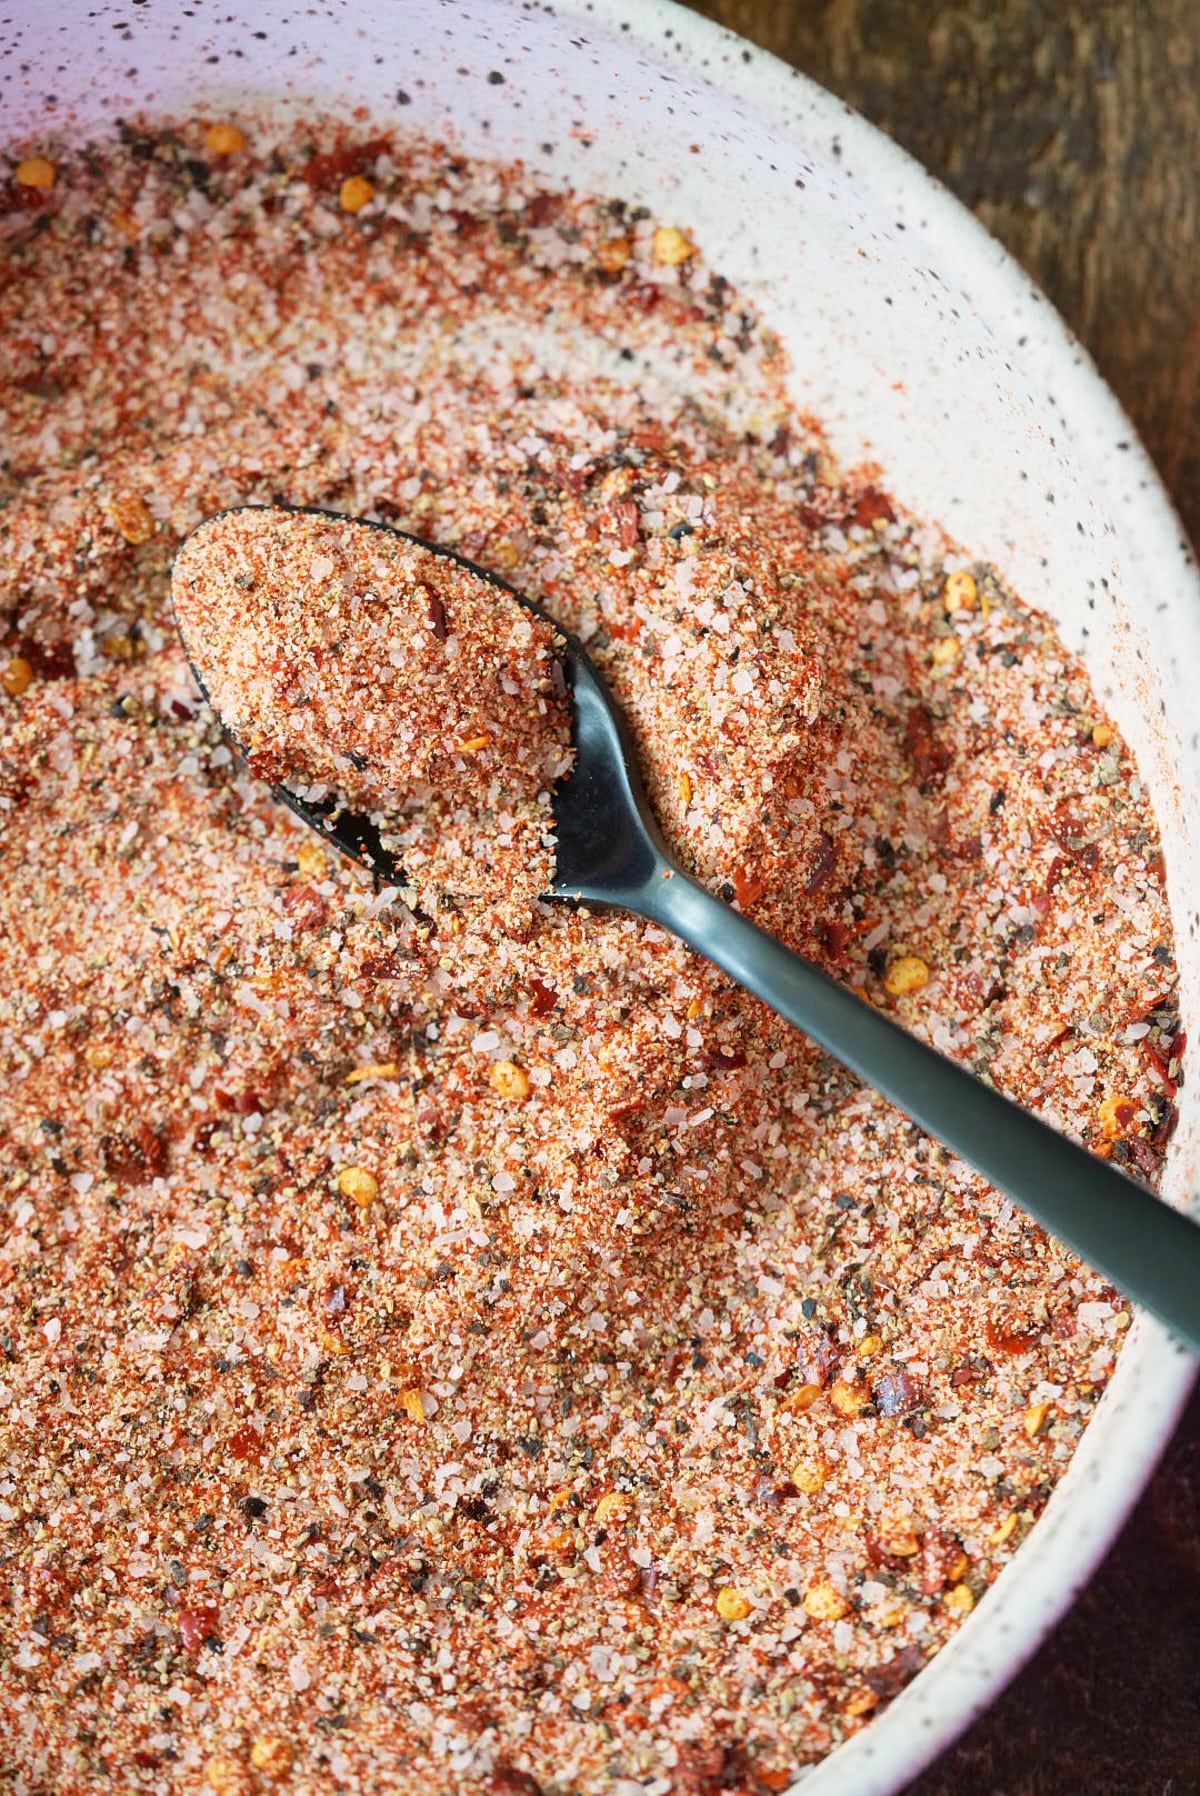
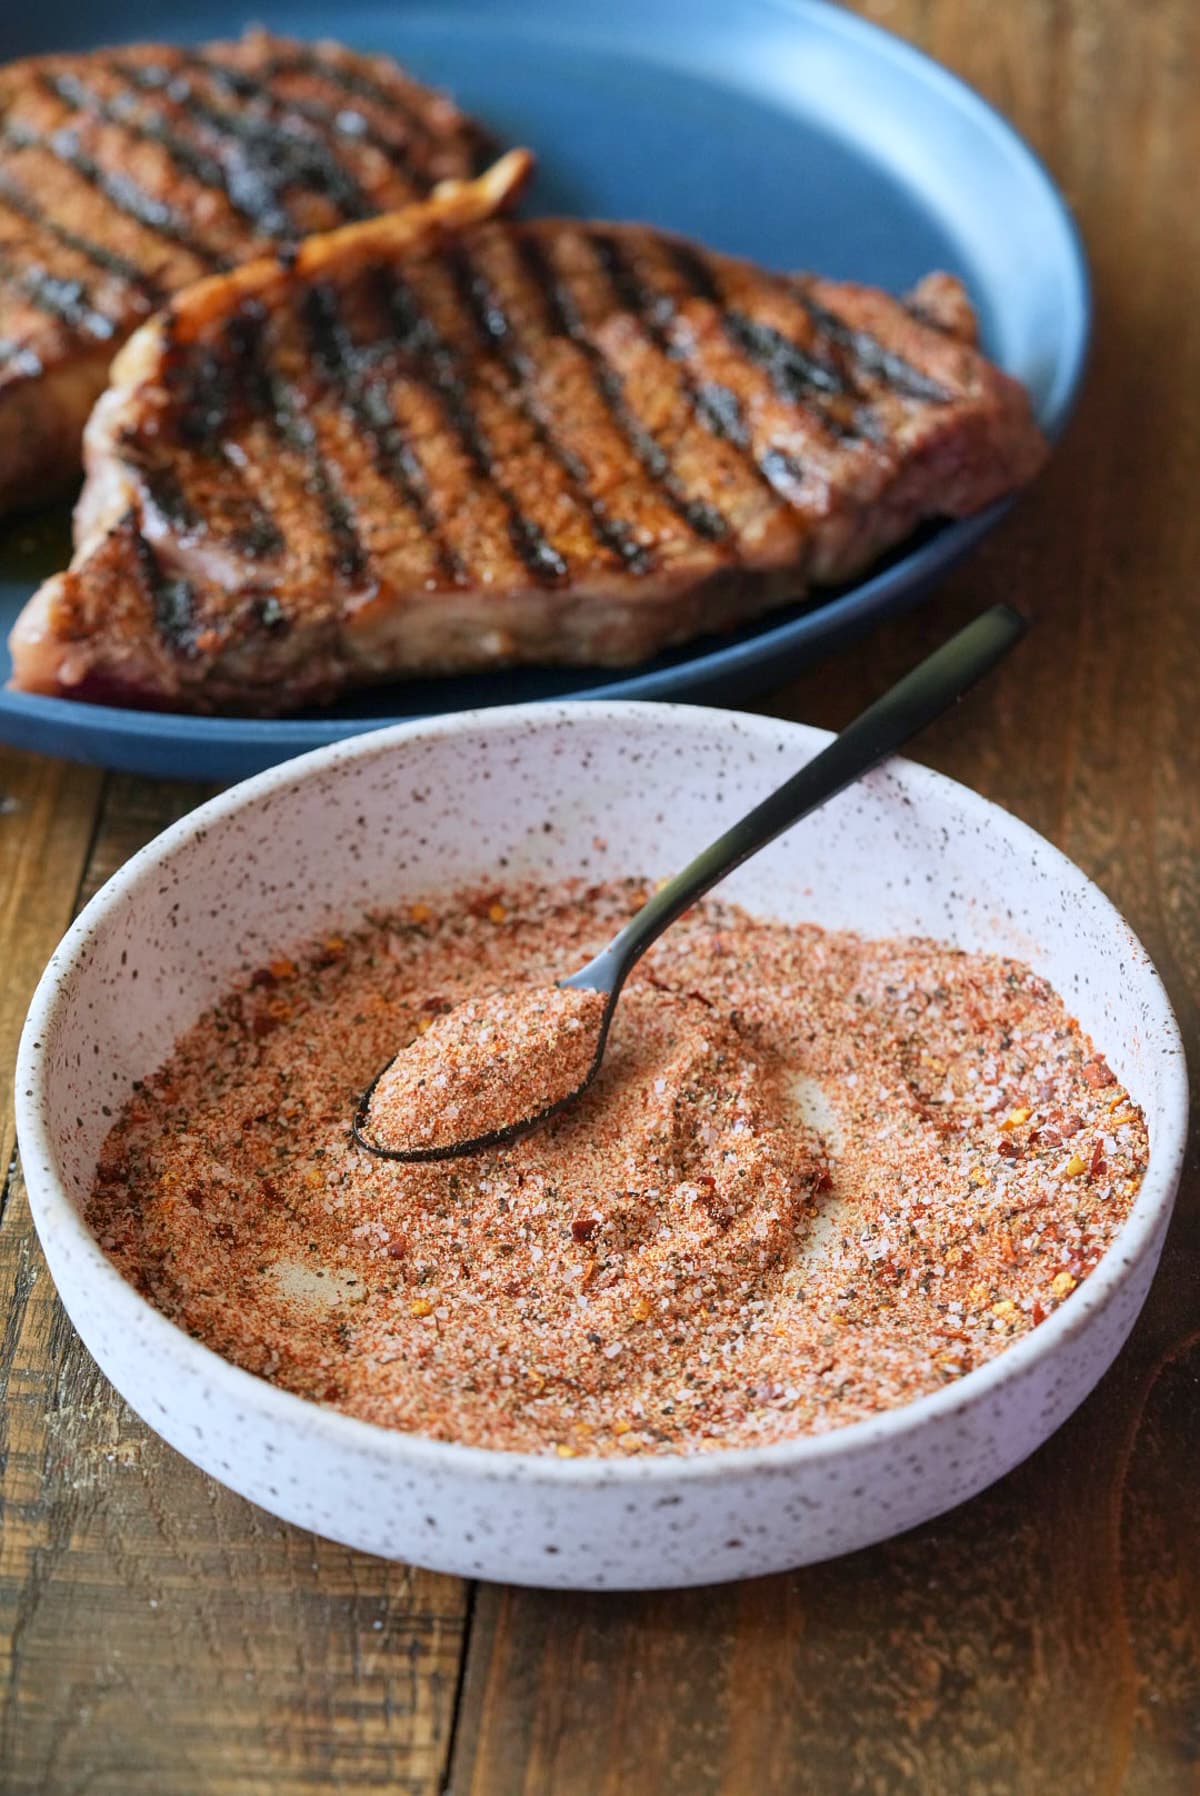
Combine coarse sea salt, coarse black pepper, garlic powder, onion powder, paprika (smoked for a smoky flavor), and crushed red pepper flakes in a bowl, stirring until well blended.
Use as desired on steaks.
This best steak seasoning recipe is easily adapted to suit your own tastes, here are some ideas:
I suggest using about 1 Tablespoon of seasoning per pound of meat. This usually results in using 1 Tablespoon per 1-inch thick steak. You can use the seasoning just before cooking the steak, or rub it over the steak and set it aside to marinate for 4-5 hours for a more intense flavor.
Store the spice blend in an airtight container at room temperature. It should keep well for 6-9 months if stored in a cool, dark place. Use an airtight jar with a tight fitting lid to keep the seasoning for longer, you don't want any air getting into the spices and spoiling them.
Yes, this is a really versatile recipe and you can adjust any of the spices and seasonings to suit your own tastes. For example, if following a low sodium diet cut back on the salt; if you prefer your food less spicy cut back on the red peppers flakes.
I like to rub this steak seasoning over the steak and set is aside for at least 20 minutes, but anything up to 2 hours would work too.
If you have tried this recipe for homemade steak seasoning, or any other recipe on my blog, then please rate it and let me know how it turned out in the comments below!
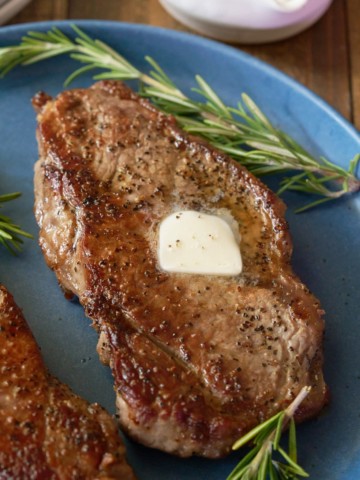
You can make a simple yet delicious pan-seared steak with just a few ingredients. With the right technique, it delivers a flavorful and satisfying meal every time.
This post contains affiliate links, please read my full disclaimer here.
You’ll find the full recipe with ingredient amounts and instructions in the recipe card at the bottom of this post. Be sure to check out the blog post itself for extra tips and tricks!
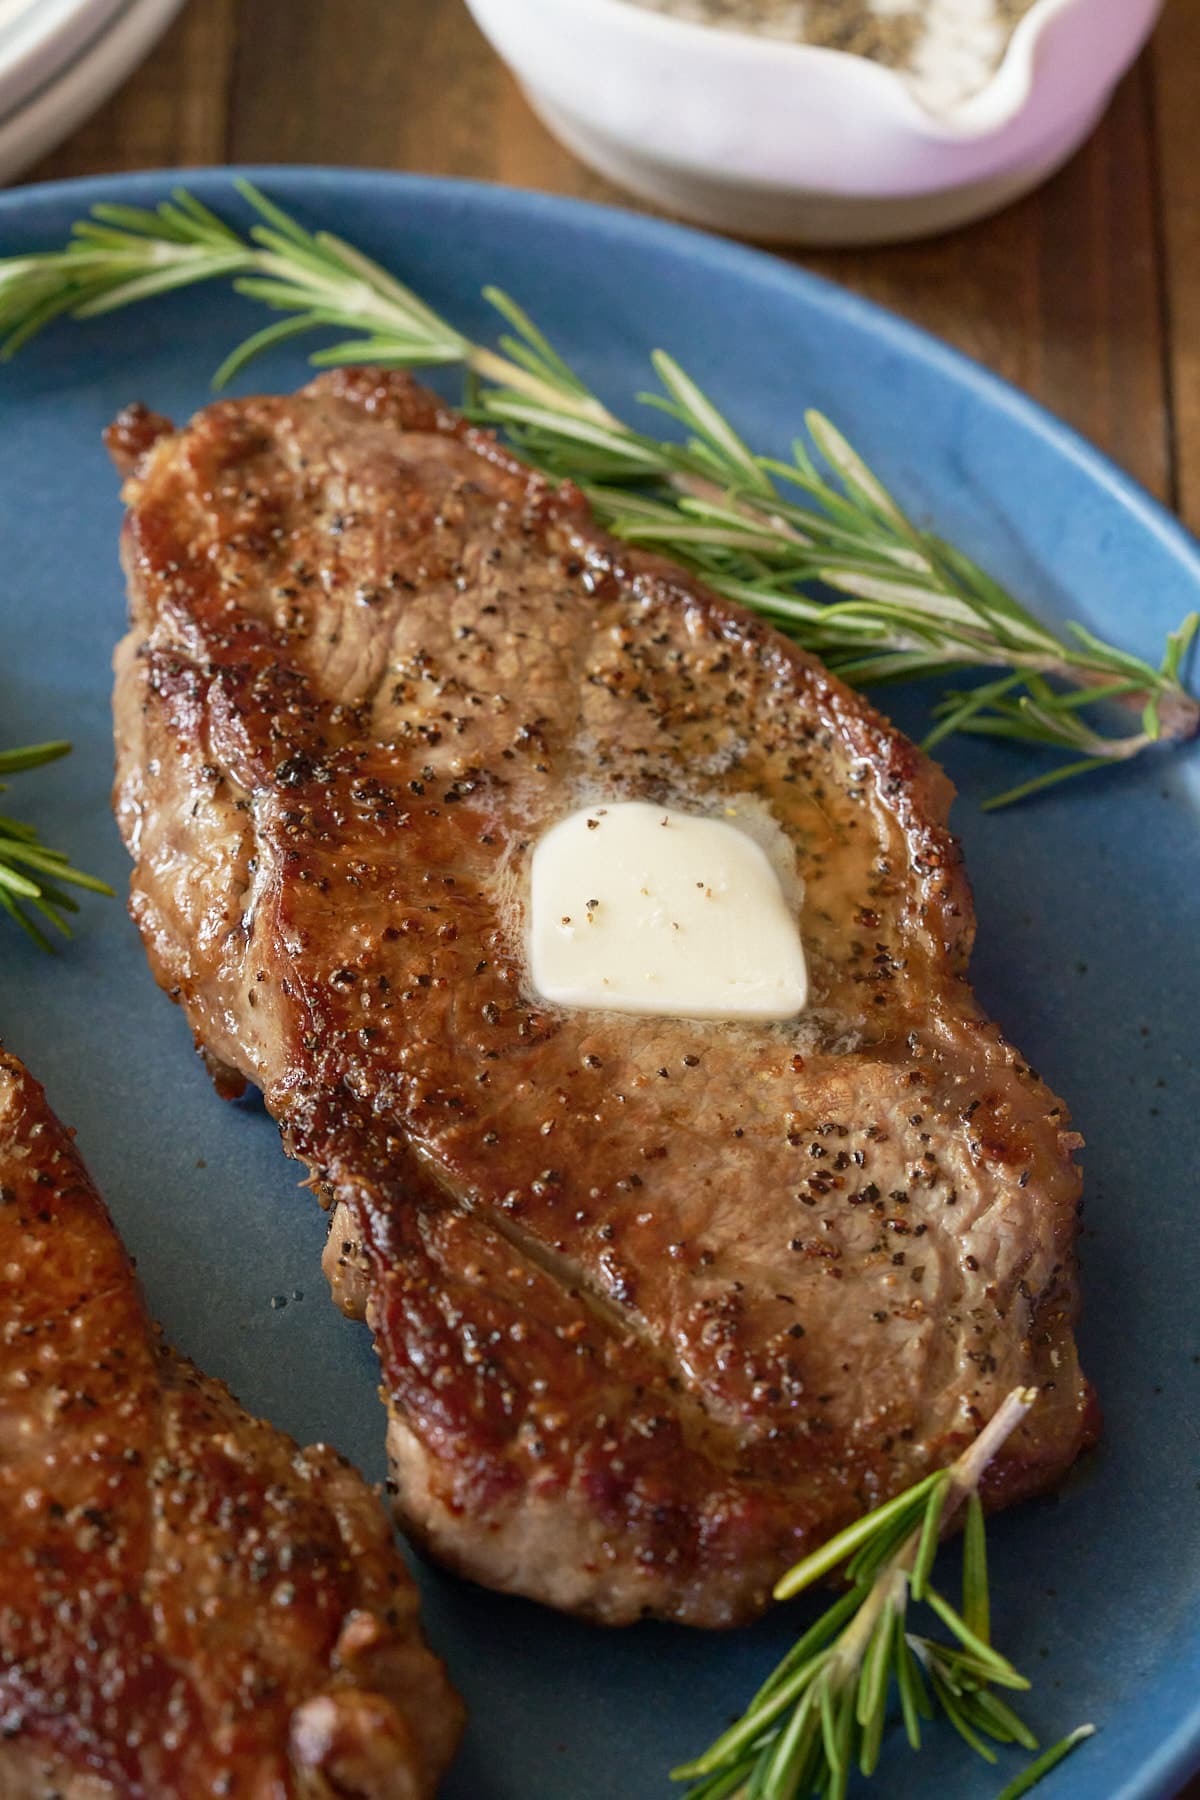
I enjoy pan-seared steak because it is the original fast food I can cook and enjoy in minutes. With this easy steak recipe, I cook the steaks in a bit of oil before finishing them with some butter, fresh herbs, and garlic. These small additions make the steak shiny and flavor the cooking juices. You can pour them over the steak when it's time to eat.
For pan searing, I suggest you use a steak that is about 1-inch thick. Any thicker than this, and you’ll need to finish the steak in the oven. Cooking your steak on the stove gives you everything you come to expect from steak served at a good quality steakhouse!
If you enjoy steak try these great tasting recipes, my Air Fryer Steak with Garlic Herb Butter, Air Fryer Steak Fajitas and Air Fryer Steak Kebabs too!
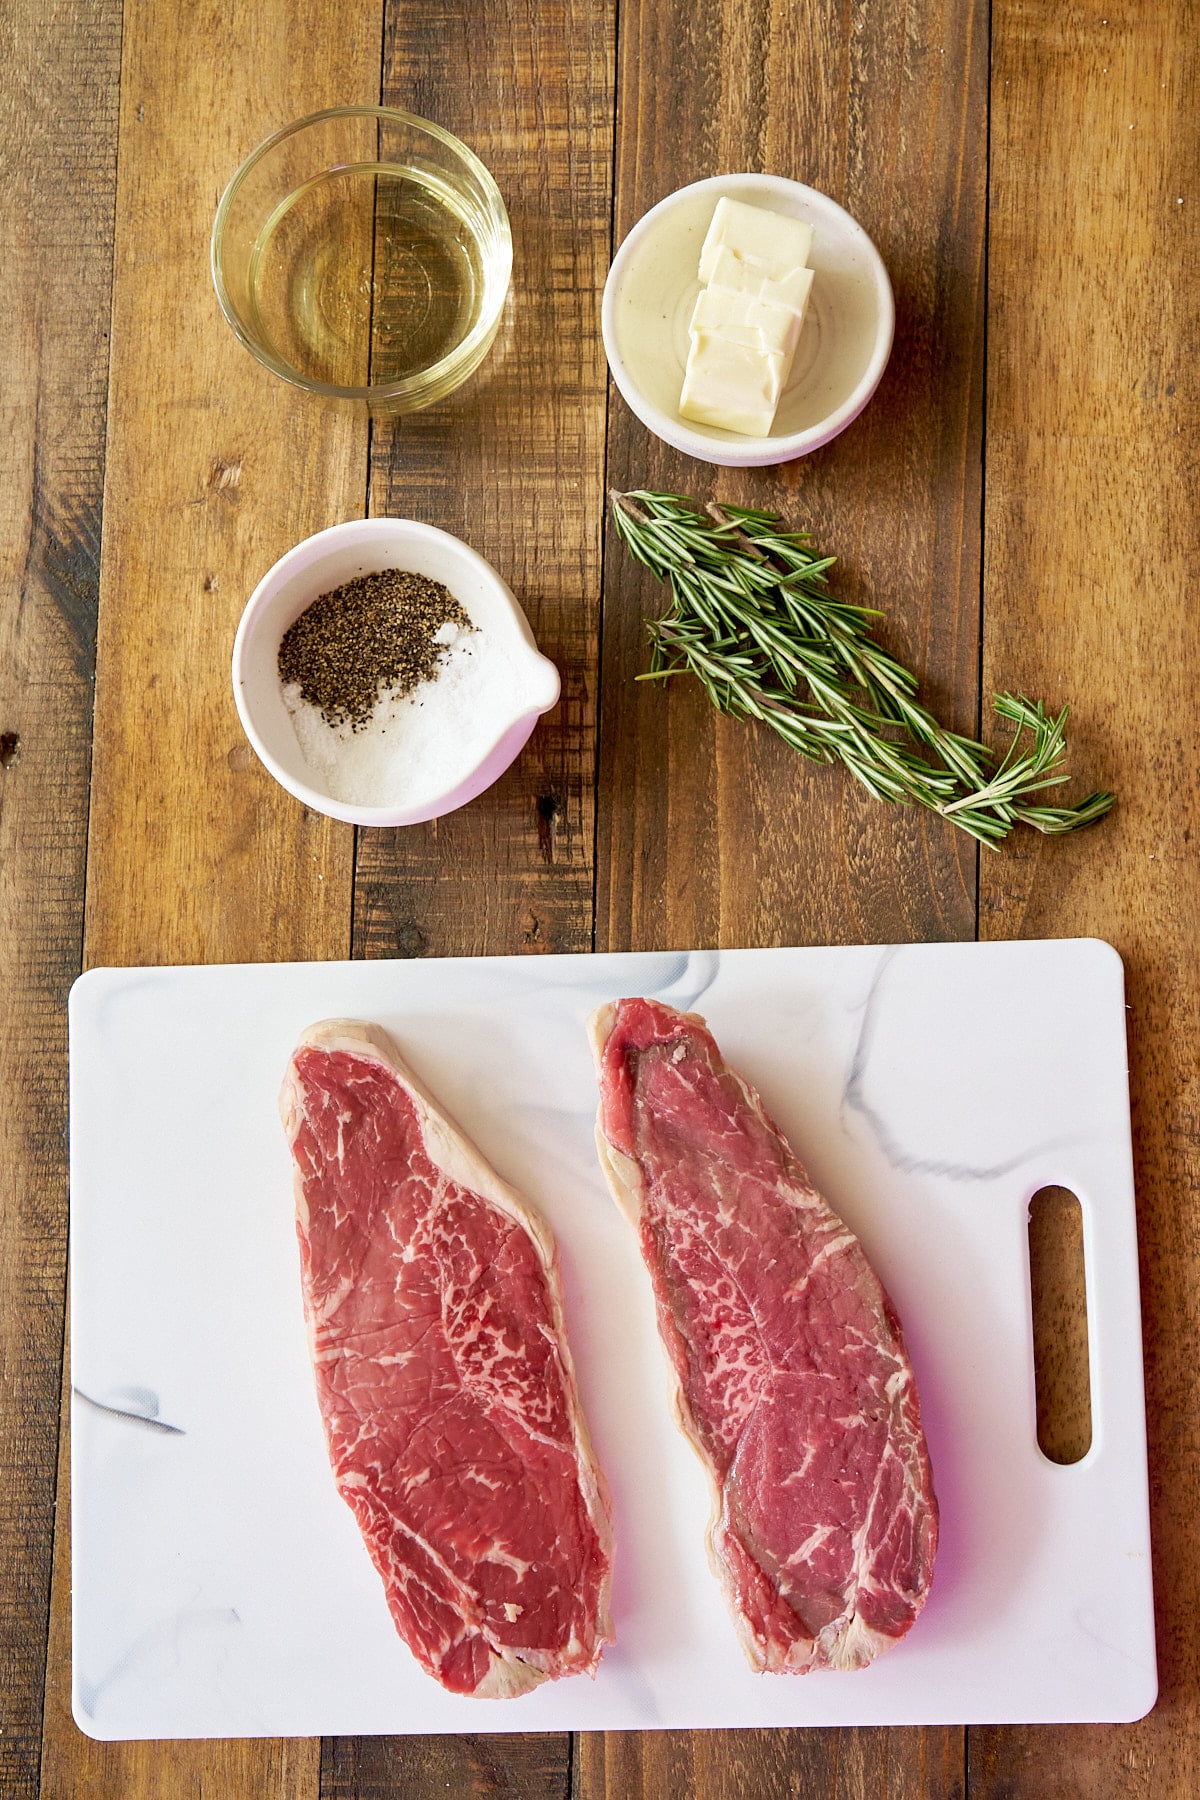
Remove the steaks from the refrigerator, pat them dry, and season generously with salt and pepper on both sides. Allow them to sit out at room temperature for about 20 minutes.


Meanwhile, heat a large skillet, cast-iron, or stainless steel, over low heat for about 7 minutes. Then, increase the heat to medium-high and heat for 3 minutes. Starting on low and increasing to medium-high allows for even heating and precise temperature control of the skillet.
Add the oil to the skillet, and swirl it to ensure the whole bottom of the skillet is covered.

Place one end of the steak in the skillet closest to you, then lower the rest slowly into the skillet. Do this with other steak as well on the other side of the skillet. Make sure the steaks do not overlap or touch.
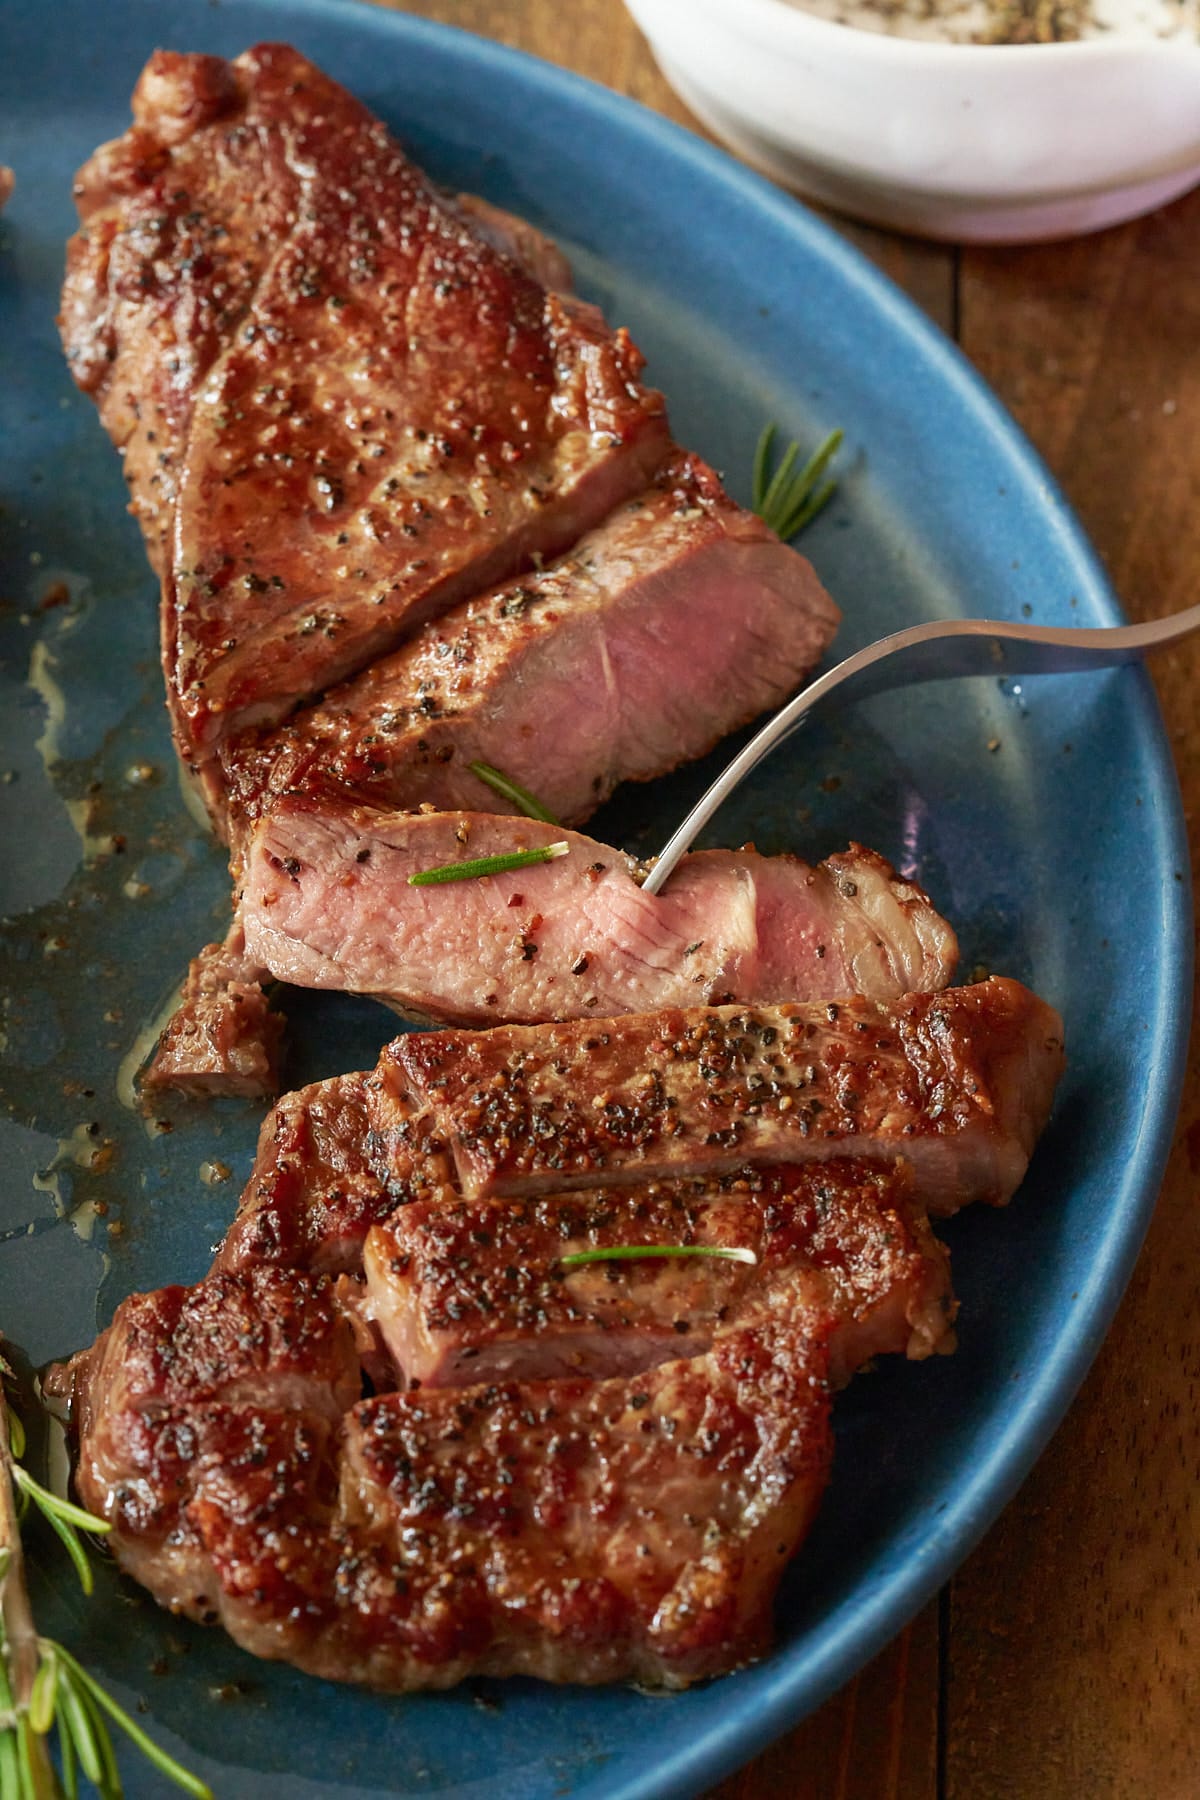
Cook the steak for 3-4 minutes on one side, then flip and cook for another 3-4 minutes for medium-rare. Cook longer for desired doneness. Use a meat thermometer to check internal temperature. See the table for cooking temperatures below.
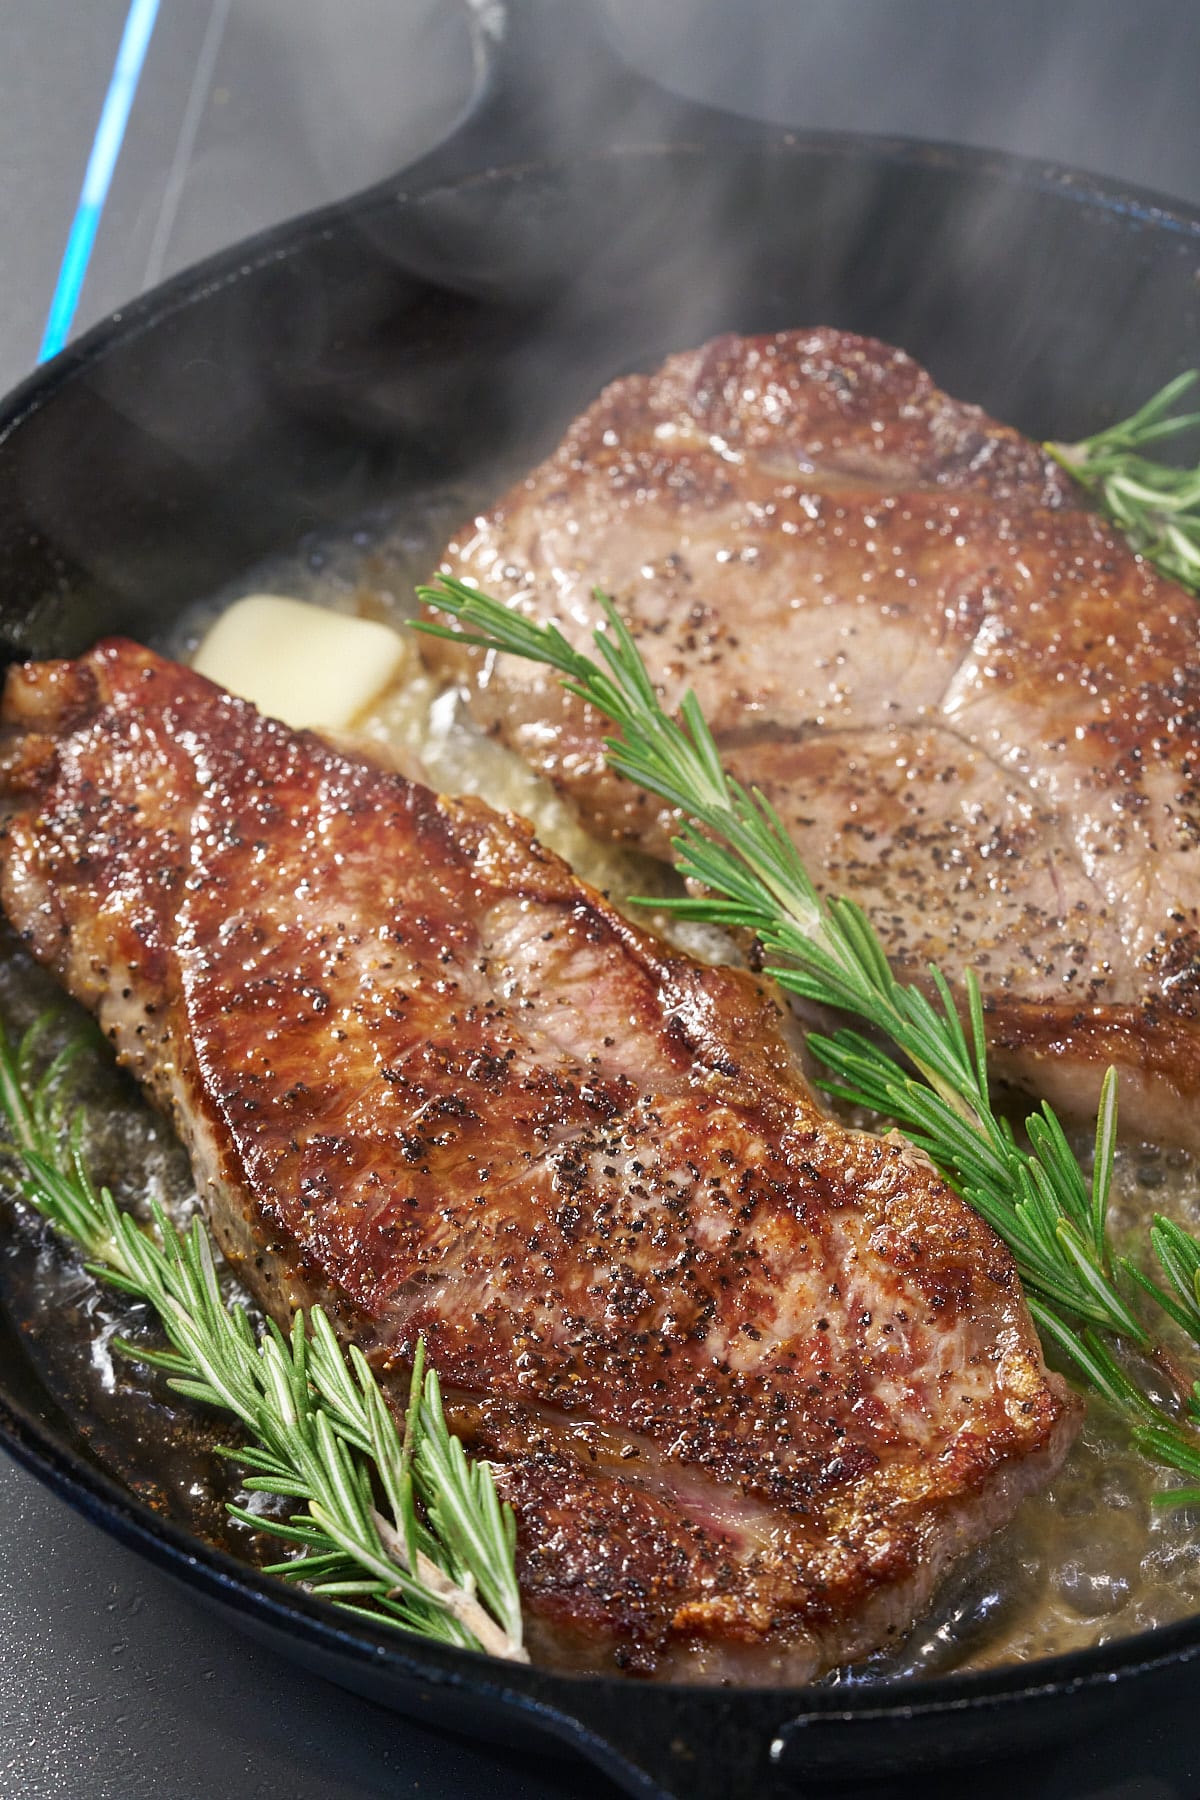
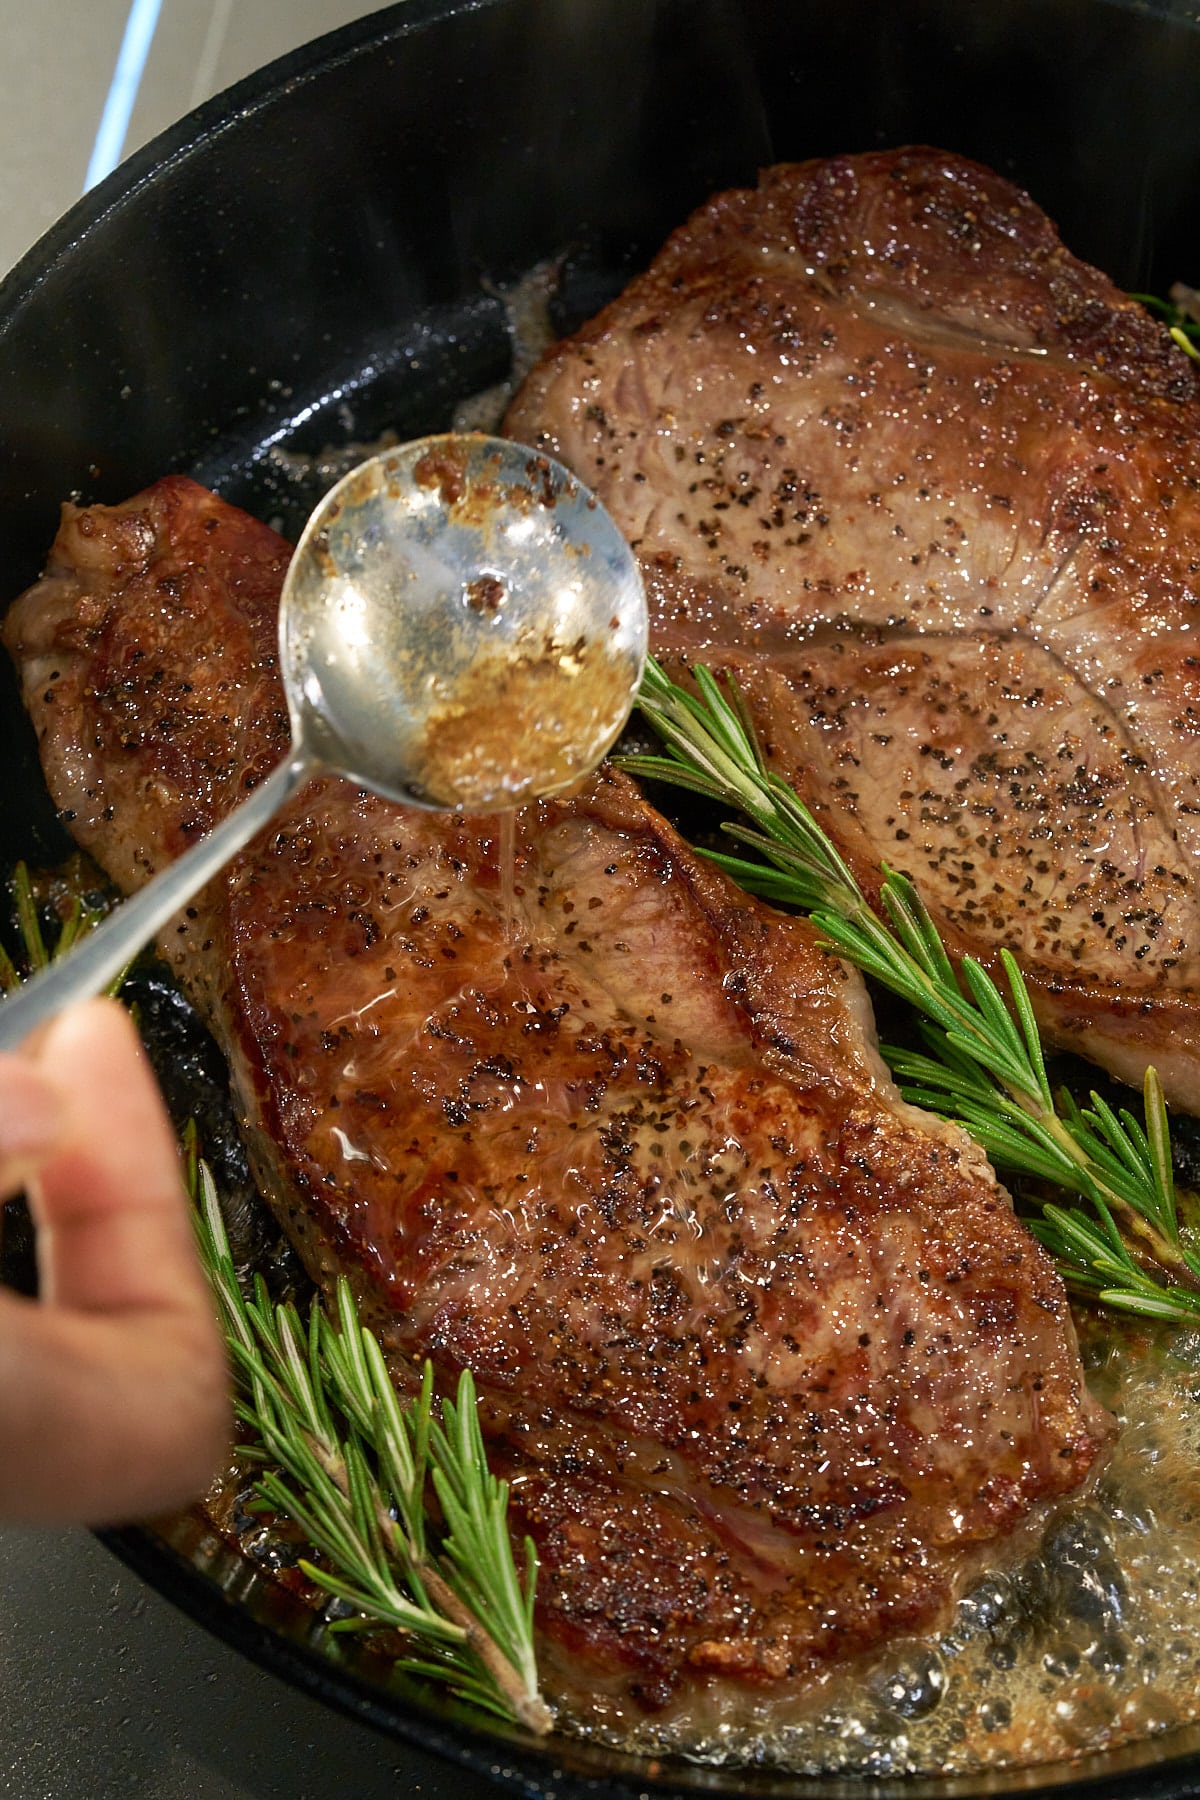
In the last minute of cooking, add butter, herbs, and garlic to the pan for extra flavor.
Tilt the pan and spoon the melted butter over the steaks.
Transfer the steaks to a cutting board or plate and let them rest for about 5-10 minutes before slicing. This allows the juices to redistribute throughout the meat.
Slice against the grain and serve immediately, optionally drizzling any pan juices over the top.
For an idea of the correct temperature to cook your steak, follow the times below. Make sure you use a quick read thermometer to check the correct temperatures.
| Temperature | Doneness |
| 125°F (52°C) | rare |
| 135°F (57°C) | medium-rare |
| 145°F (63°C) | medium |
| 150°F (65°C) | medium-well |
| 160°F (71°C) | well-done |
These tips will help you to cook the best pan-fried steak you've ever tried:
This recipe is easily adapted to suit your own tastes, here are some ideas:

I like to add a knob of butter to the skillet just before serving, along with some fresh herbs and garlic. This flavored butter mixes with the pan juices and is great for basting the steak. You could also serve steak with a knob of my Homemade Garlic Butter on top.
I like to serve steaks with a potato side and a couple of easy veggie sides, try my Air Fryer Potato Wedges, Air Fryer Sweet Potato Wedges or Easy Air Fryer Baked Potatoes. When it comes to vegetables try Garlic Herb Mushrooms, Sauteed Mushrooms, Sauteed Spinach or my Oven Roasted Broccoli.
For salads, opt for something with a bit of zing and lots of crunch, like my Homemade Coleslaw or Southern Cucumber Salad.
How long you cook steak depends on how thick the steaks are cut, as a rule allow 2-4 minutes a side depending on thickness. You should also take into consideration how you like your steak cooked. I've included a table of internal cooking temperatures for steak earlier in this post.
Always use oil to pan sear steak as it has a higher smoke point, whereas butter will burn before the steak is cooked. Instead I like to add butter at the end of the cook to baste the steaks and add extra flavor.
Adding butter at the end of the cook adds depth, enhancing the flavor of the steak as well as giving you that lovely glossy finish you expect from a properly cooked steak.
I don't. I found that bringing my pan to medium-high heat rather than high resulted in perfectly seared steak.
If you have tried this pan seared steak recipe, or any other recipe on my blog, then please rate it and let me know how it turned out in the comments below!
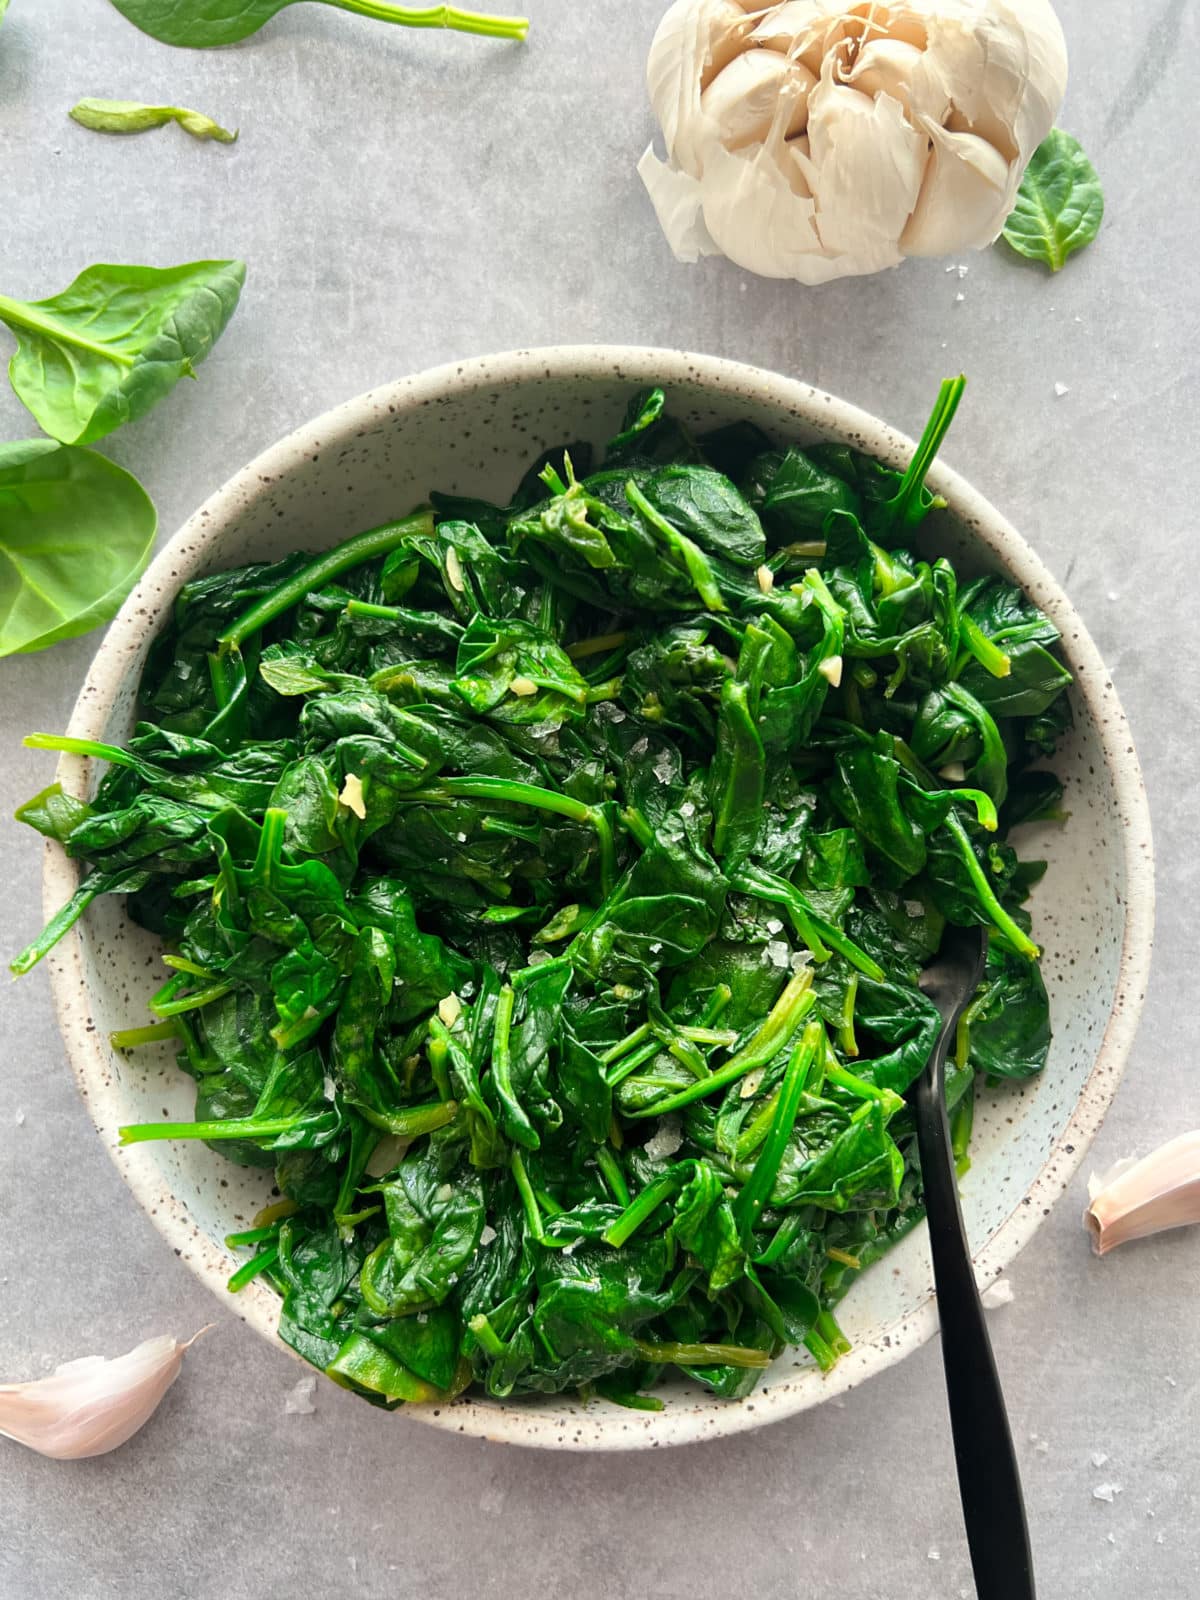
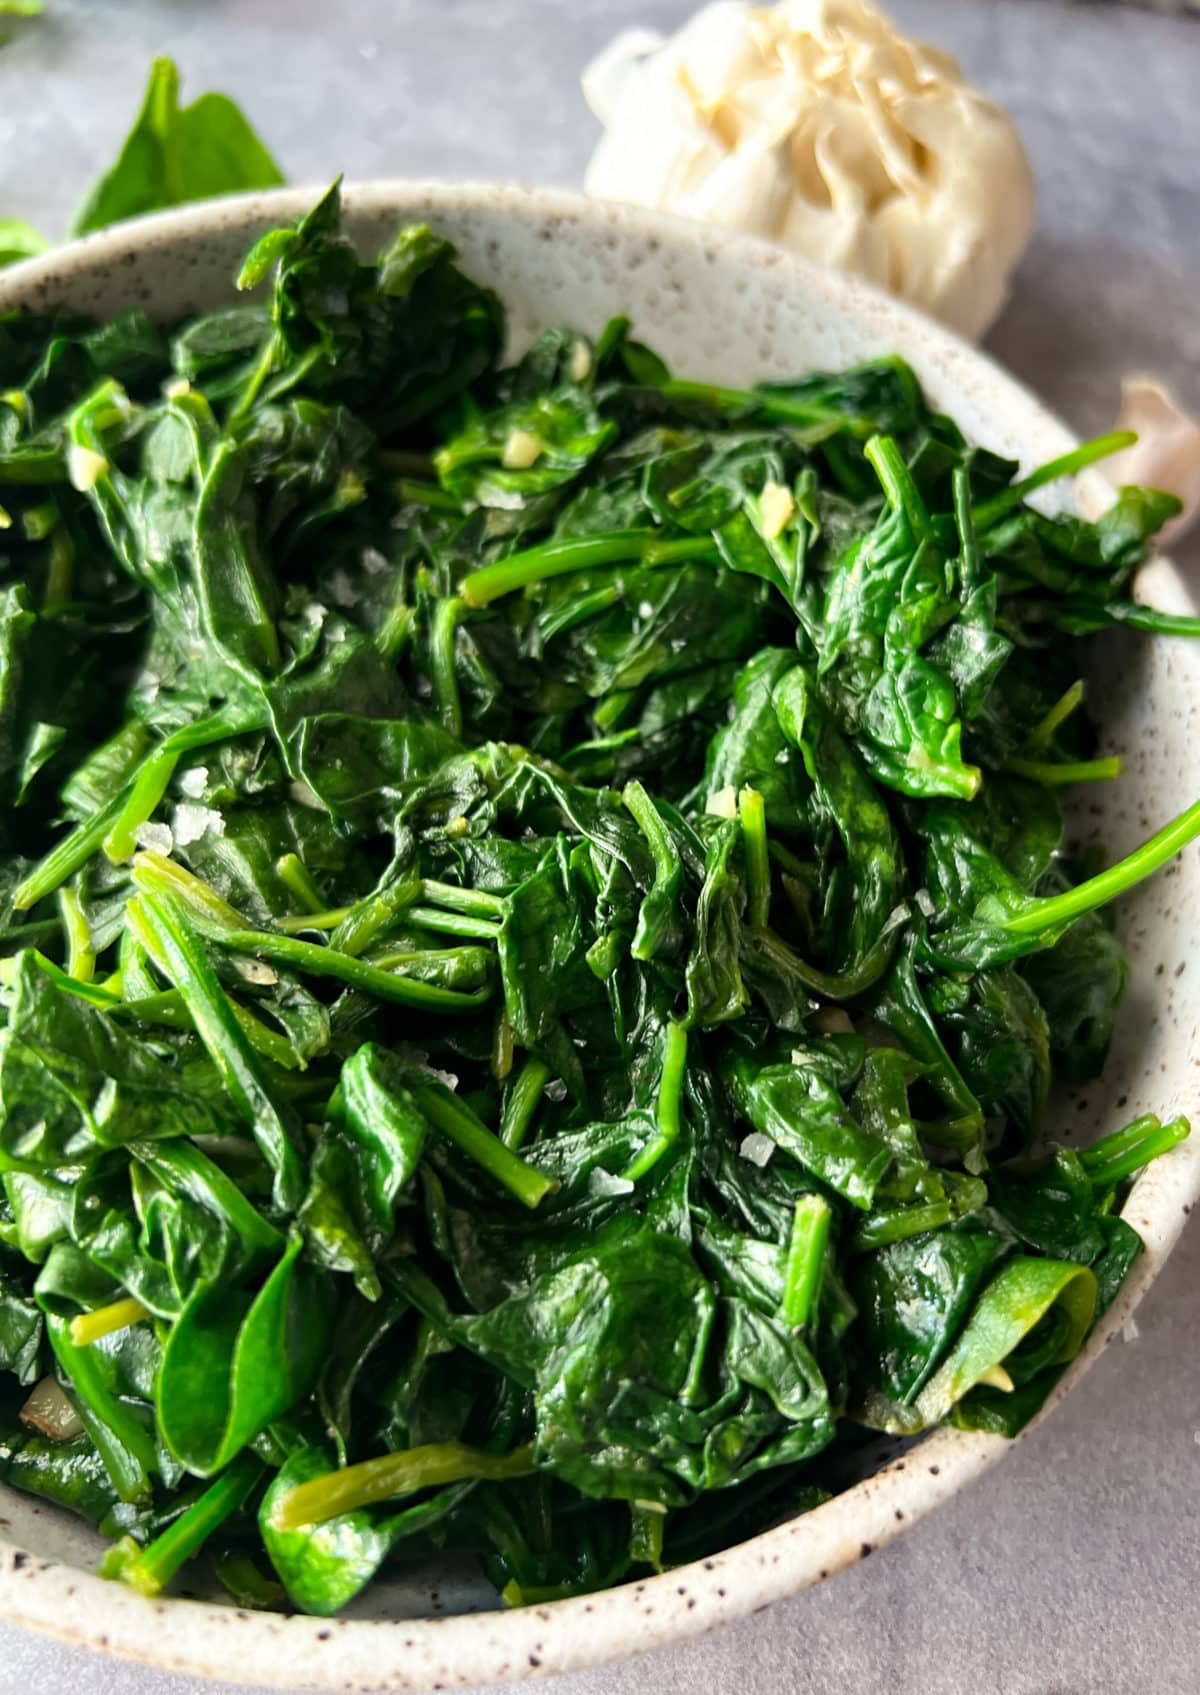
You can make Sauteed Spinach, a simple and delicious side dish, in just 10 minutes. Its vibrant green color and delicate flavor make it a versatile and nutritious addition to any meal.
This post contains affiliate links, please read my full disclaimer here.
You’ll find the full recipe with ingredient amounts and instructions in the recipe card at the bottom of this post. Be sure to check out the blog post itself for extra tips and tricks!
Simple and easy side dishes are always some of my favorites. From sauteed mushrooms to sautéed yellow squash, knowing the cooking skill of sautéing can result in some easy-tasting side dishes.
We eat spinach as one of our weekly vegetables, and this sauté method happens to be one of our favorites. Initially, my husband would always saute the spinach in a large skillet, but he could never fit the right amount in the pan.
The amount he could fit in the pan resulted in a very small amount of cooked and wilted spinach. It was delicious, but it was never enough. Y'all know what I'm talking about.
This method uses a large pot or Dutch oven, giving you the opportunity to cook way more spinach at a time. Everyone can enjoy spinach now thanks to this method. If you like sautéed spinach, check out my sautéed beet greens, my sautéed brussels sprouts, or my creamed spinach recipe.
Find the full recipe and instructions for this sauteed spinach recipe in the printable recipe card below.
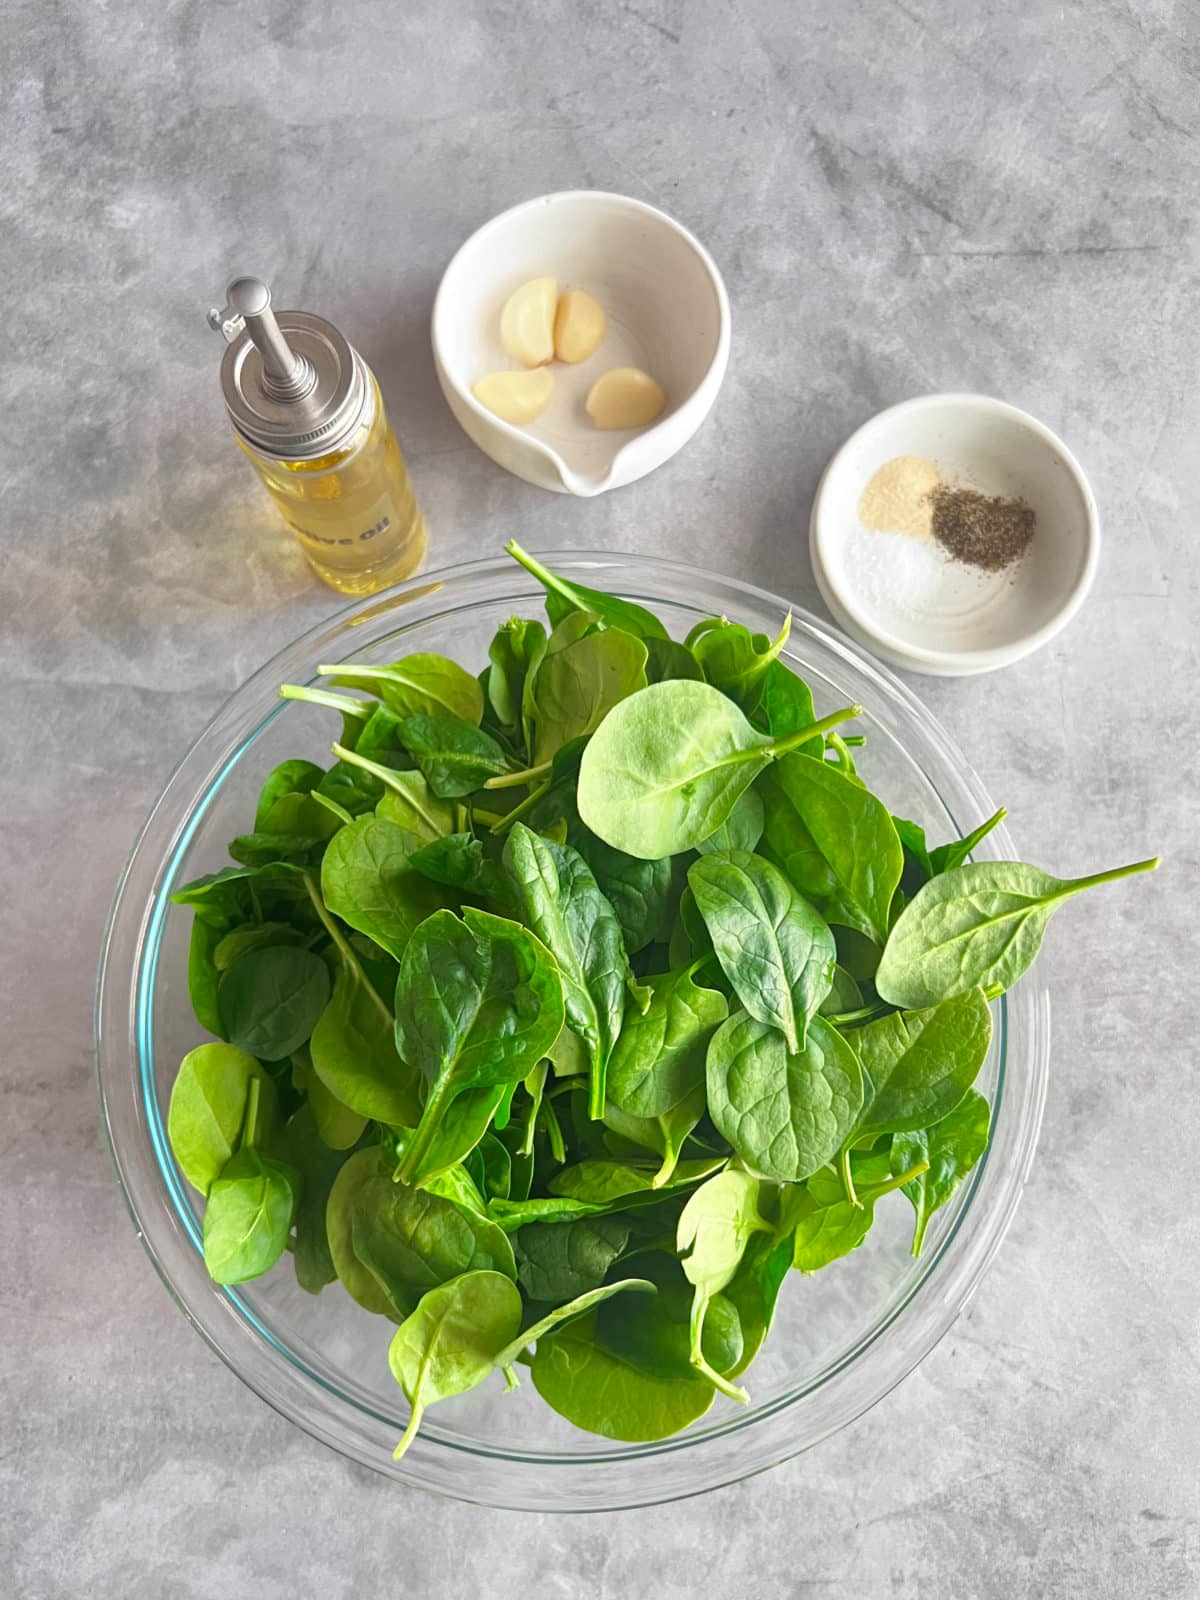
Heat olive oil in a large pot over medium heat.
Add the garlic cloves to the pot and sauté for about 30 seconds until fragrant, being careful not to burn the garlic.
Add the spinach, kosher salt, black pepper, and onion powder to the pot and stir. It will start to reduce.
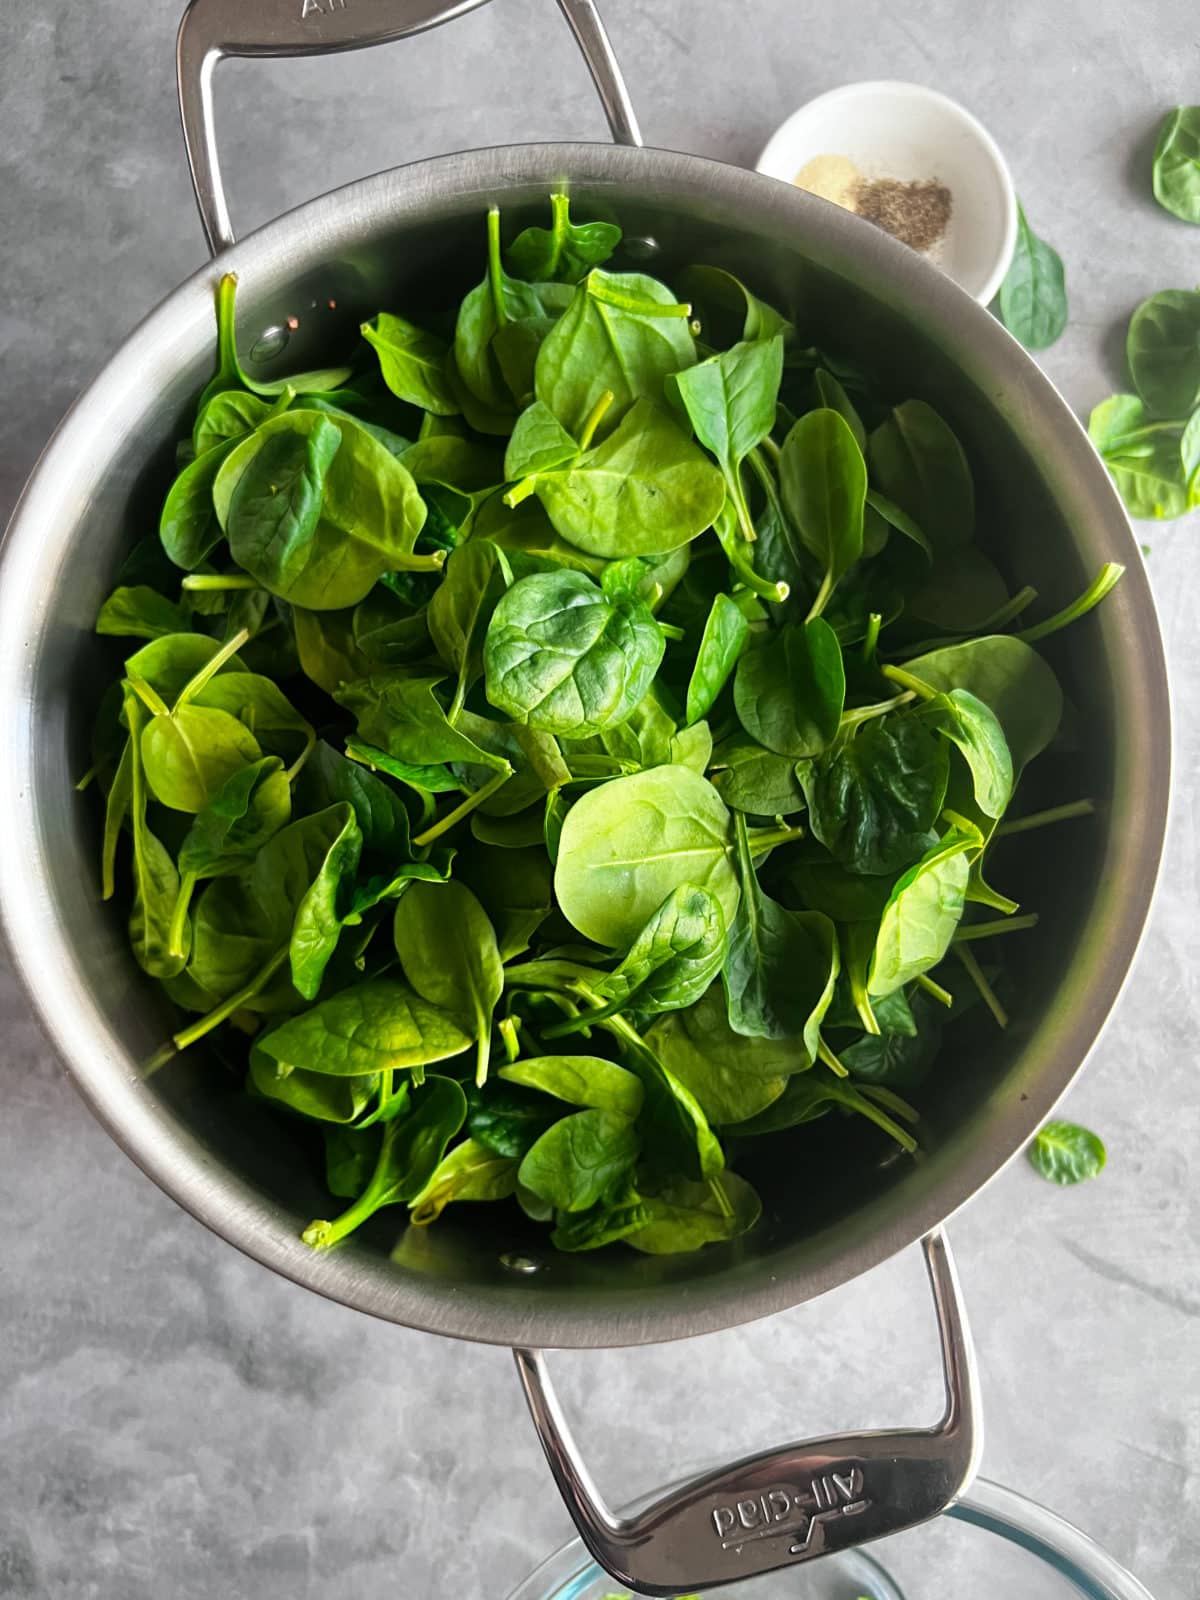
Sauté the spinach, stirring frequently for about 2-3 minutes, until it becomes wilted and tender.
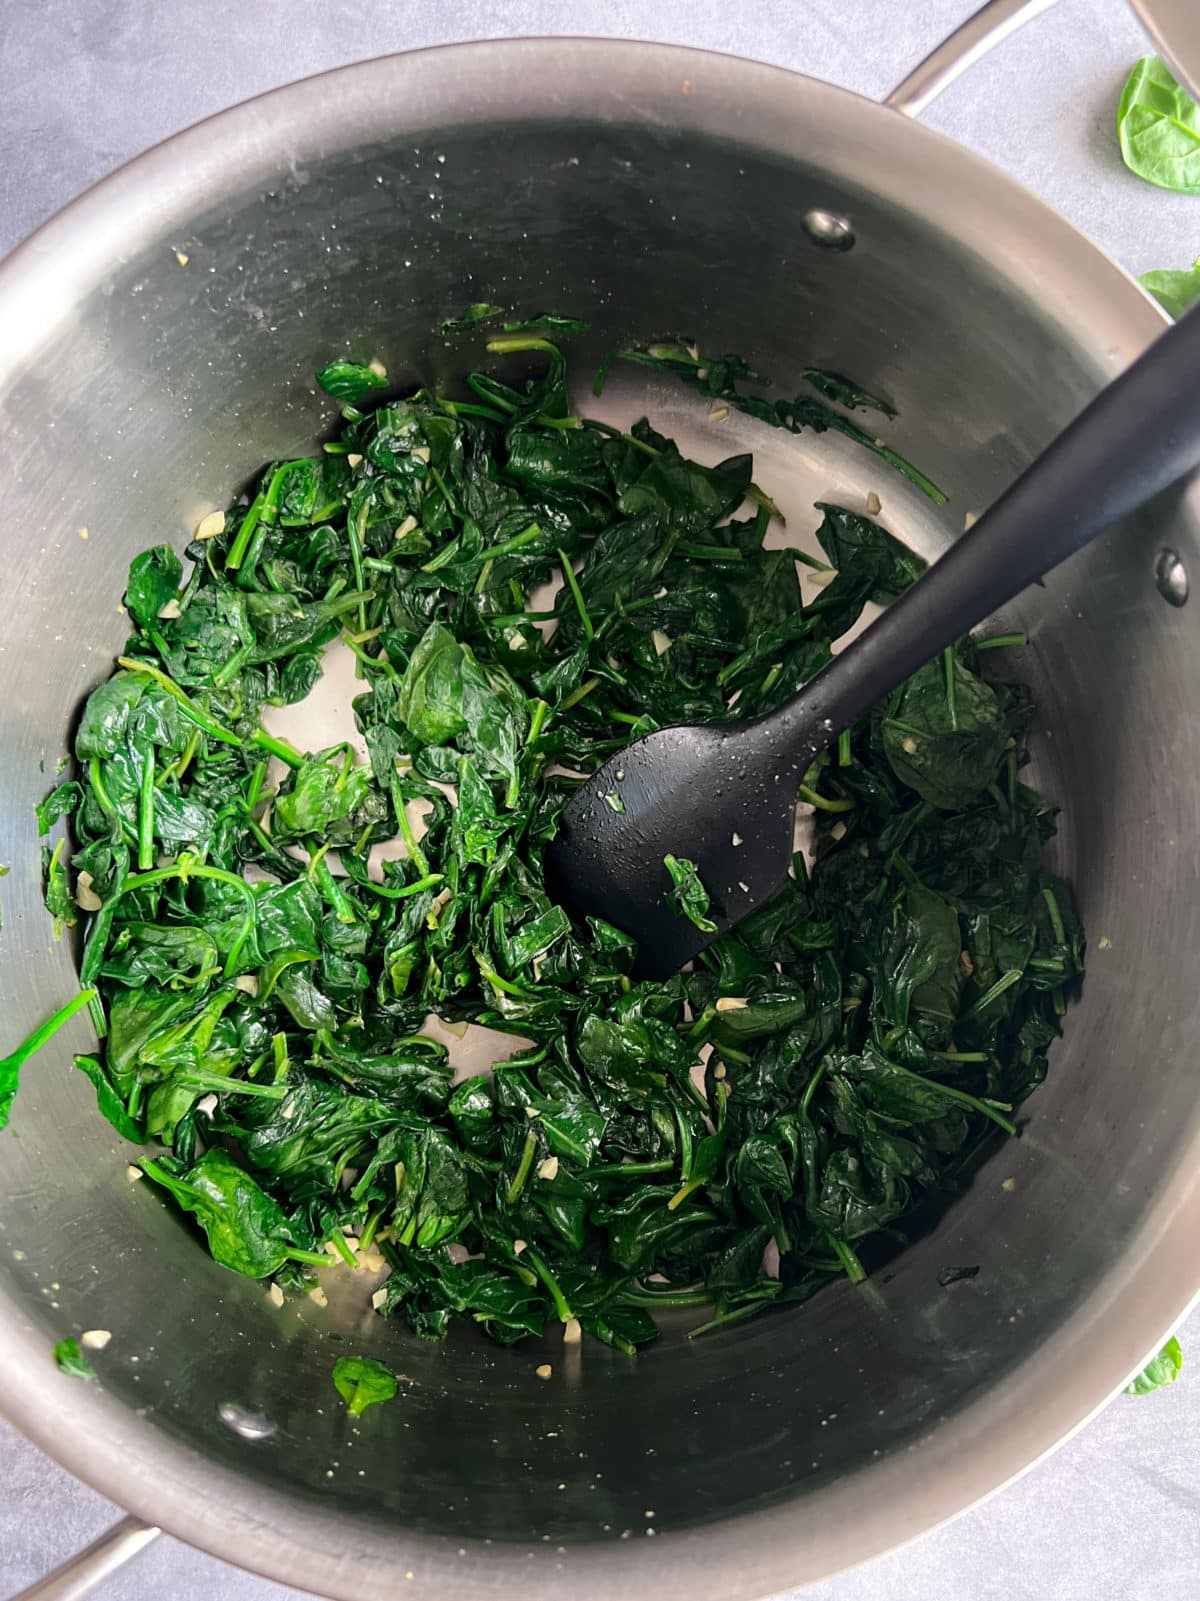
Once the spinach is cooked, taste and adjust the seasoning if necessary.
Serve the sautéed spinach immediately as a delicious and healthy side dish. Season with additional salt and pepper to taste if desired.
Make sure your heat is only around medium heat when sauteing the garlic. Any hotter than that, and your garlic may burn. Medium heat is enough to release the taste and fragrance of the garlic.
To store leftover sauteed spinach, first allow it to cool to room temperature. Then, transfer it to an airtight container and refrigerate. It will remain fresh for 3-4 days.
To reheat sautéed spinach, you can either gently warm it in a skillet over medium heat on the stovetop or place it in a microwave-safe dish, cover lightly, and heat on medium power in short intervals in the microwave, stirring occasionally until just warmed through.
For sautéed spinach, you can explore a range of recipe variations and customizations to suit your palate or make the dish complement your meal. Here are some ideas:
Olive oil is favored for its taste and health perks, yet avocado oil, coconut oil, or butter are great alternatives for varied flavors and dietary needs.
Absolutely! Garlic, onions, mushrooms, bell peppers, and spices like nutmeg or red pepper flakes can enhance the dish's flavor.
Young, tender spinach leaves are less likely to be bitter. You can also balance bitterness by adding ingredients like garlic, lemon juice, or a pinch of sugar.
Yes, you can sauté frozen spinach. It's a convenient option when fresh spinach isn't available. To do so, first, thaw the spinach and squeeze out as much excess water as possible to prevent it from becoming too watery when cooked.
Looking for recipes to serve along with this sauteed spinach? Try these out:
I hope you enjoy this sautéed spinach as much as we do. If you have tried this recipe or any other recipe on my blog, please rate it and let me know how it turned out in the comments below!
This Planters Punch Cocktail is a delicious, refreshing rum cocktail. Made with rum, citrus, and sweetener, this drink offers a tropical taste that transports you to sunny shores with every sip.

This post contains affiliate links, please read my full disclaimer here.
You’ll find the full recipe with ingredient amounts and instructions in the recipe card at the bottom of this post. Be sure to check out the blog post itself for extra tips and tricks!
I've been having fun making my own cocktails at home, and I had to share this classic cocktail, Planter’s Punch. A bit of dispute exists as to where this cocktail originated, either in Illinois, Charleston, or in Jamaica. My research says it originated in Jamaica, with the use of Jamaican rum, which I use in the cocktail as well.
This drink is fruity, sweet, and strong with 3 ounces of rum in it. Balanced by two kinds of citrus, bitters, and simple syrup. I also added a dash of club soda at the end to make it a bit lighter.
If you enjoy Caribbean cocktails, try out my Jamaican Rum Punch.

Fill a glass, preferably a rocks glass, with ice. Set aside.
Combine dark rum, white rum, simple syrup, fresh lime juice, and Angostura bitters in a cocktail shaker.
Fill the shaker with ice cubes. Cover the shaker and shake the mixture vigorously until well chilled.
Strain the cocktail into a glass filled with ice. Top with a splash of club soda.

Garnish the drink with an orange slice and a lime slice.
Serve and enjoy.

The cocktail ratio for Planter's Punch can vary, but a traditional approach to the drink follows a simple rhyme:
"One of sour, two of sweet, three of strong, four of weak."
Here's how to interpret the ratio:
Yes! To do so, mix dark rum, white rum, simple syrup, lime juice, orange juice, and Angostura bitters in a large container. Chill the mixture. When ready to serve, pour over ice in glasses, add a splash of club soda to each glass, and garnish with orange and lime slices.

Very strong.
If you have tried this Planter's Punch recipe or any other recipe on my blog, then please rate it and let me know how it turned out in the comments below!
Looking for other delicious cocktails? Try these out:
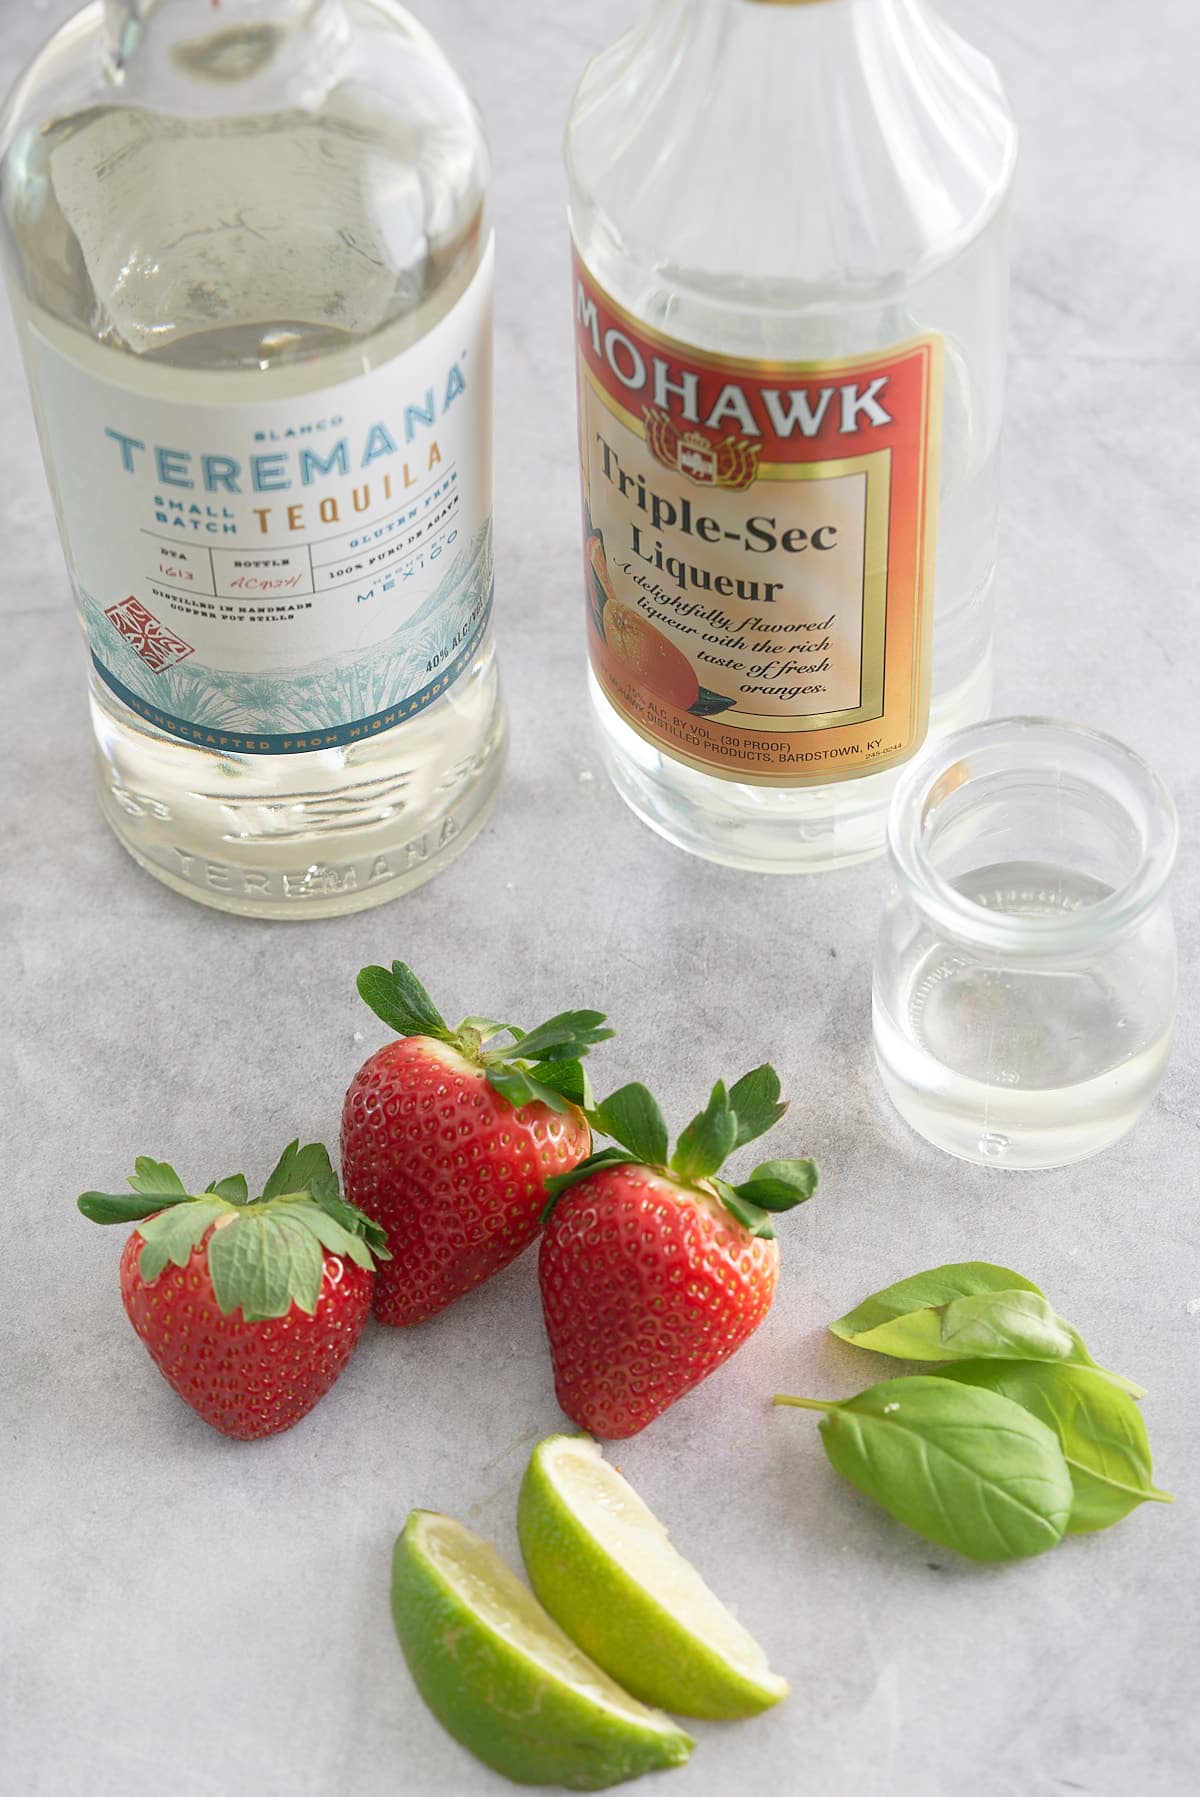
A strawberry basil margarita is one of my favorite cocktail recipes. Taking a classic margarita recipe, I add fresh strawberries and basil to the tequila, triple sec, and lime. Serve it over ice for a refreshing tasty cocktail. This post is meant for an audience 21 and over.

This post contains affiliate links, please read my full disclaimer here.
You’ll find the full recipe with ingredient amounts and instructions in the recipe card at the bottom of this post. Be sure to check out the blog post itself for extra tips and tricks!
Strawberries and fresh basil make a great flavor combo, so no wonder it works in this delicious margarita. The trick to making the best strawberry basil margarita cocktail is to take time to properly muddle the strawberries getting as much juice squeezed out as you can, before muddling the basil and adding the remaining ingredients.
This strawberry basil margarita cocktail recipe makes 1 cocktail serving, but you can easily multiply the recipe ingredients if serving a larger group. For two servings, simply double the ingredients and pour it into two glasses.
If you enjoy a cocktail when the sun is out, try my Classic Margarita or my Paloma Cocktail.
Here's what you will need to make this easy strawberry basil margarita cocktail:
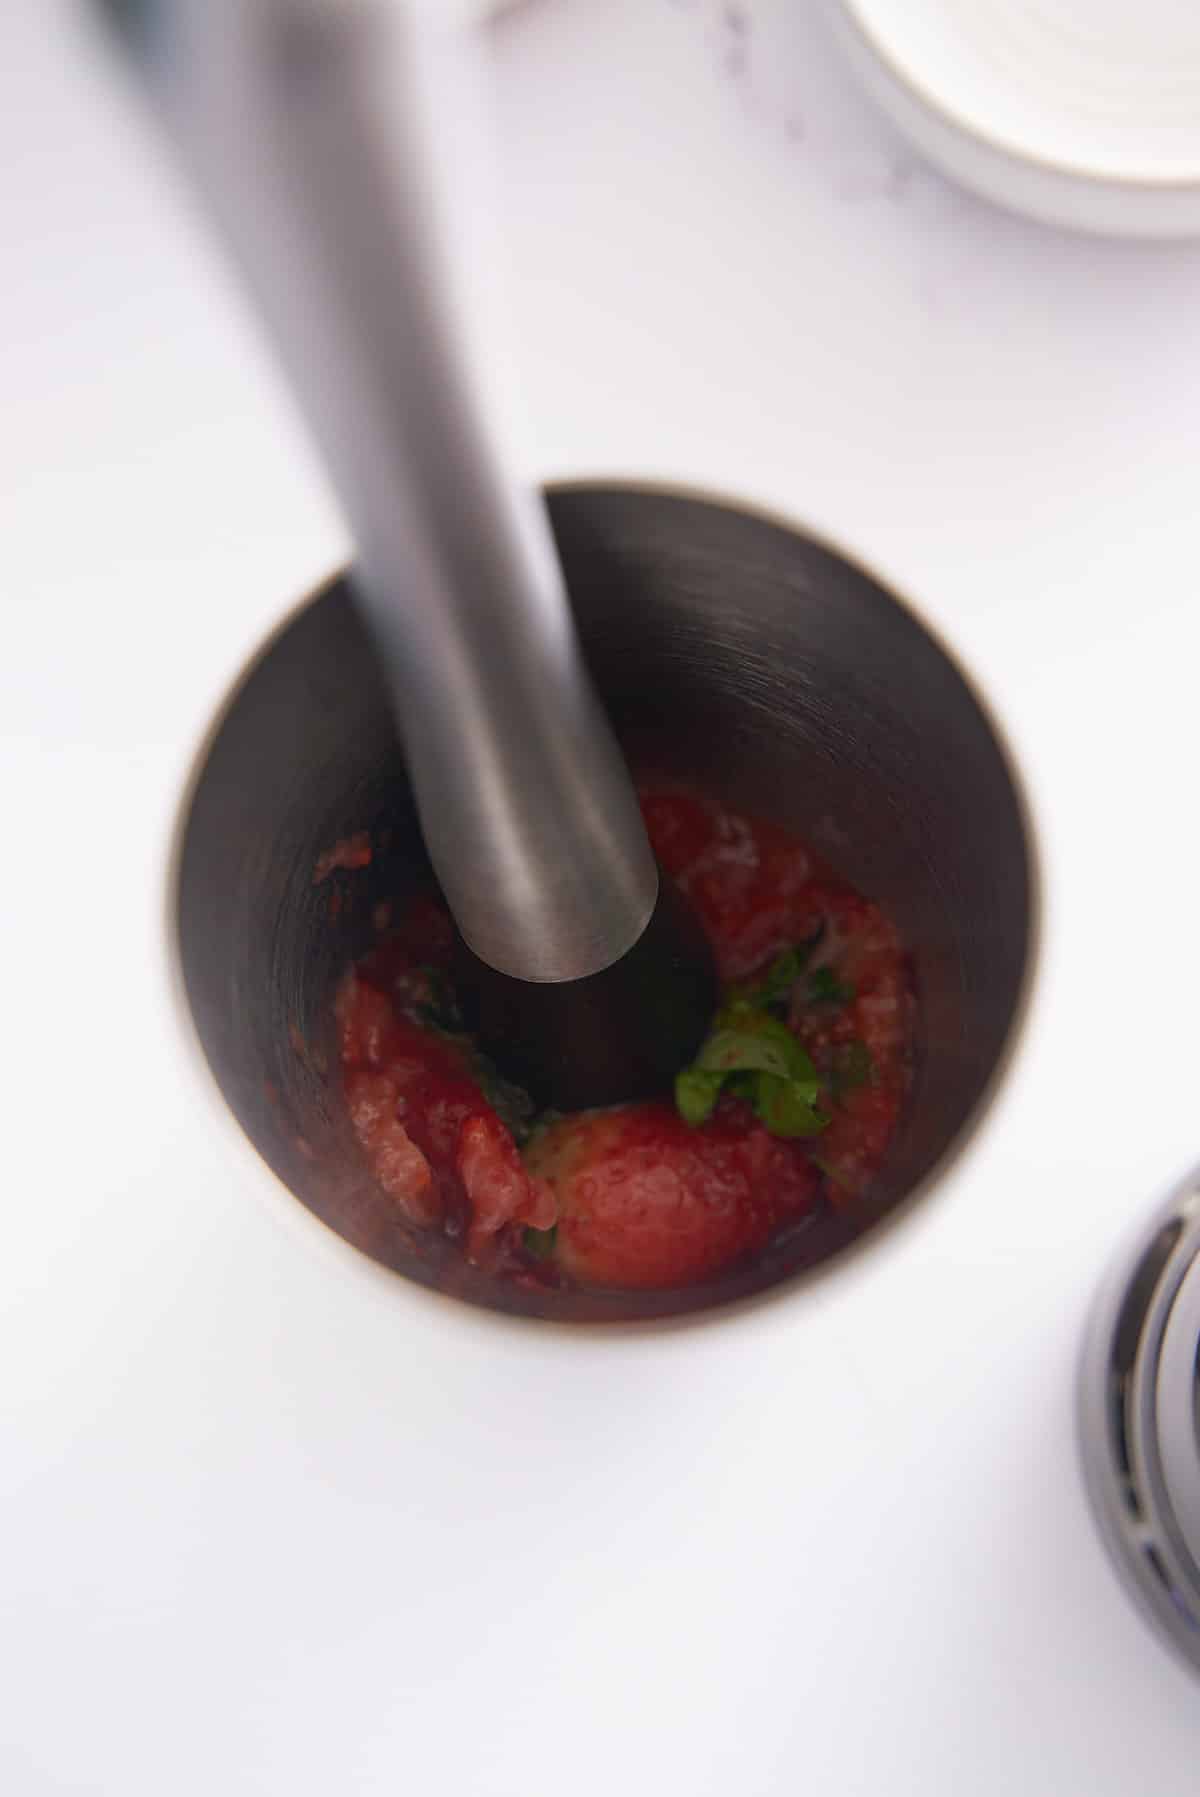
Add the strawberries to the cocktail shaker, and muddle.
Once you see some juices released, add the basil leaves and lightly muddle some more.
Add the tequila, triple sec, fresh lime juice, and simple syrup to the shaker.
Fill the shaker with ice cubes and shake vigorously for about 10 seconds. Strain the mixture into a glass filled with fresh ice.

Garnish with a strawberry and a basil leaf. Serve immediately and enjoy!

These tips will help you make the best strawberry basil margarita recipe you've ever tried.

A strawberry margarita takes the ingredients from a class margarita cocktail, tequila; triple sec, and lime juice; and adds muddled fresh strawberries into the mix.
Triple sec, or any similar orange liqueur like Cointreau, adds a touch of sweet orange flavor which compliments tequila and balances out the sour lime flavor.
The difference between a strawberry daiquiri and a strawberry margarita is the base alcohol used in the cocktail. A margarita always has a base of tequila, whereas a daiquiri uses a base of white rum.
Looking for more cocktail recipes? Try these out:
If you have tried this Strawberry Basil Margarita recipe or any other recipe on my blog, please rate it and let me know how it turned out in the comments below!
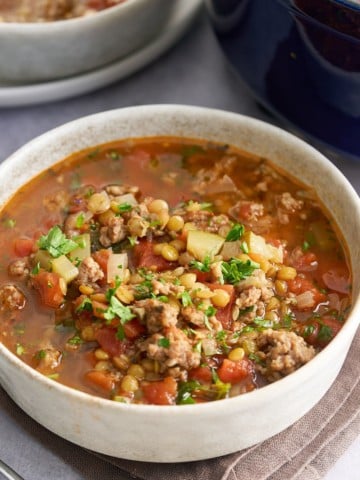
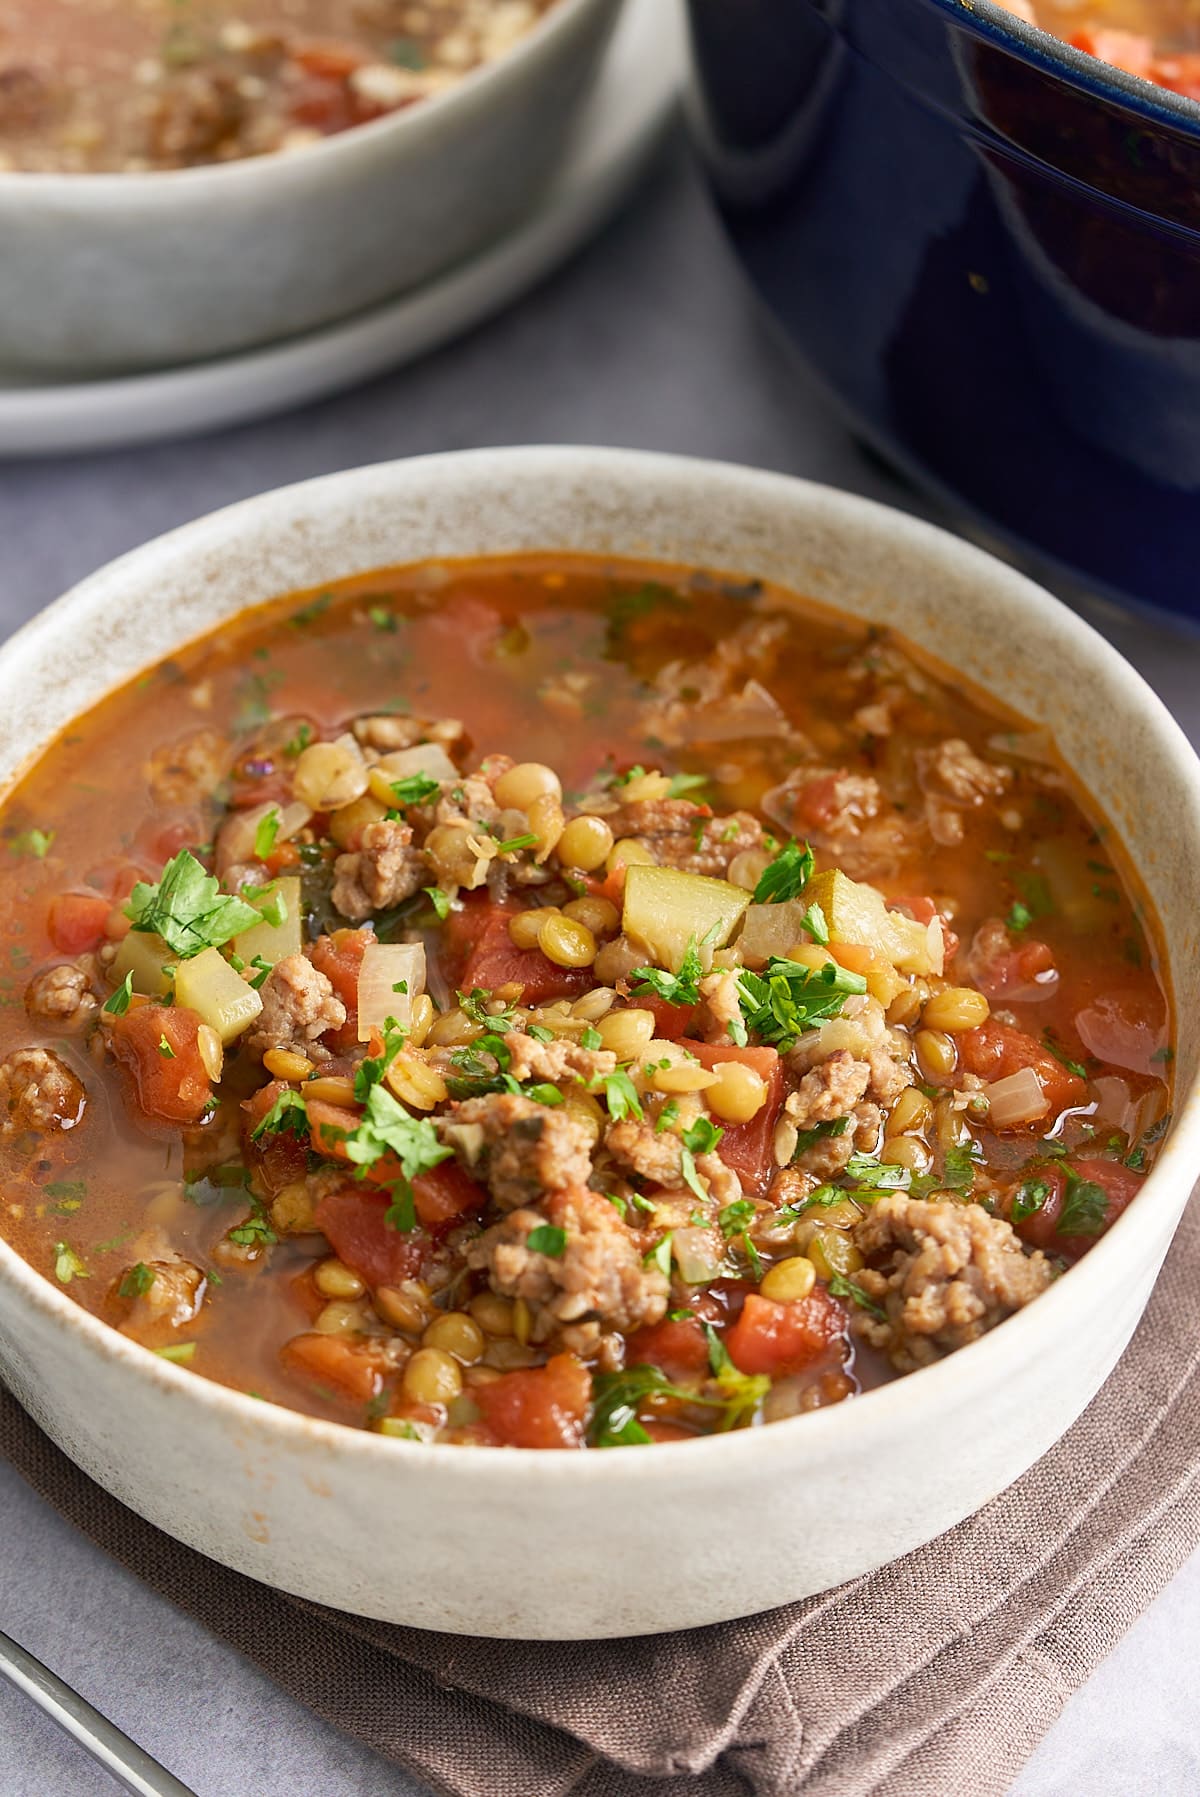
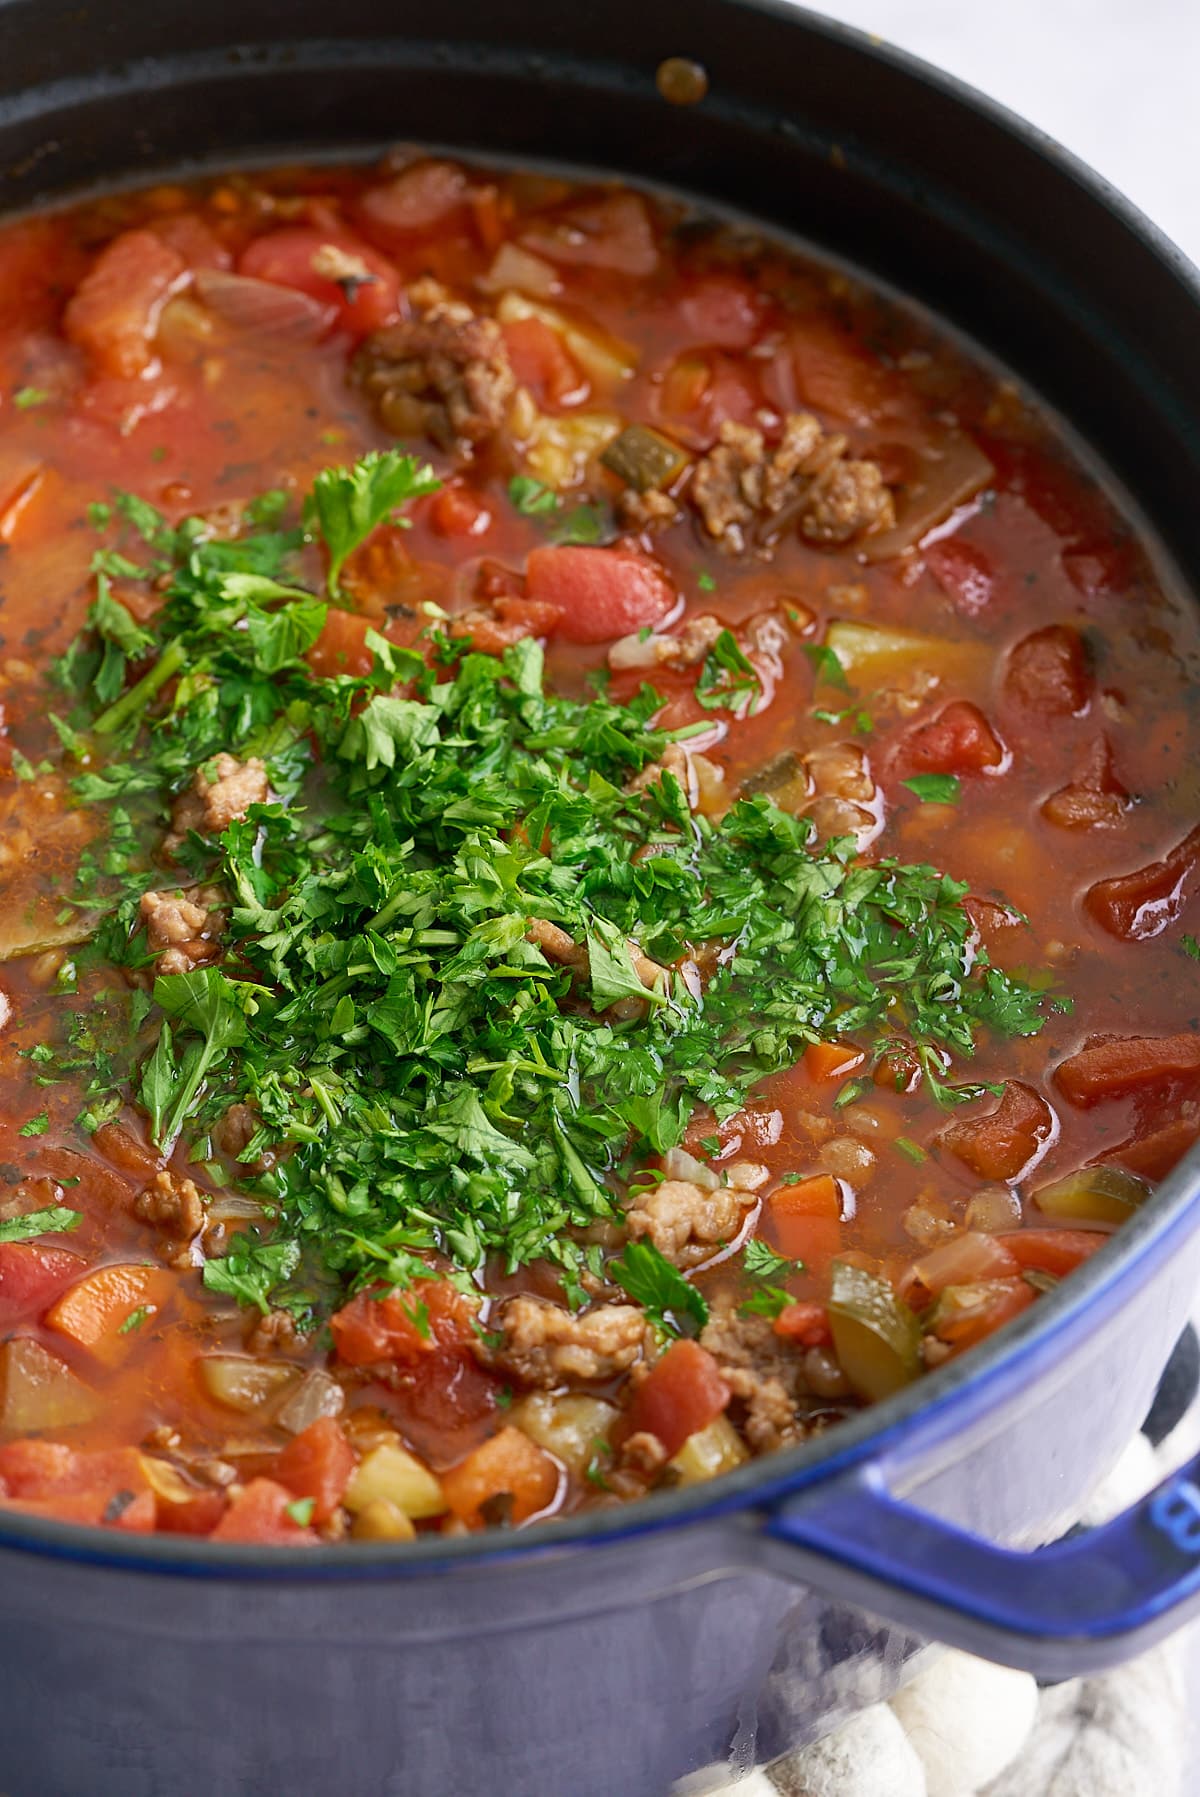
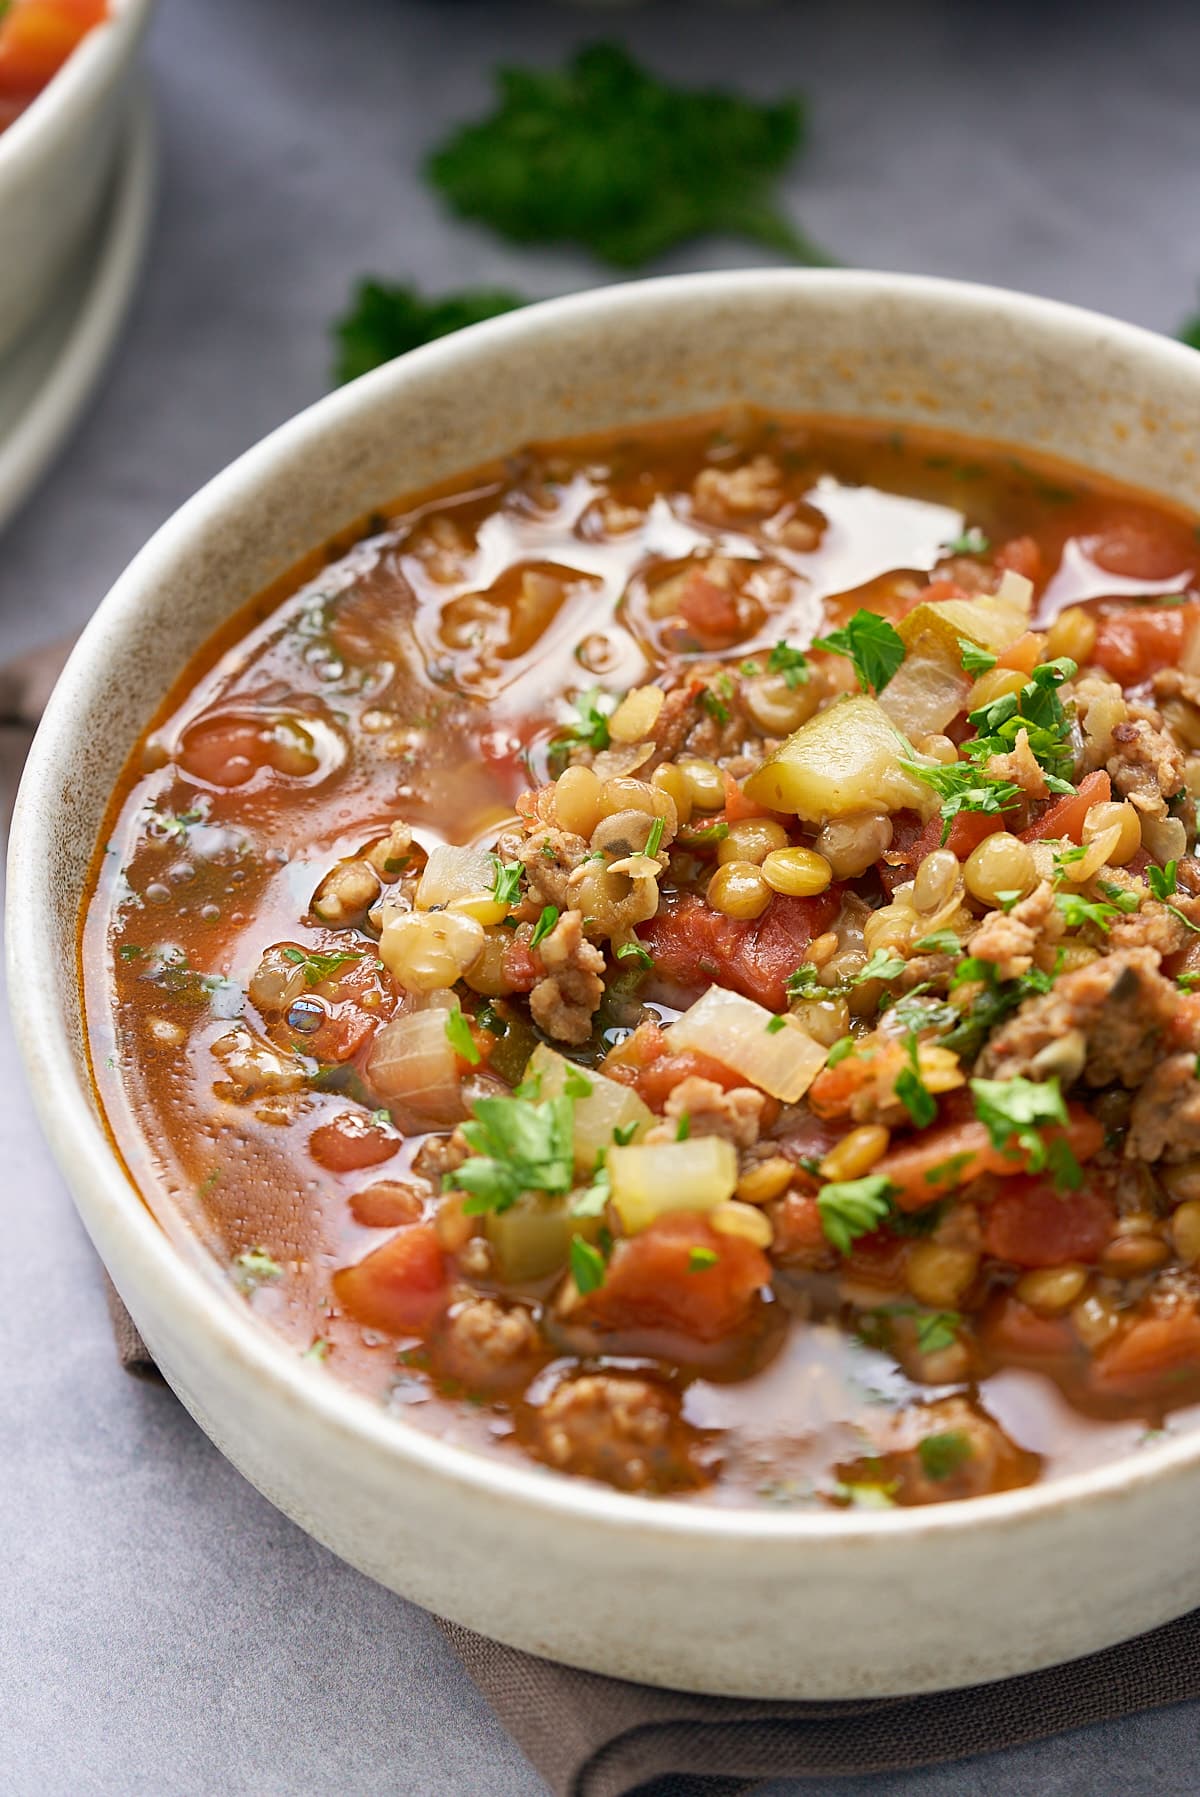
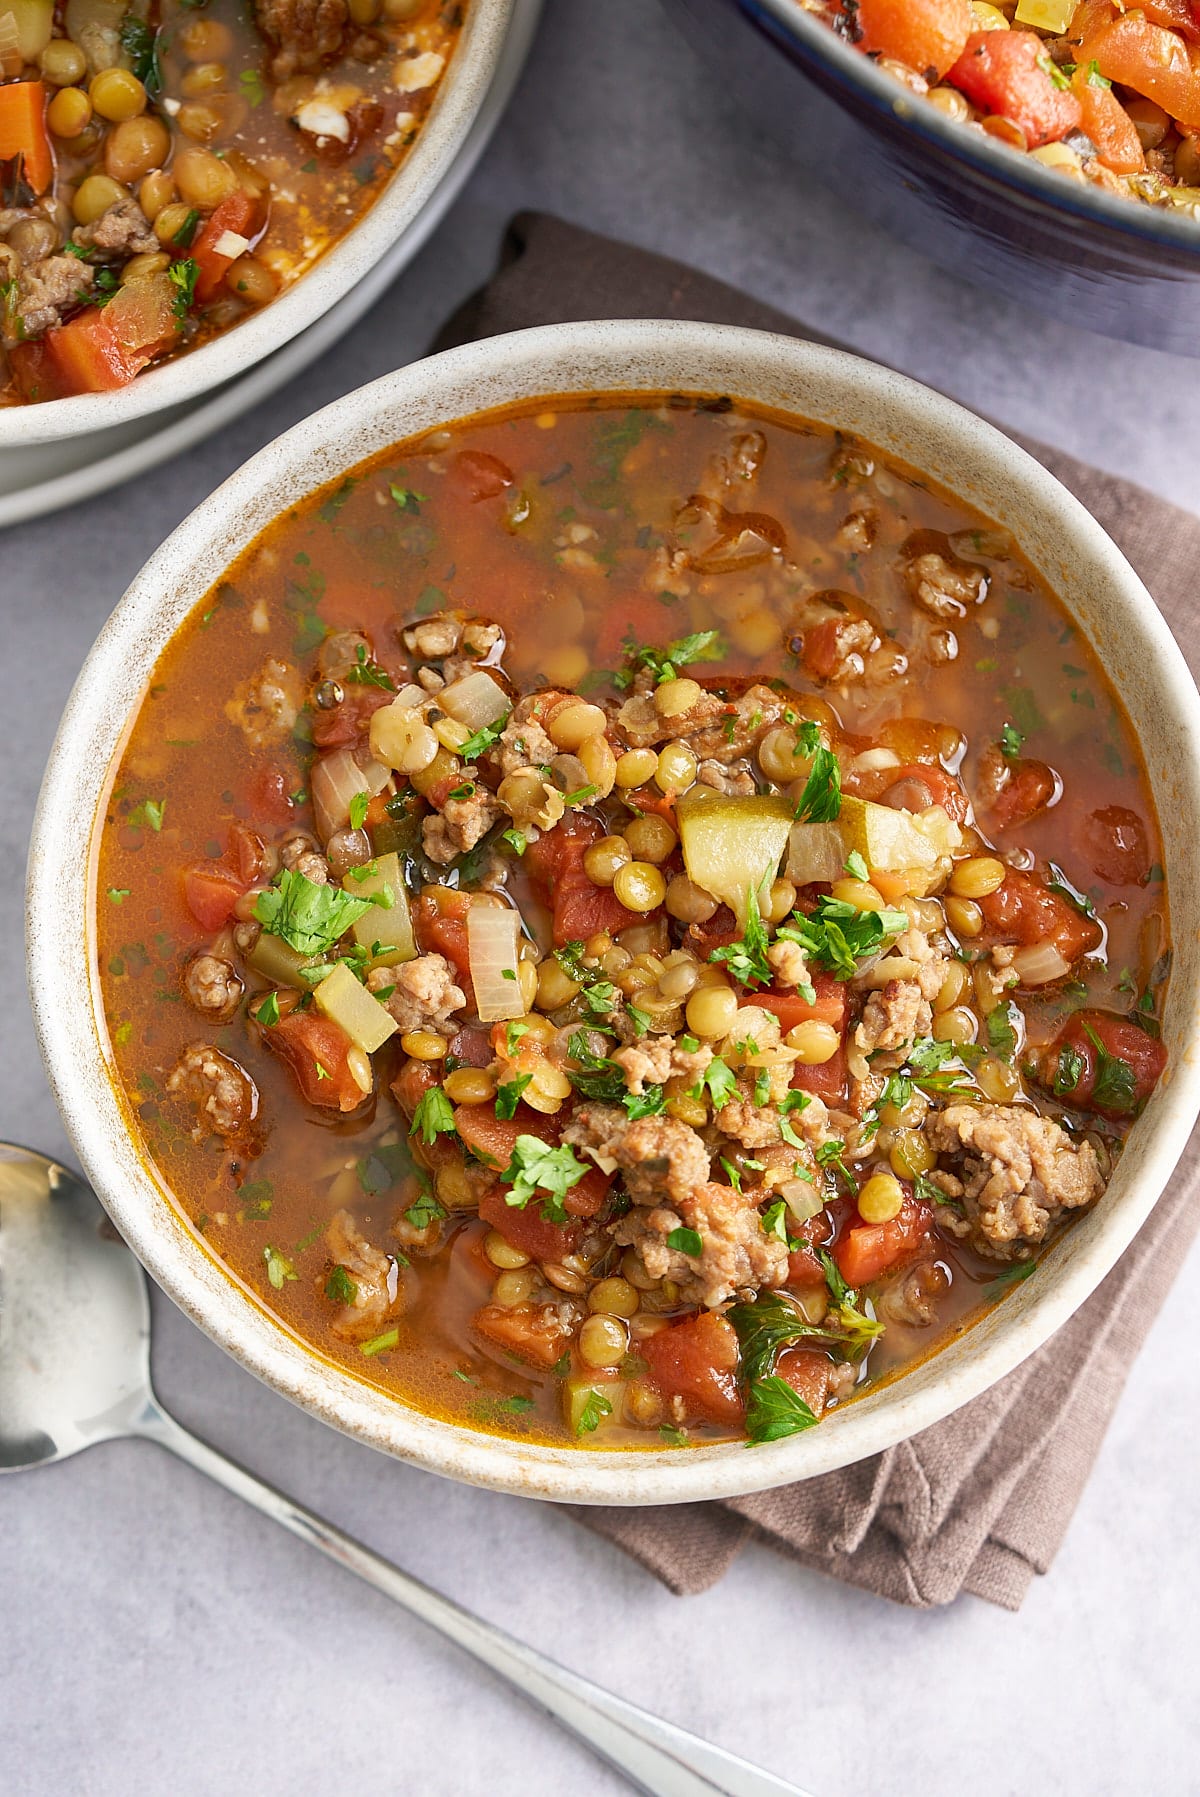
This Sausage lentil soup is hearty and nutritious. With the star ingredient of Italian sausage, it is packed full of flavor and complements the sweet vegetables and rich earthy lentils. Serve with a side of crusty bread and you have a filling and delicious meal.
This post contains affiliate links, please read my full disclaimer here.
You’ll find the full recipe with ingredient amounts and instructions in the recipe card at the bottom of this post. Be sure to check out the blog post itself for extra tips and tricks!
I learned long ago that Italian sausage is amazing. I'll add it to pasta recipes, like this Instant Pot Ravioli. But this Sausage Lentil Soup is another recipe where the flavor shines through.
This is one of the most flavorful soup recipes you will ever have. Similar to Carrabba's version, this sausage lentil soup recipe is easy, and preparation time is minimal. Just sauté the sausage and a few veggies then add the remaining ingredients and let the soup bubble away gently on the stove.
I also like to enjoy leftover lentil soup the next day. Heat this soup and pack it in a thermos for a quick and easy lunch on the go.
If your family enjoys hearty and filling soups, try my Collard Green Soup, Oxtail Soup, Lentil Spinach Soup, Moroccan Spiced Soup, Jamaican Jerk Chicken Soup, or my Split Pea Soup with Ham.
Here's what you will need to make this easy sausage lentil soup recipe:
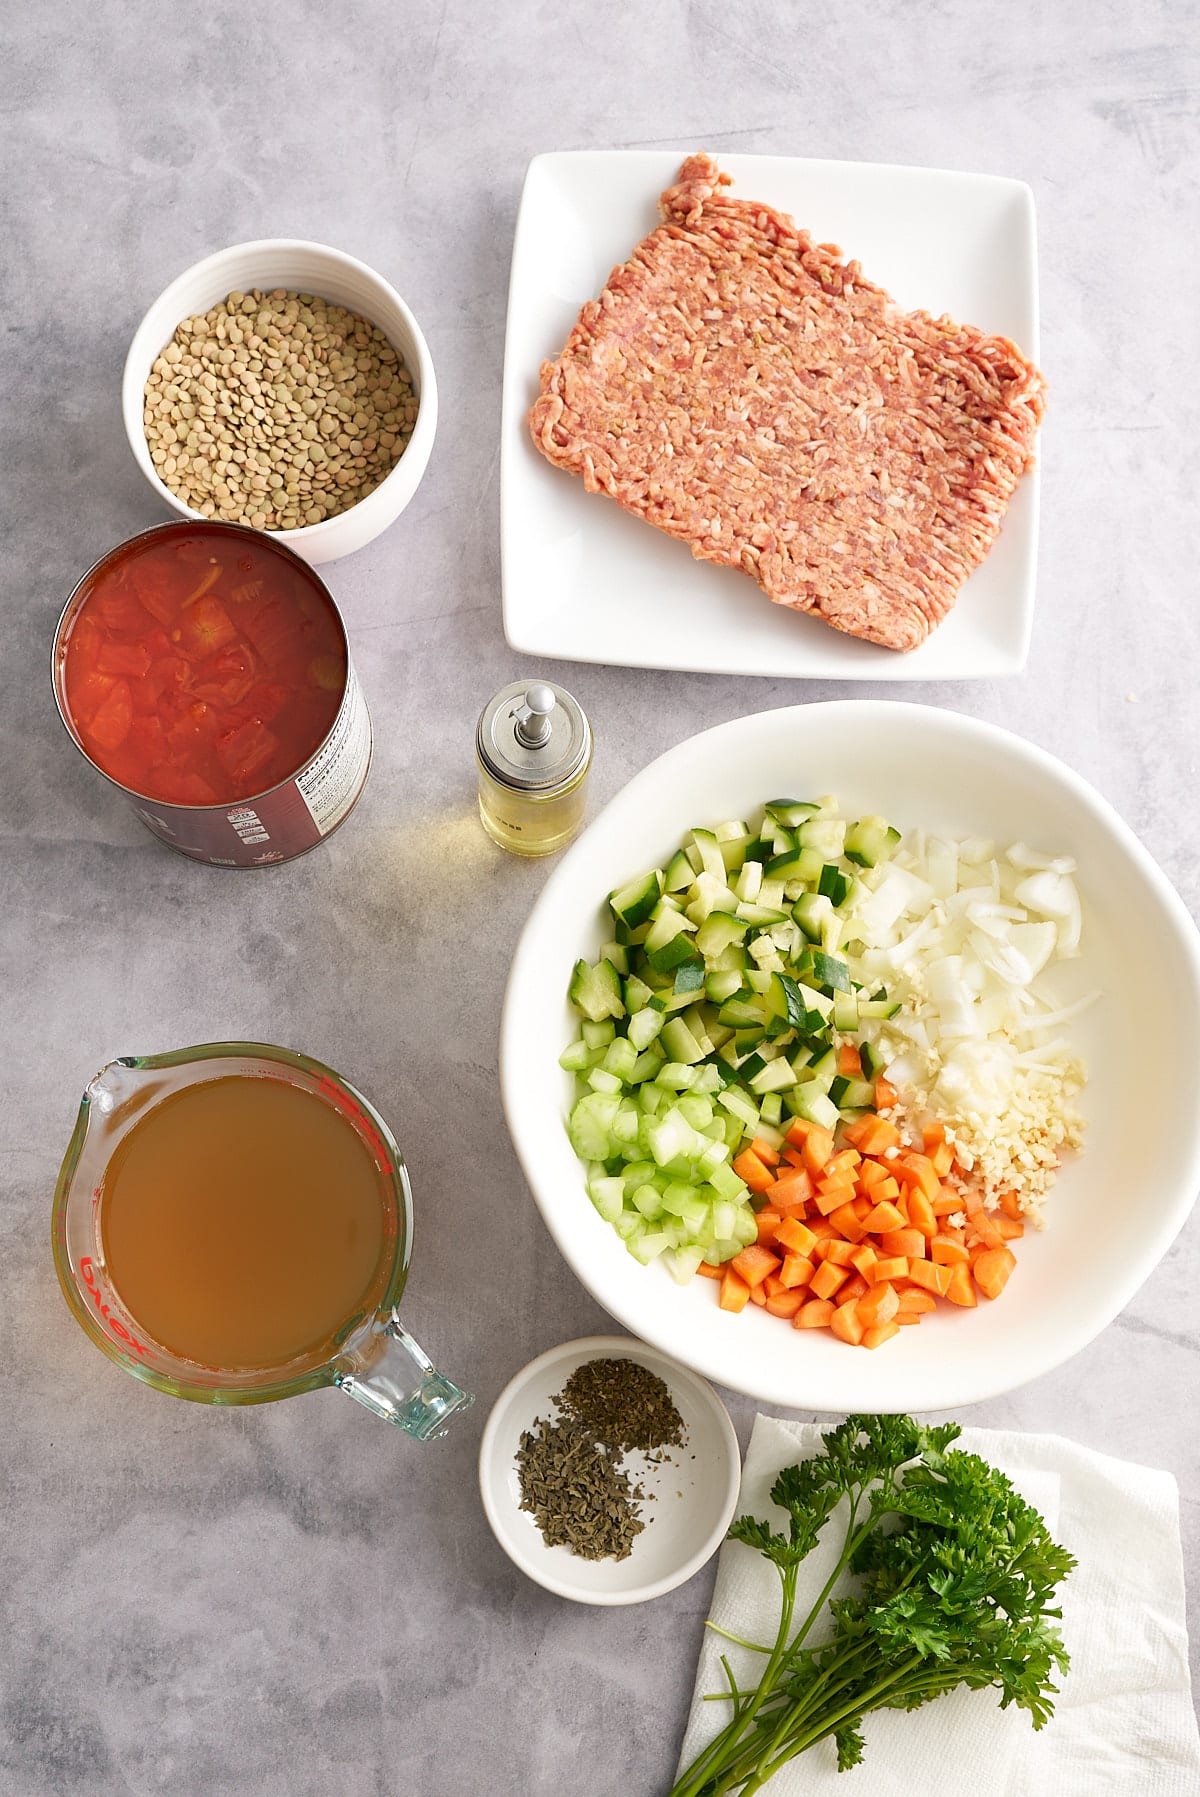
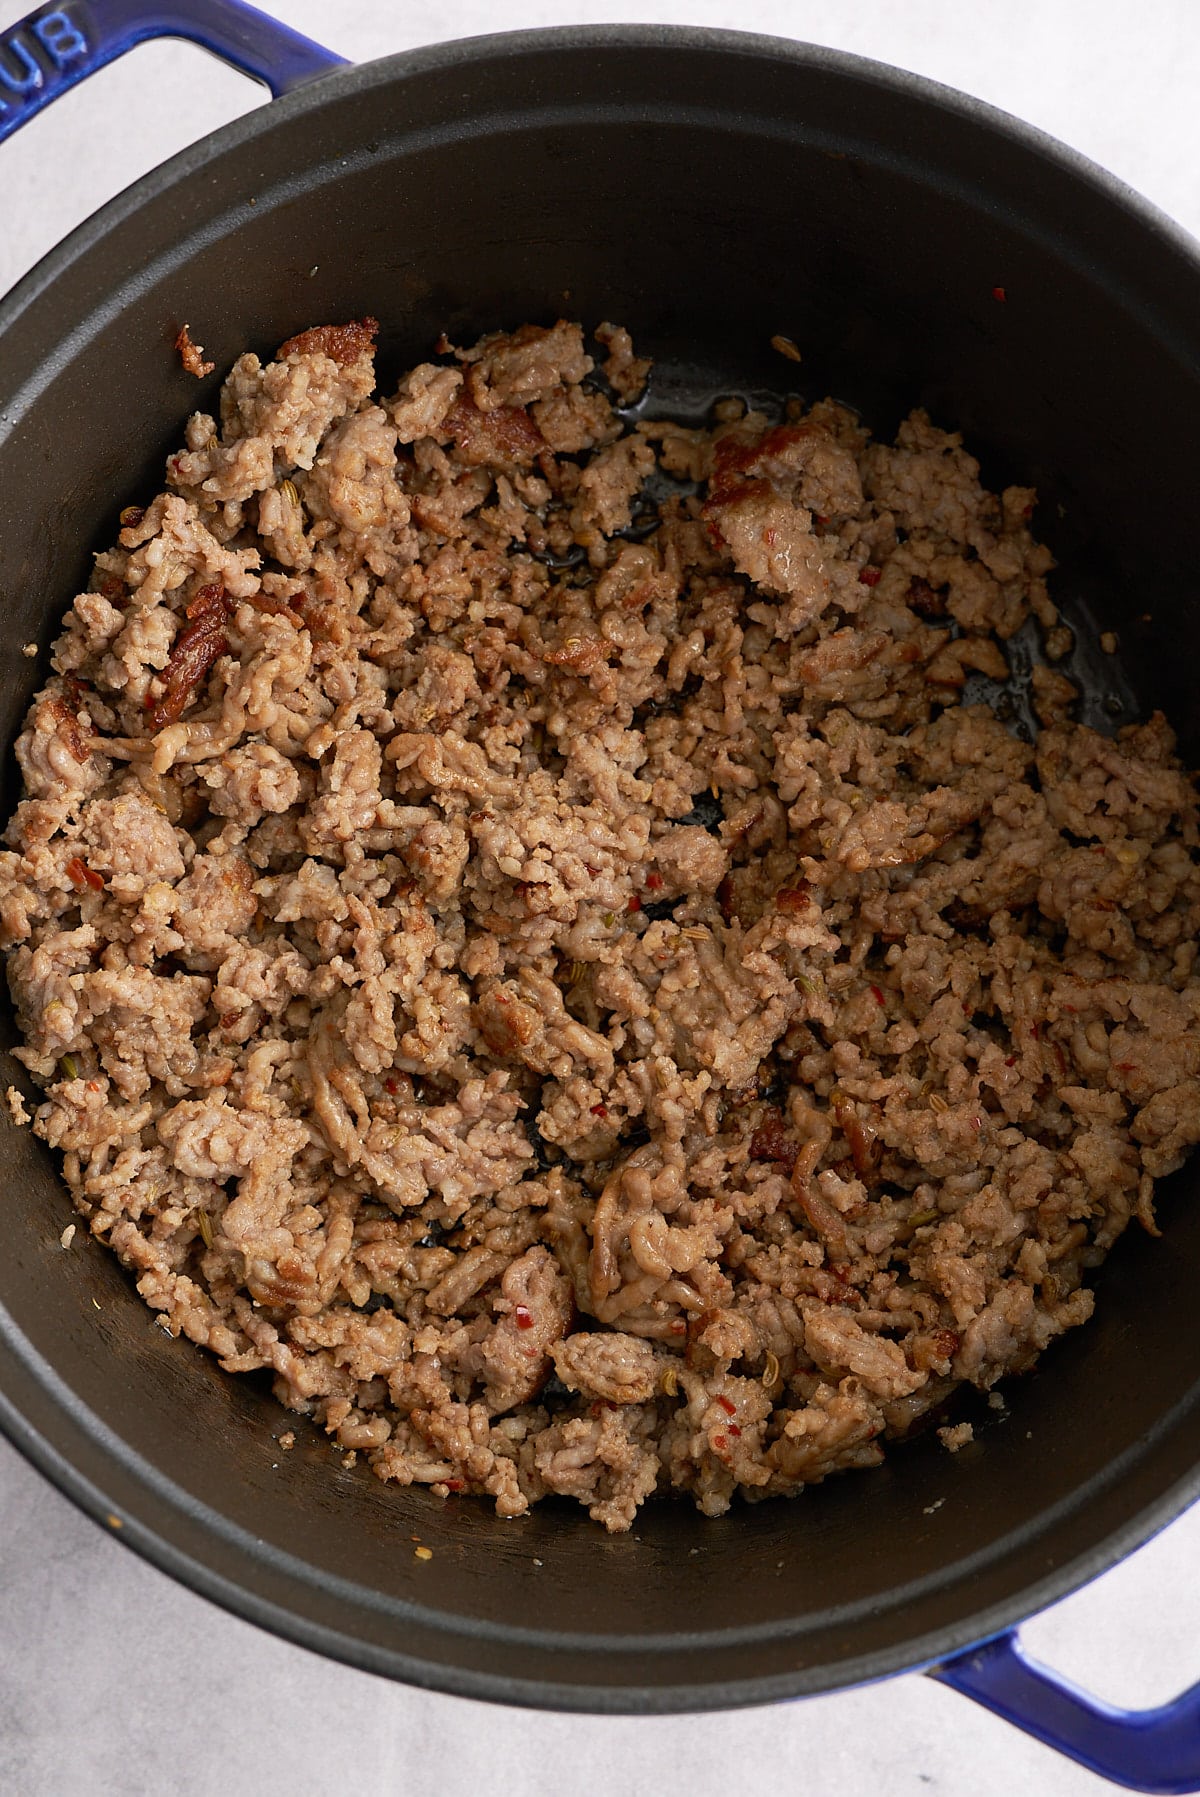
Heat oil over medium-high heat in a large soup pot or Dutch oven. Add the Italian sausage and cook until it's browned, breaking up the meat as it cooks.
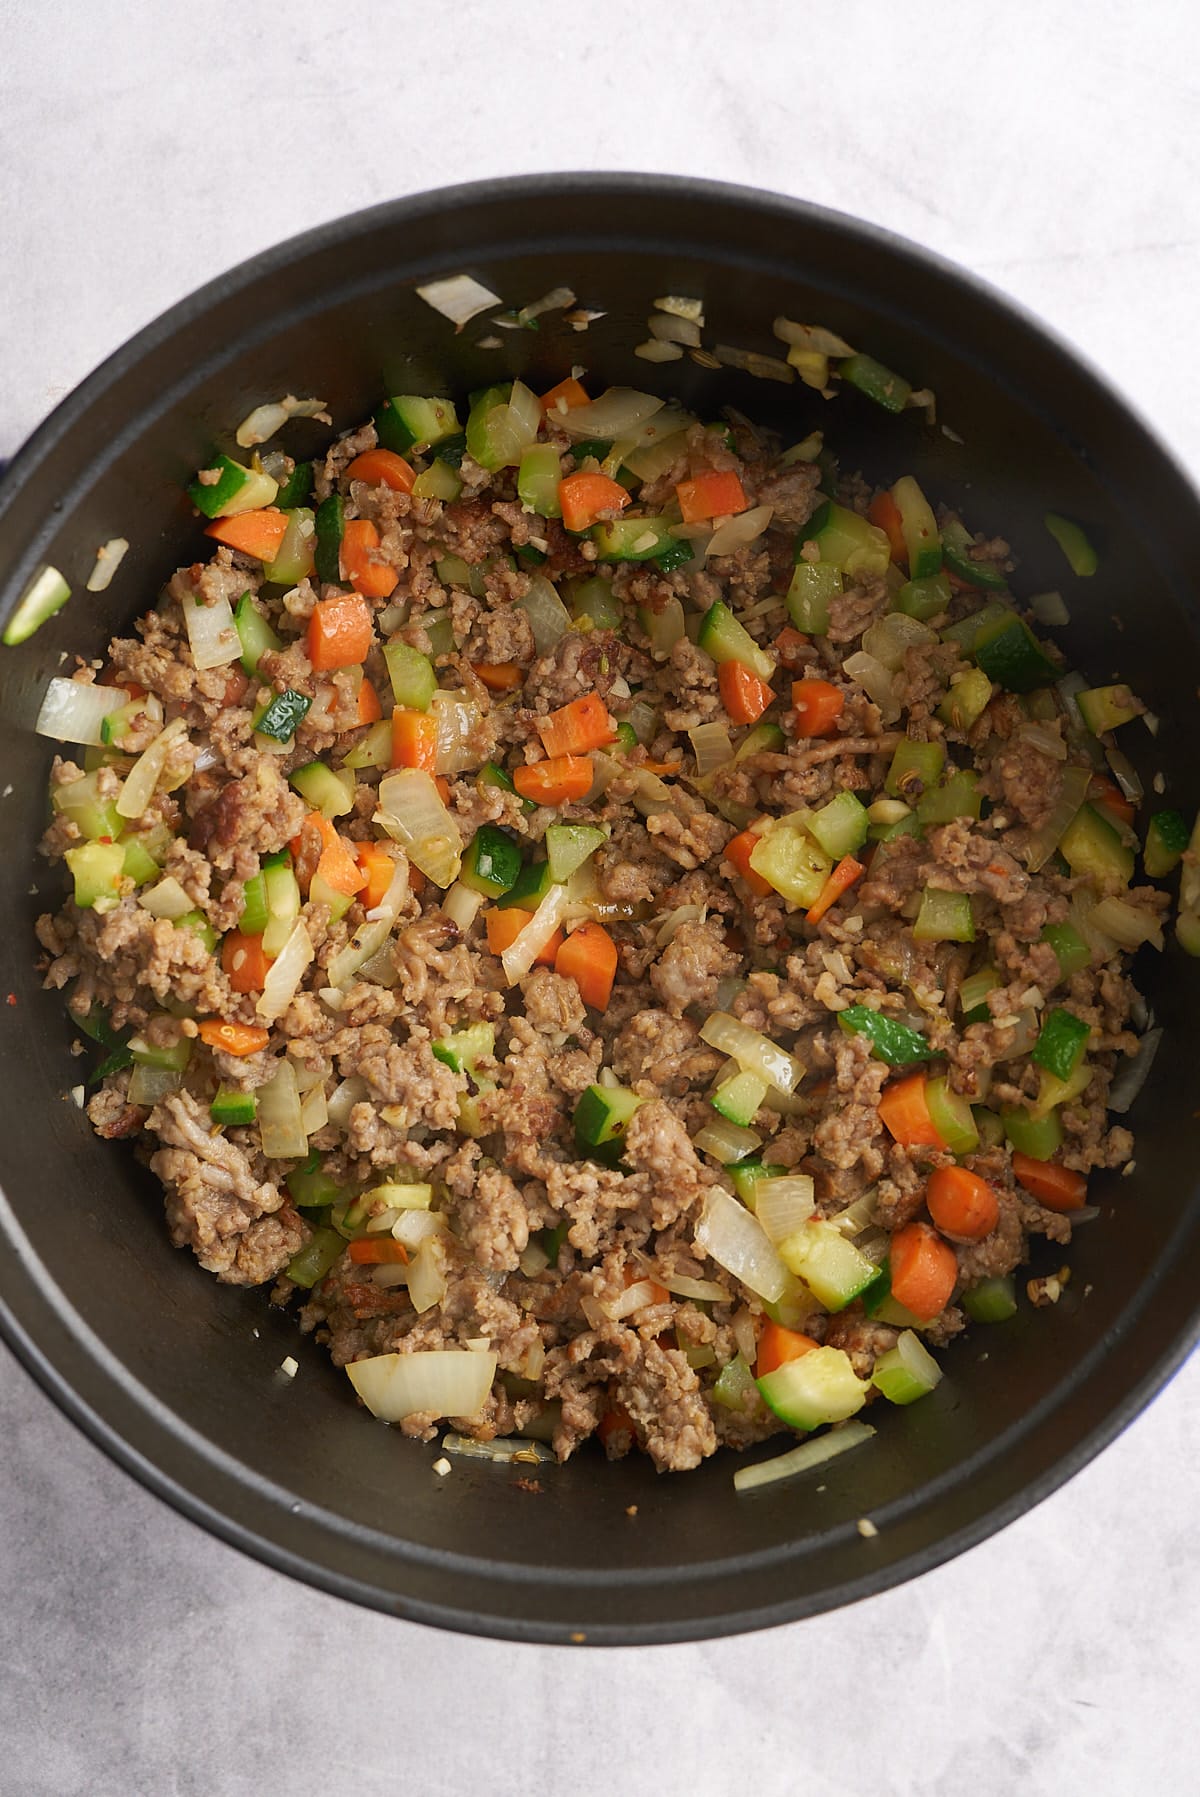
Add the yellow onion, celery, carrot, zucchini, and minced garlic to the pot. Stir and cook for about 3-5 minutes until the vegetables soften.
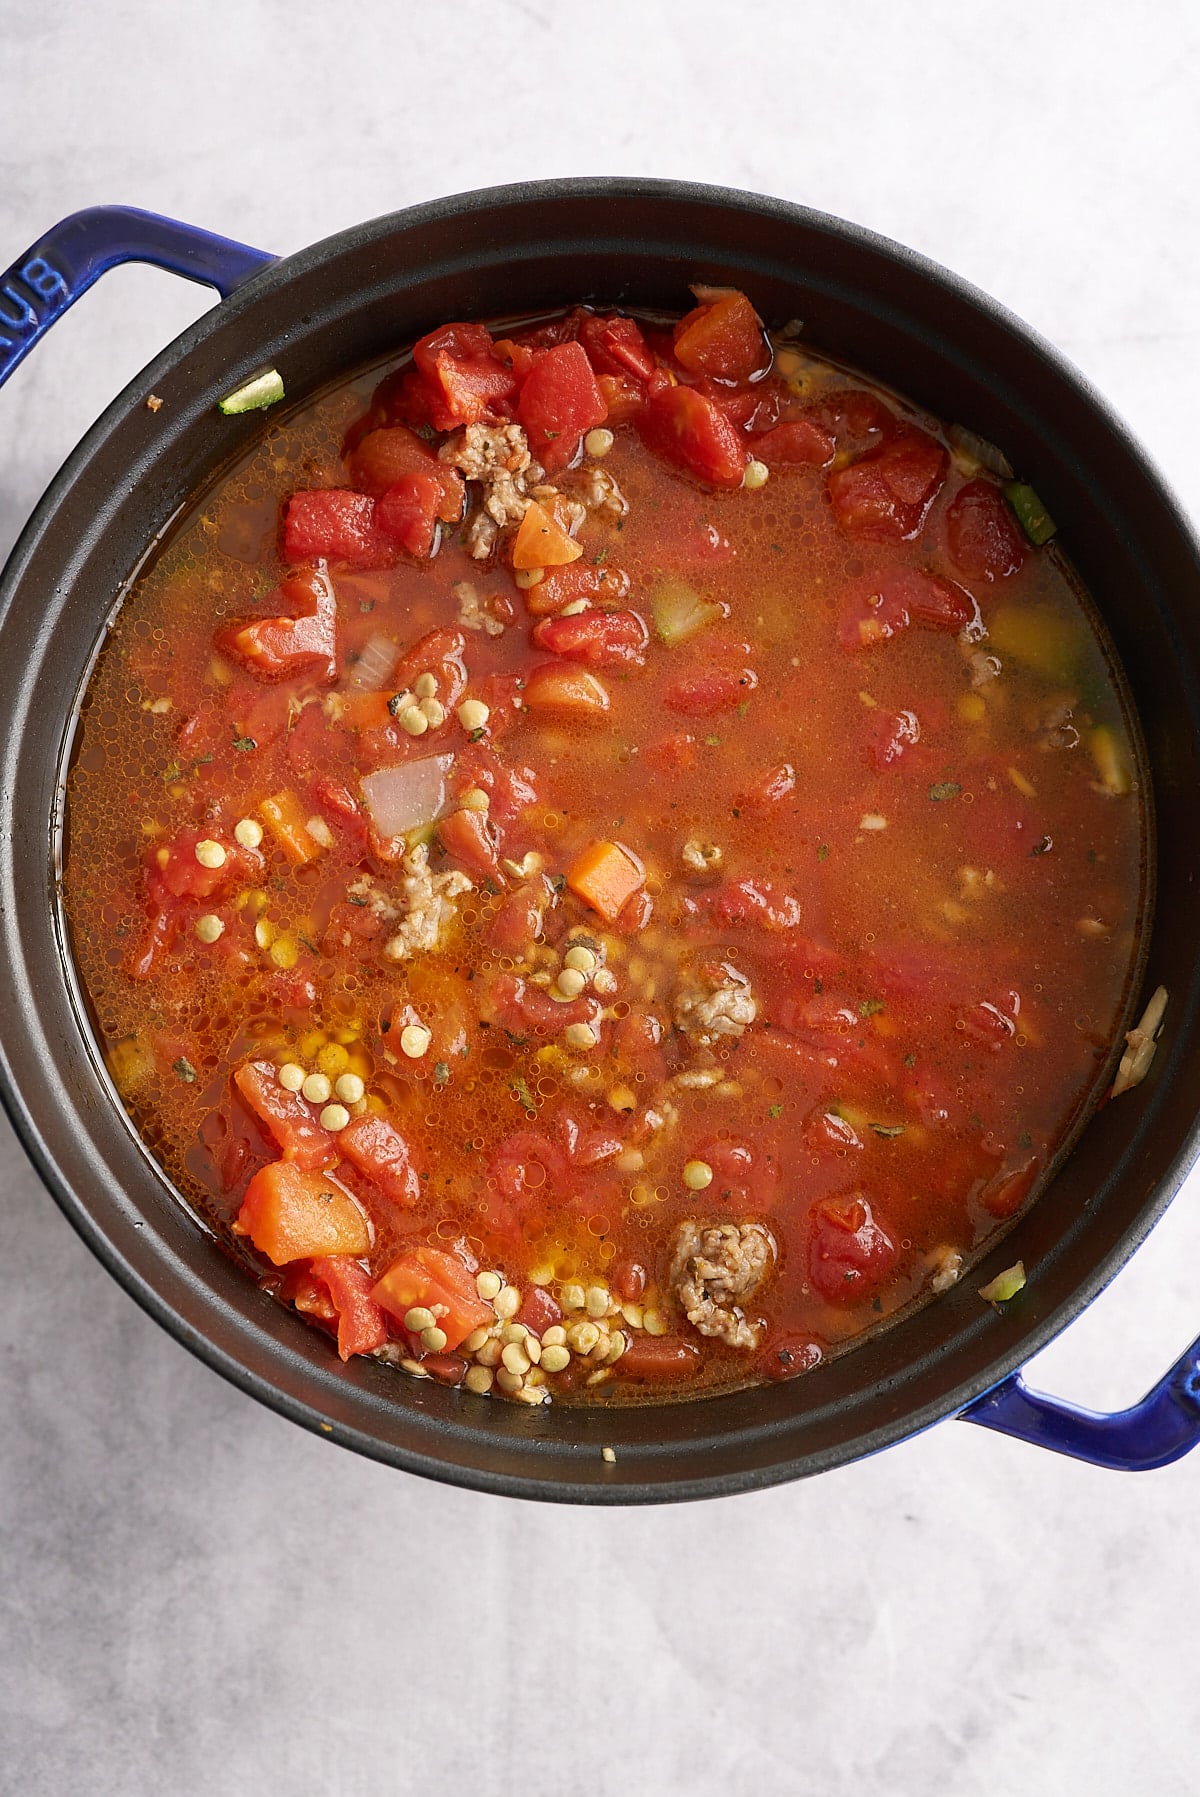
Pour in the chicken broth, add the lentils, dried basil, dried oregano, and diced tomatoes. Stir everything together to combine all the ingredients.
Cover the pot and let the soup simmer over medium-low heat for about 35-45 minutes, or until the lentils are tender, stirring occasionally.
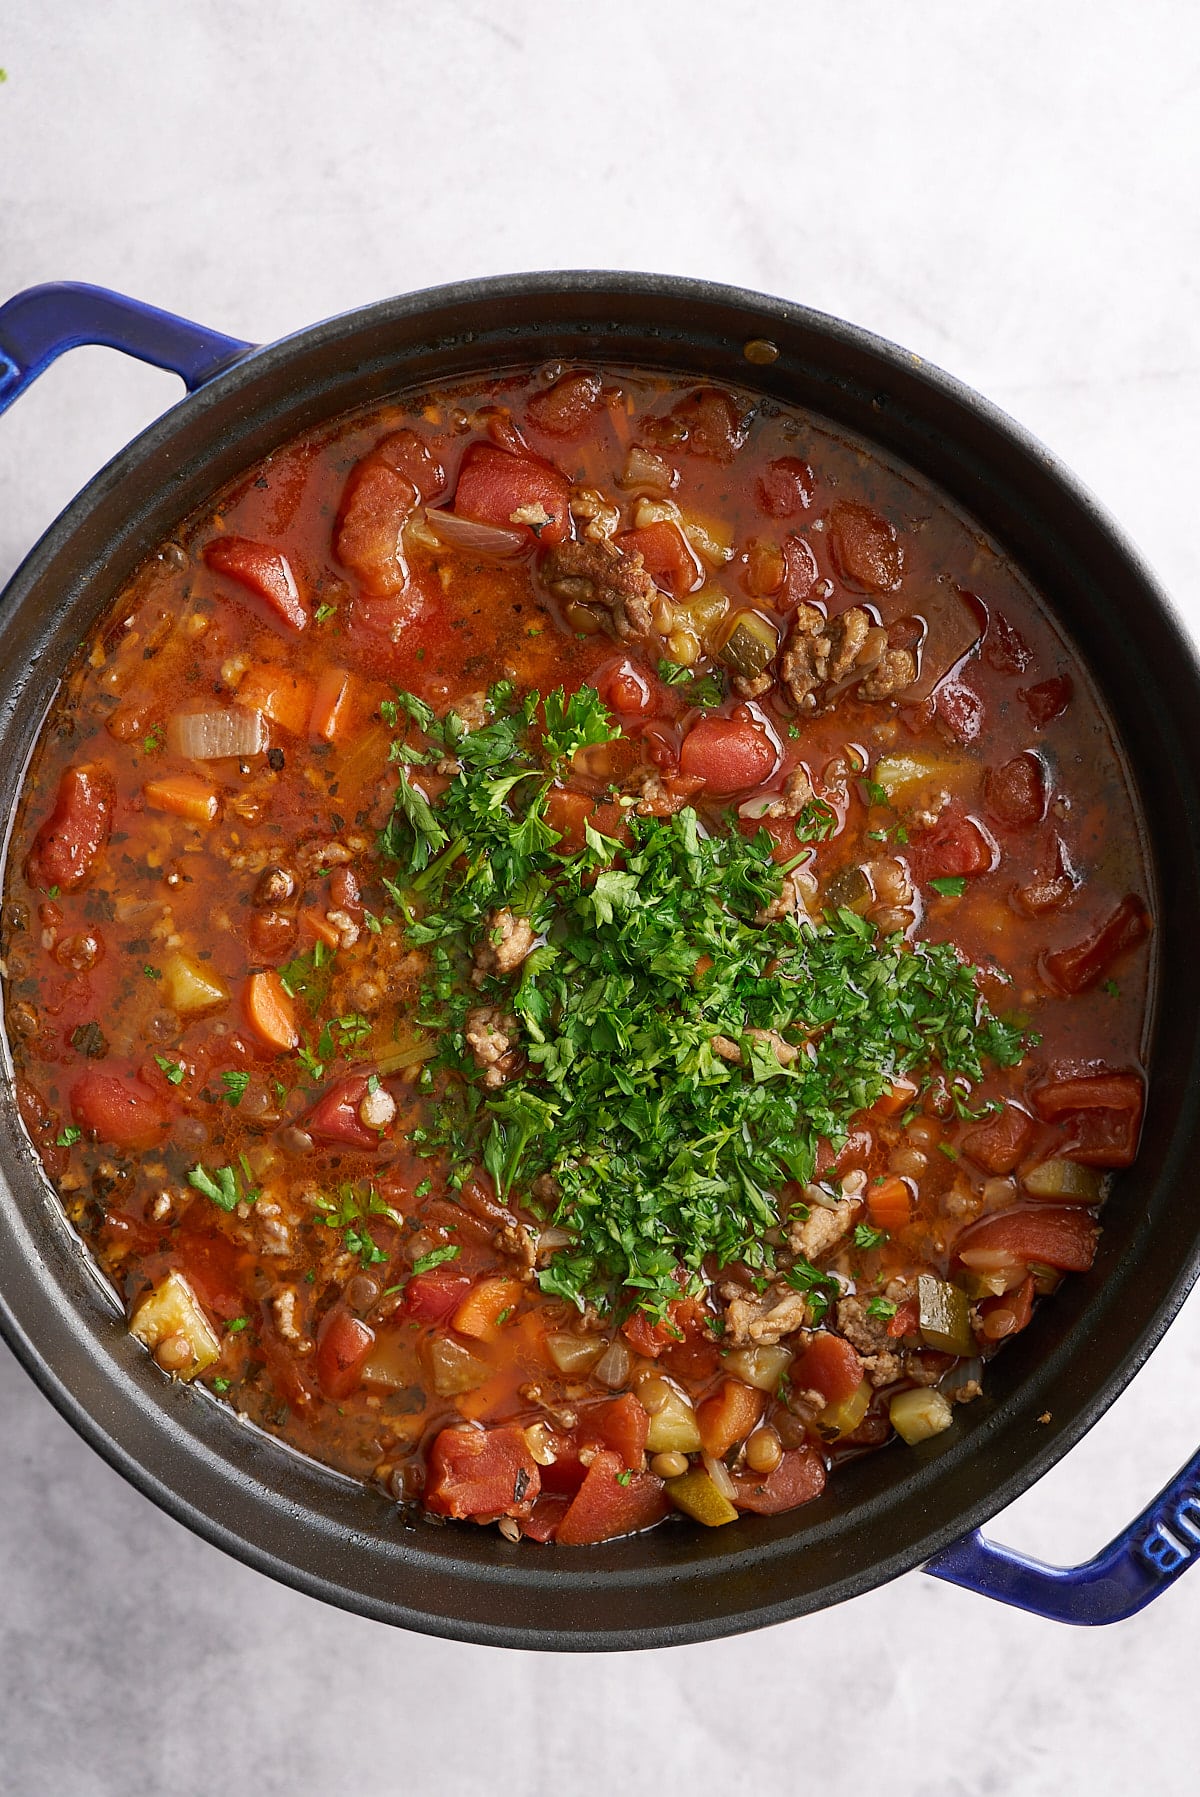
Once the lentils are tender, add the fresh parsley and stir. Season the soup with salt and pepper to taste.
Serve the soup while it’s hot, and you can top each serving with a dollop of sour cream or a sprinkle of Parmesan cheese if desired. Enjoy!
These tips will help you make the best sausage lentil soup you've ever tried.
I like to serve the soup with a swirl of sour cream and some shredded Parmesan cheese on top. As this is a hearty and filling bowl of soup I keep any additional side dishes simple. Serve with some crusty bread, or try my Classic Southern Cornbread Recipe, or these Easy Cornbread Muffins
To refrigerate: Leftovers can be stored in an airtight container in the refrigerator for up to 5 days. When ready to enjoy, reheat the soup on the stove-top until piping hot.
To freeze: Once cooked and cooled, place the soup into an airtight container and store it in the freezer for up to 3 months. Defrost in the refrigerator before reheating to piping hot.
Yes, lentils not only add great texture and bite to a soup, but they are high in fiber and protein which keeps you fuller for longer, are naturally rich in minerals, and low in fat.
I like to use brown or green lentils in my Italian sausage lentil soup as they keep their shape well and don't break down as much as a split red lentil, or yellow split peas.
No, you don't need to soak lentils. Just add them to the soup and they will soften as the soup cooks.
If you have tried this Sausage Lentil Soup recipe, or any other recipe on my blog, then please rate it and let me know how it turned out in the comments below!
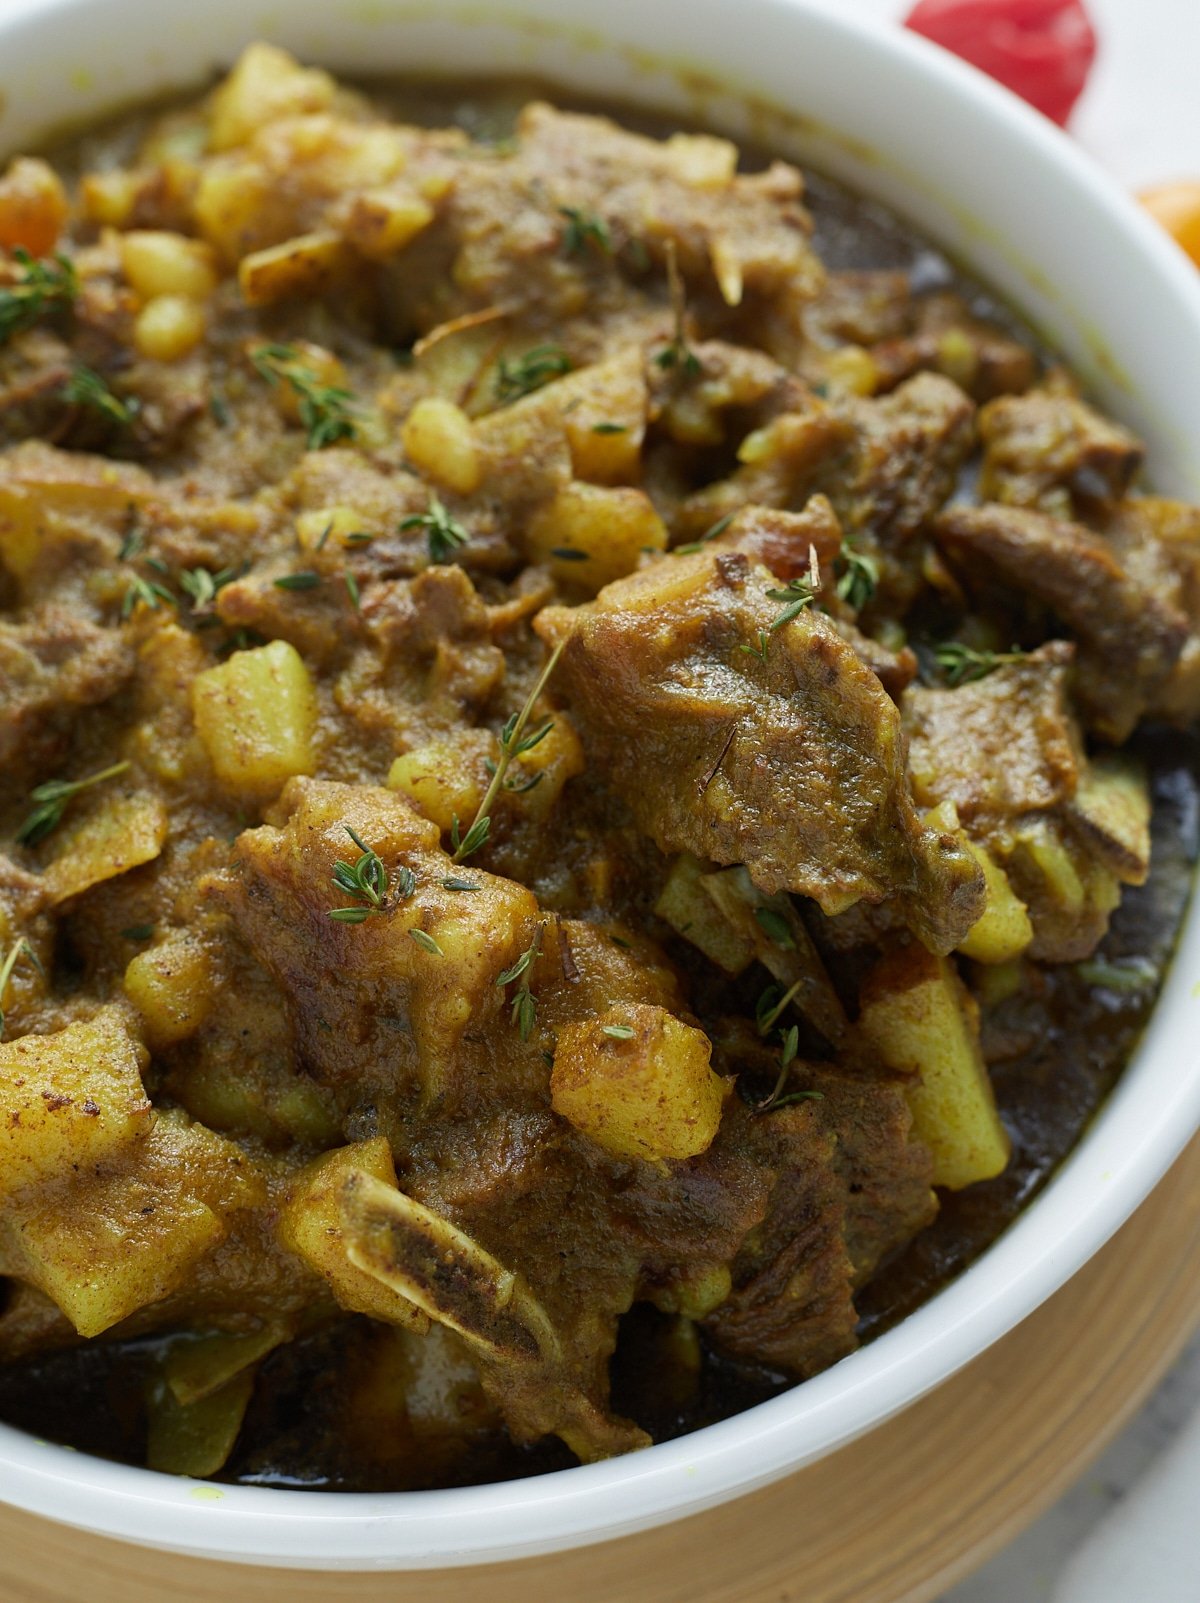
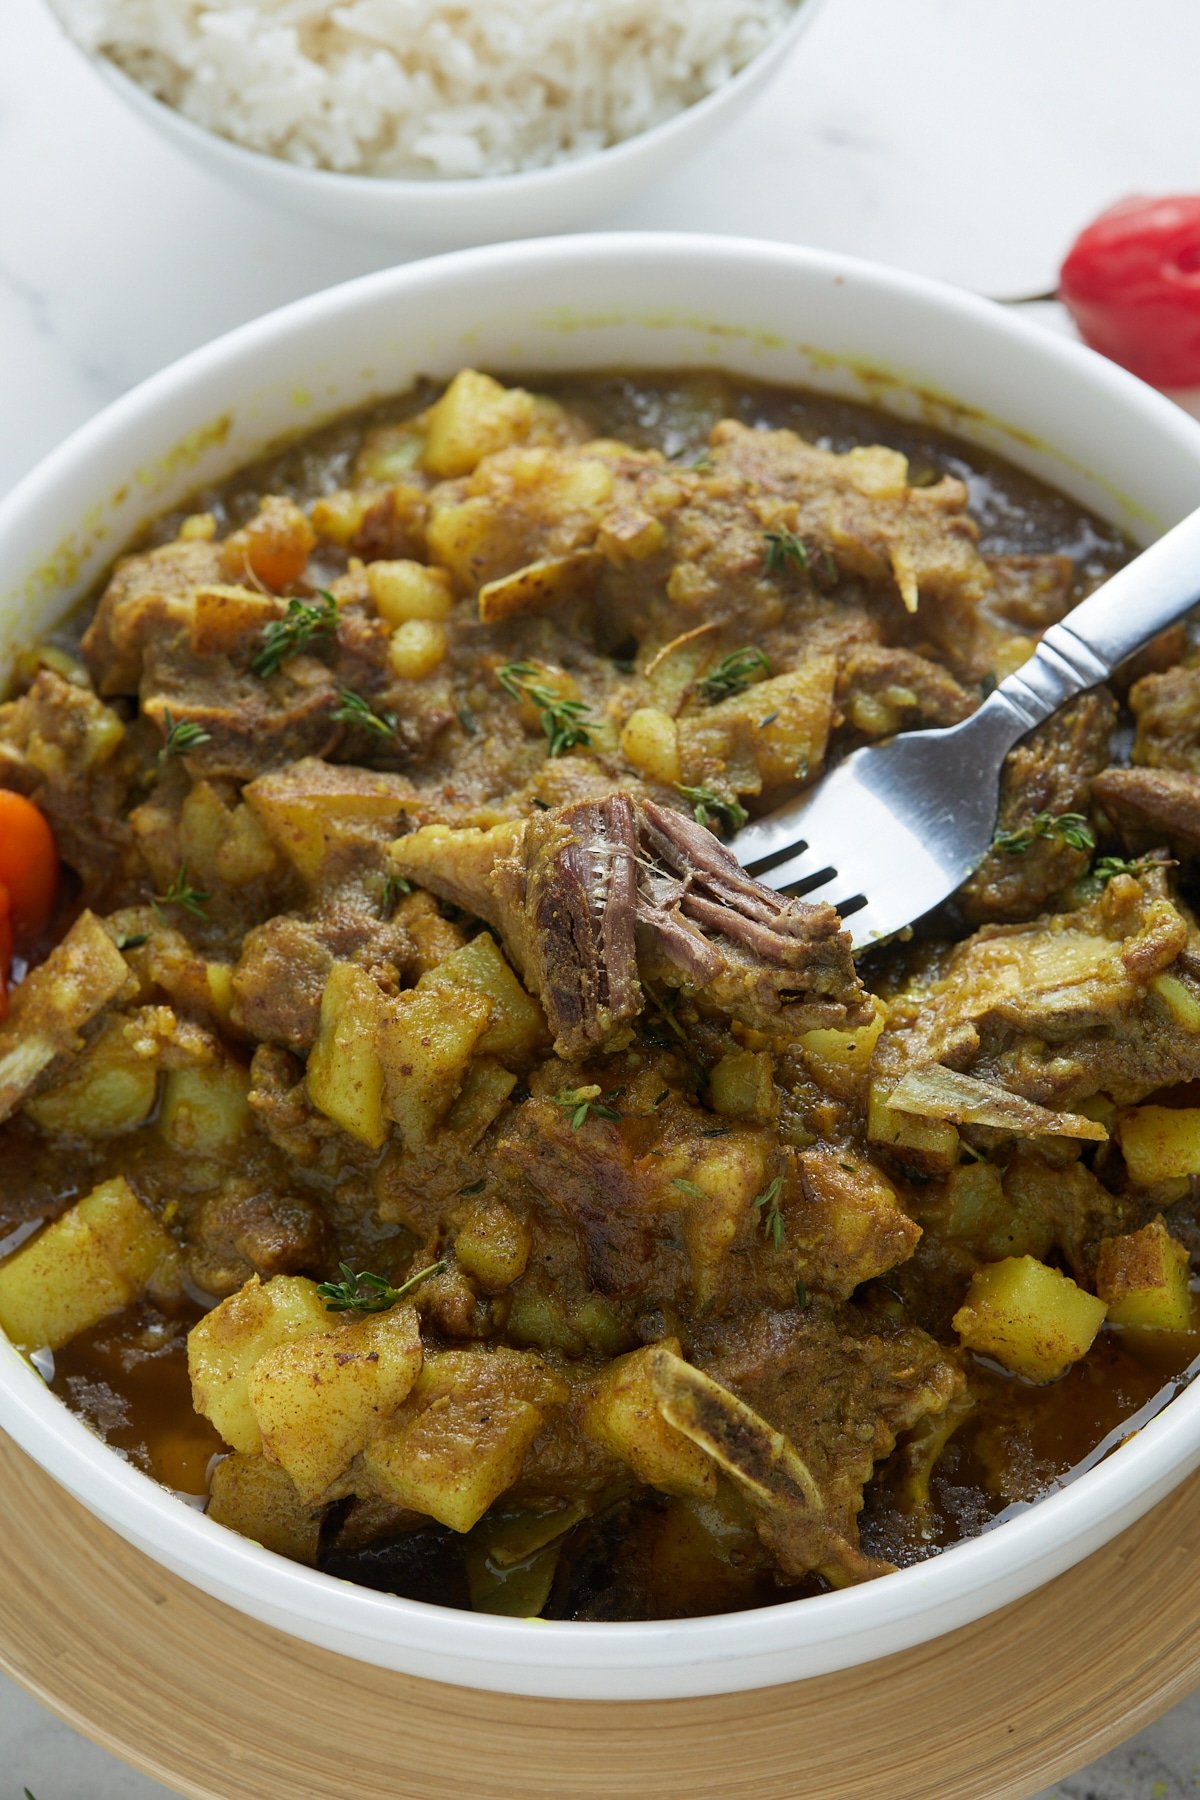
This Jamaican Curry Goat recipe is a flavorful, succulent dish made with Jamaican curry, goat pieces, and other spices. It’s a traditional Jamaican dish that you and your family will love.

You’ll find the full recipe with ingredient amounts and instructions in the recipe card at the bottom of this post. Be sure to check out the blog post itself for extra tips and tricks!

I’ve shared many Jamaican recipes here on the site, and it’s about time I shared how I make one of my favorite Jamaican dishes, curry goat. Curry goat was one of the must-have items on my wedding menu (that and mannish wata a.k.a goat head soup).
When made right, curry goat should be flavorful, the goat should be fork-tender, and it should make you feel warm all over. I use the electric pressure cooker to make my curry goat, but the stovetop works fine too.
Although goat meat isn't too popular where I live, it should be, as it's a great alternative to beef, chicken, and pork. I’m thrilled to share my method of making this Caribbean staple.
Love, Tanya
Ingredient amounts and full recipe instructions are on the printable recipe card at the bottom of the post.
Gather all your ingredients.
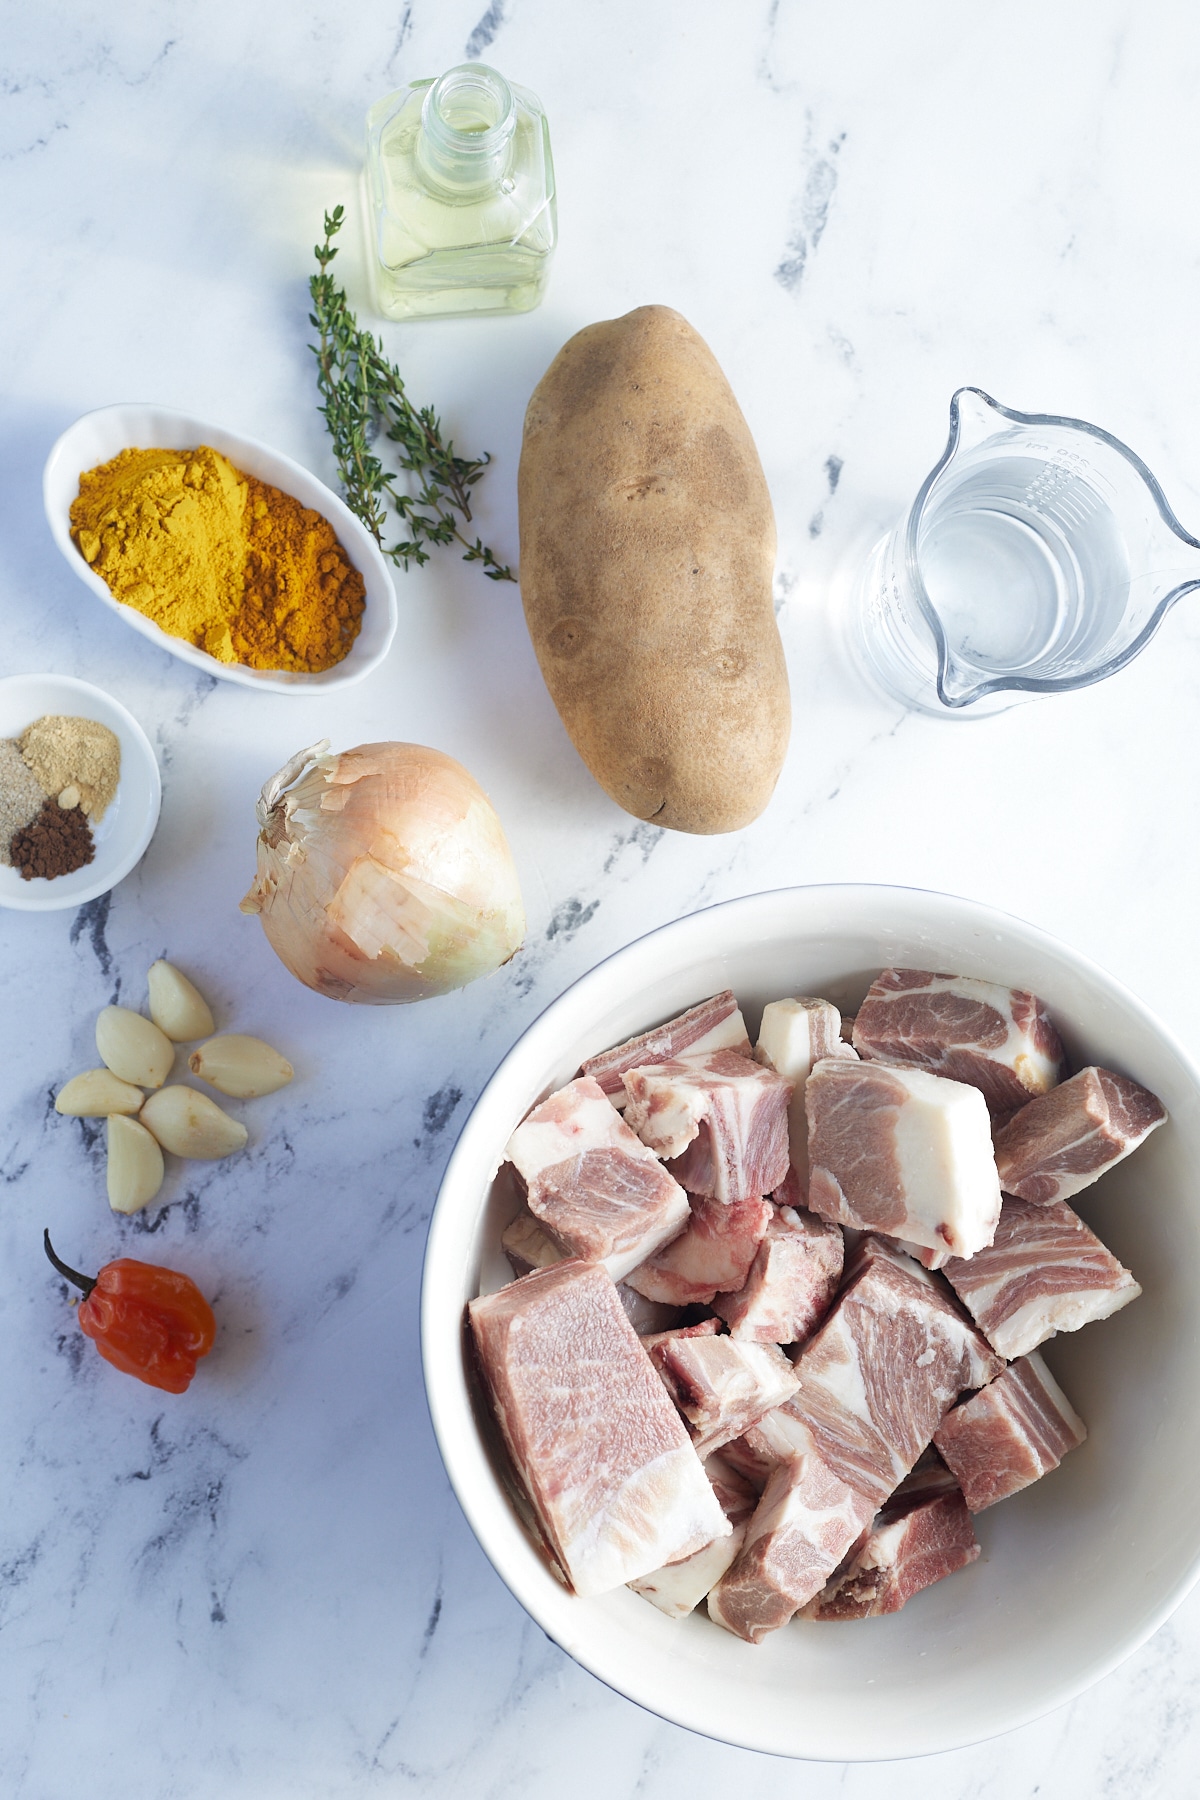
Rinse your goat pieces in water and vinegar, then pat them dry.
Season goat meat with 1 ½ tablespoon curry powder, all-purpose seasoning, ground ginger, allspice, onion, garlic cloves, and thyme. Marinate for at least 4 hours or up to overnight.
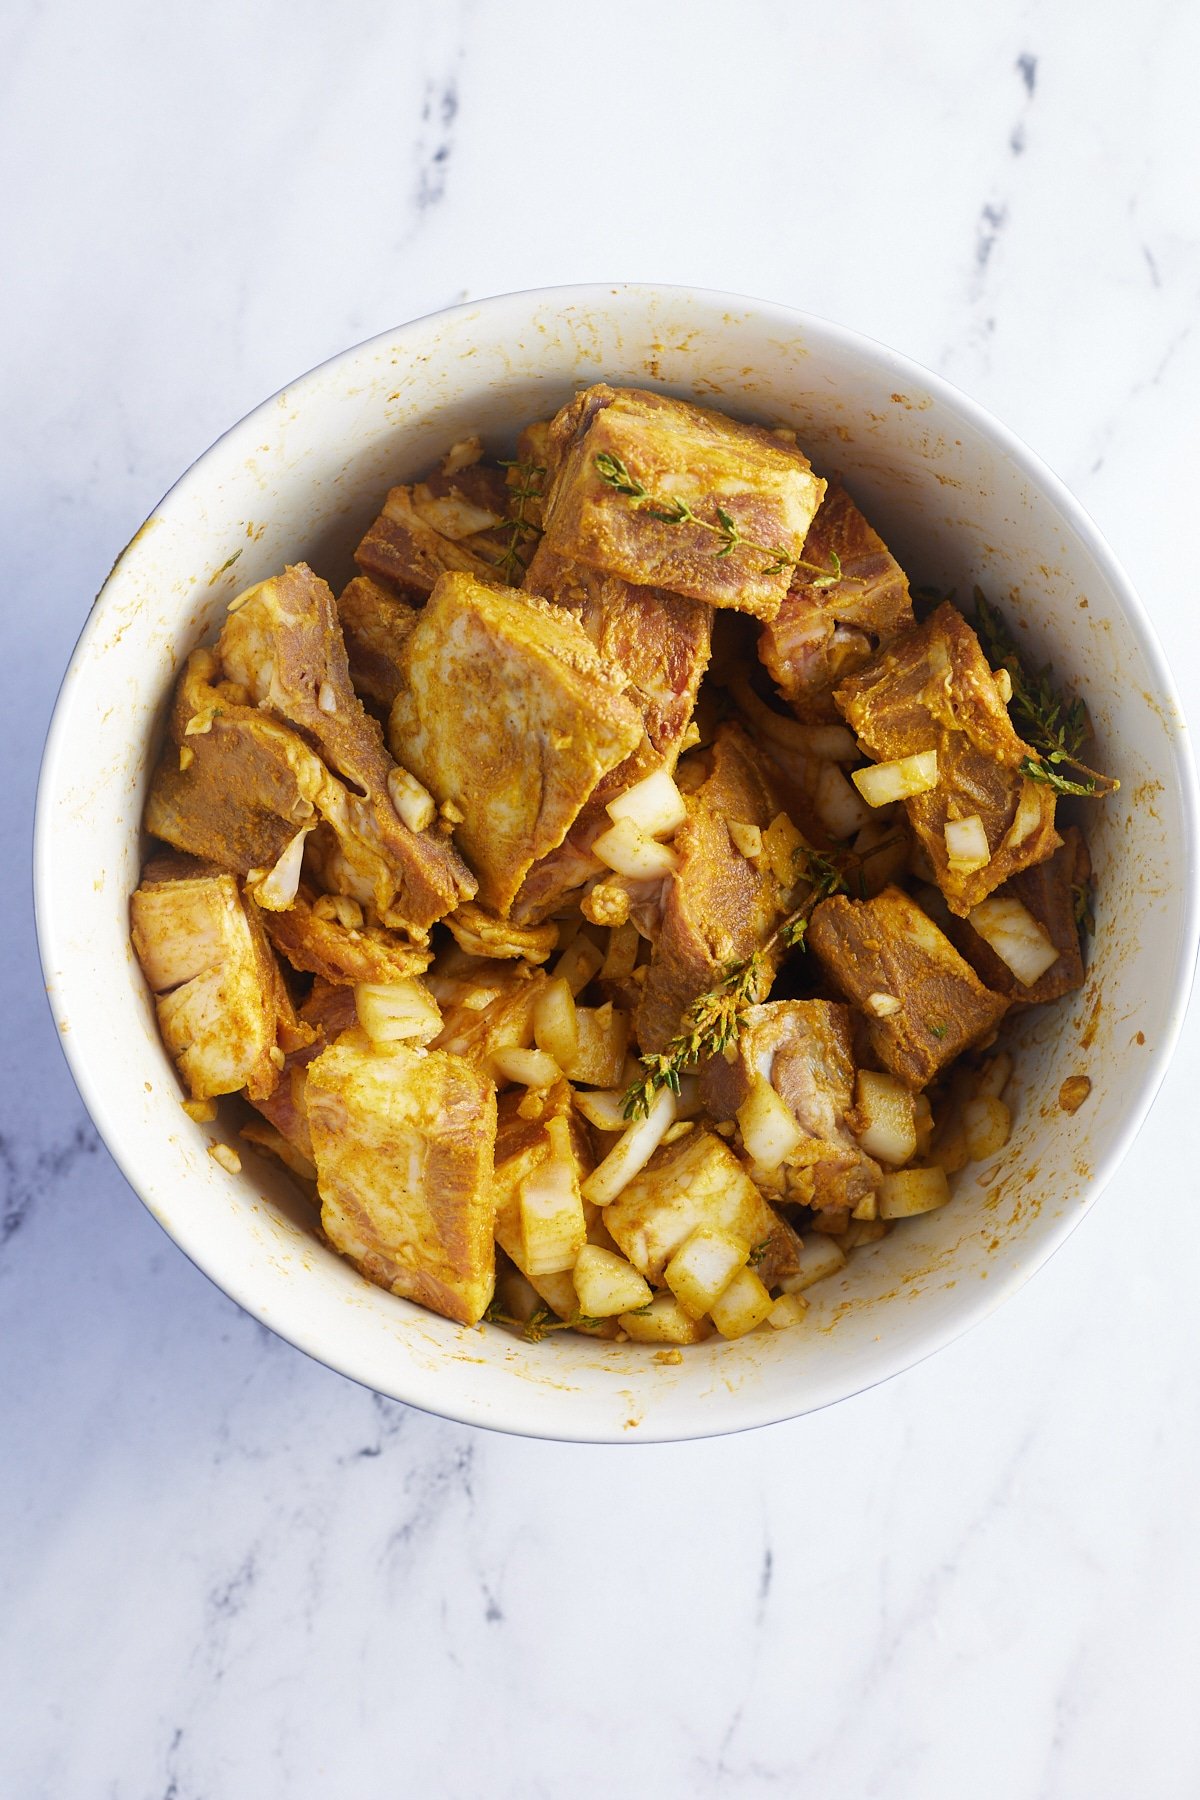
Remove the onion and garlic from the goat and set aside.

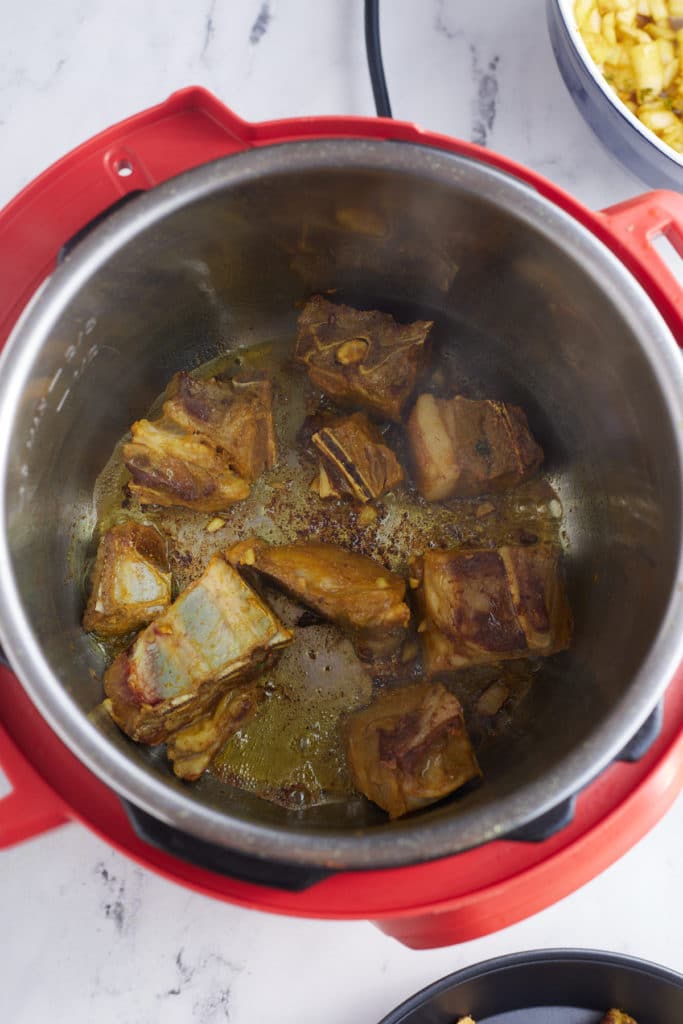
Set an electric pressure cooker, like an Instant Pot, on high sauté. Add oil. Add the goat meat and brown for about 2-3 minutes per side. I usually only brown ½ of the goat meat. This allows me to build flavor without spending too much time browning the meat.
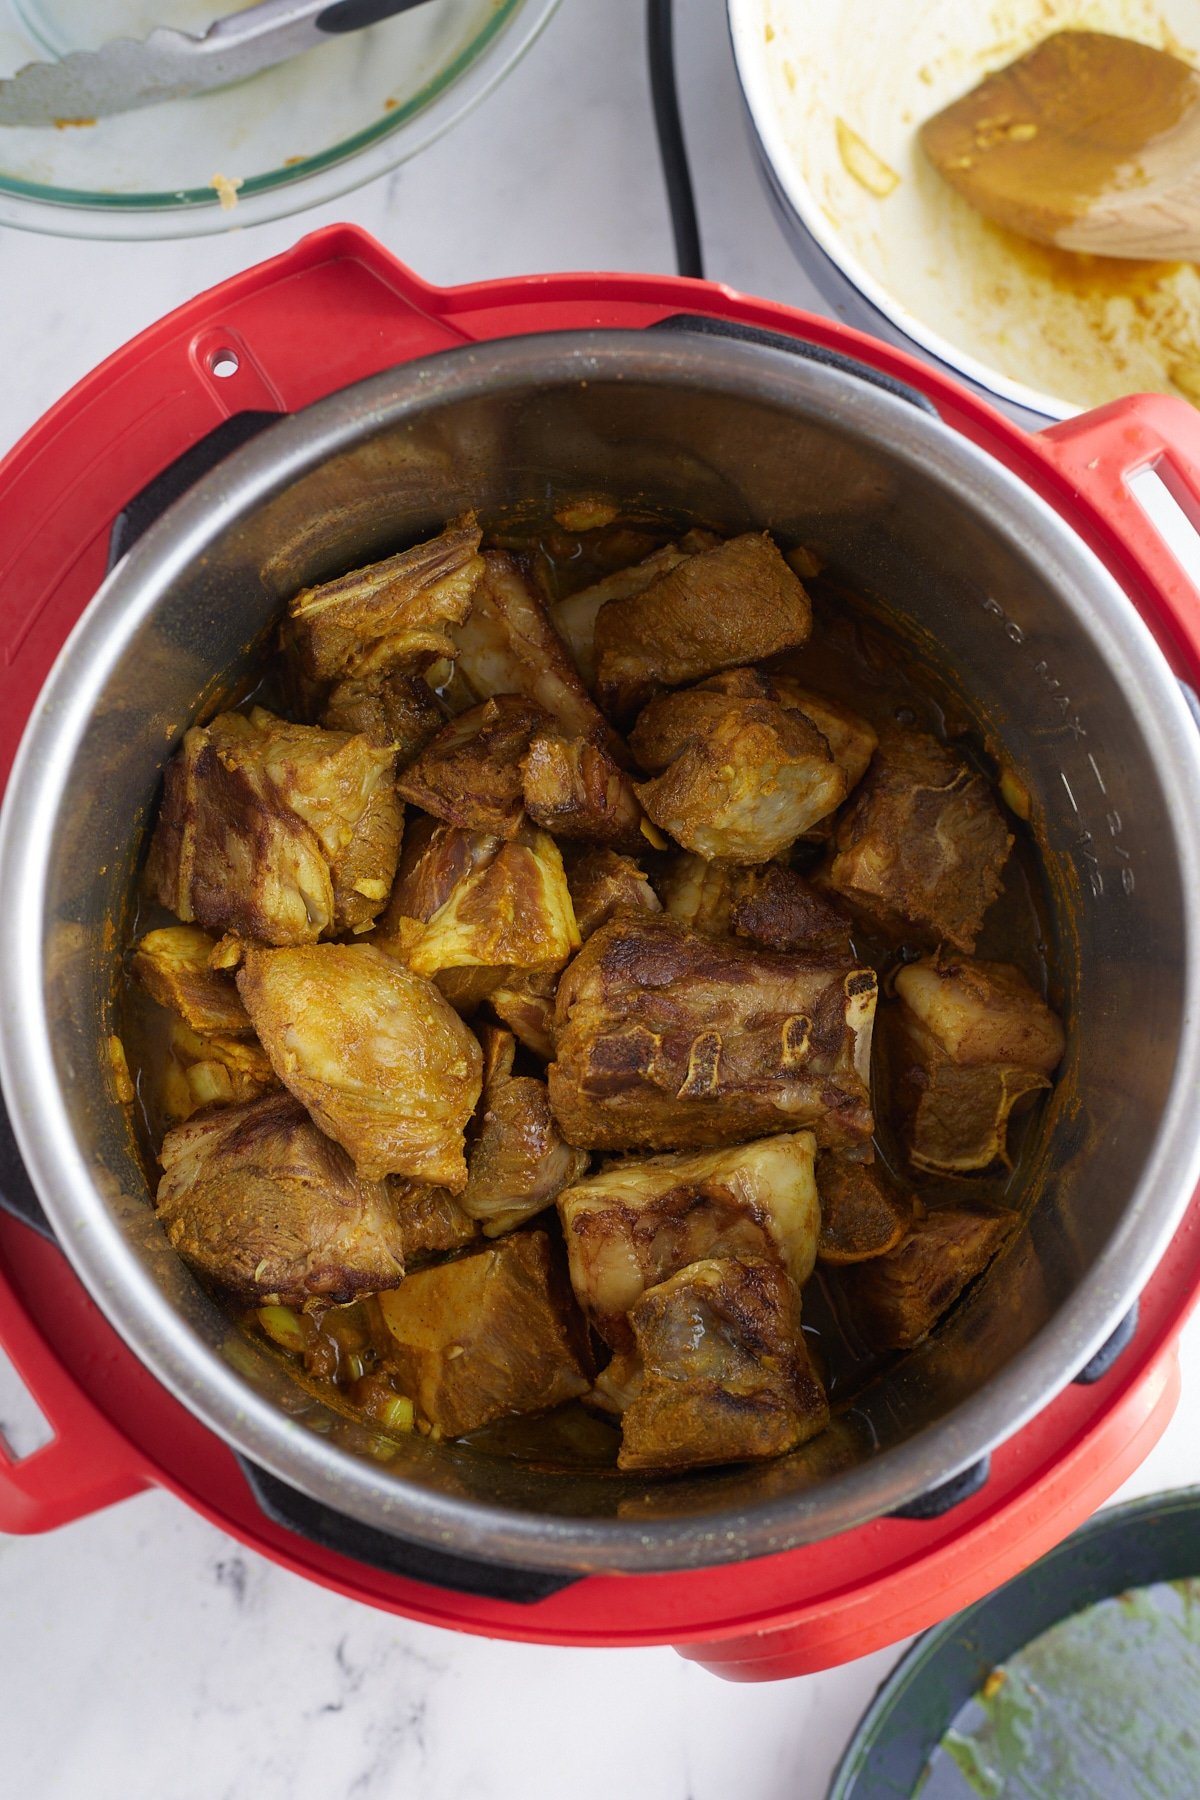
Remove the goat from the insert and add 1 tablespoon oil and the remaining curry powder, and sauté for about 10 seconds. Then add onions and garlic and sauté until softened, about 4 minutes. If the onions look dry, add a little water and continue to sauté.

Add the goat and water to the pressure cooker, then cover it. Cook for 40 minutes on high pressure. Please note that the water will not cover the goat before you pressure cook it.
Allow the pressure cooker to naturally release for 10 minutes, then release the remaining pressure.
Once all the pressure has been released, open the pressure cooker. Place in a sauté pan and cook for 10-15 minutes. Add the potatoes and a whole Scotch bonnet pepper. Cook until potatoes have softened. Remove scotch bonnet pepper.
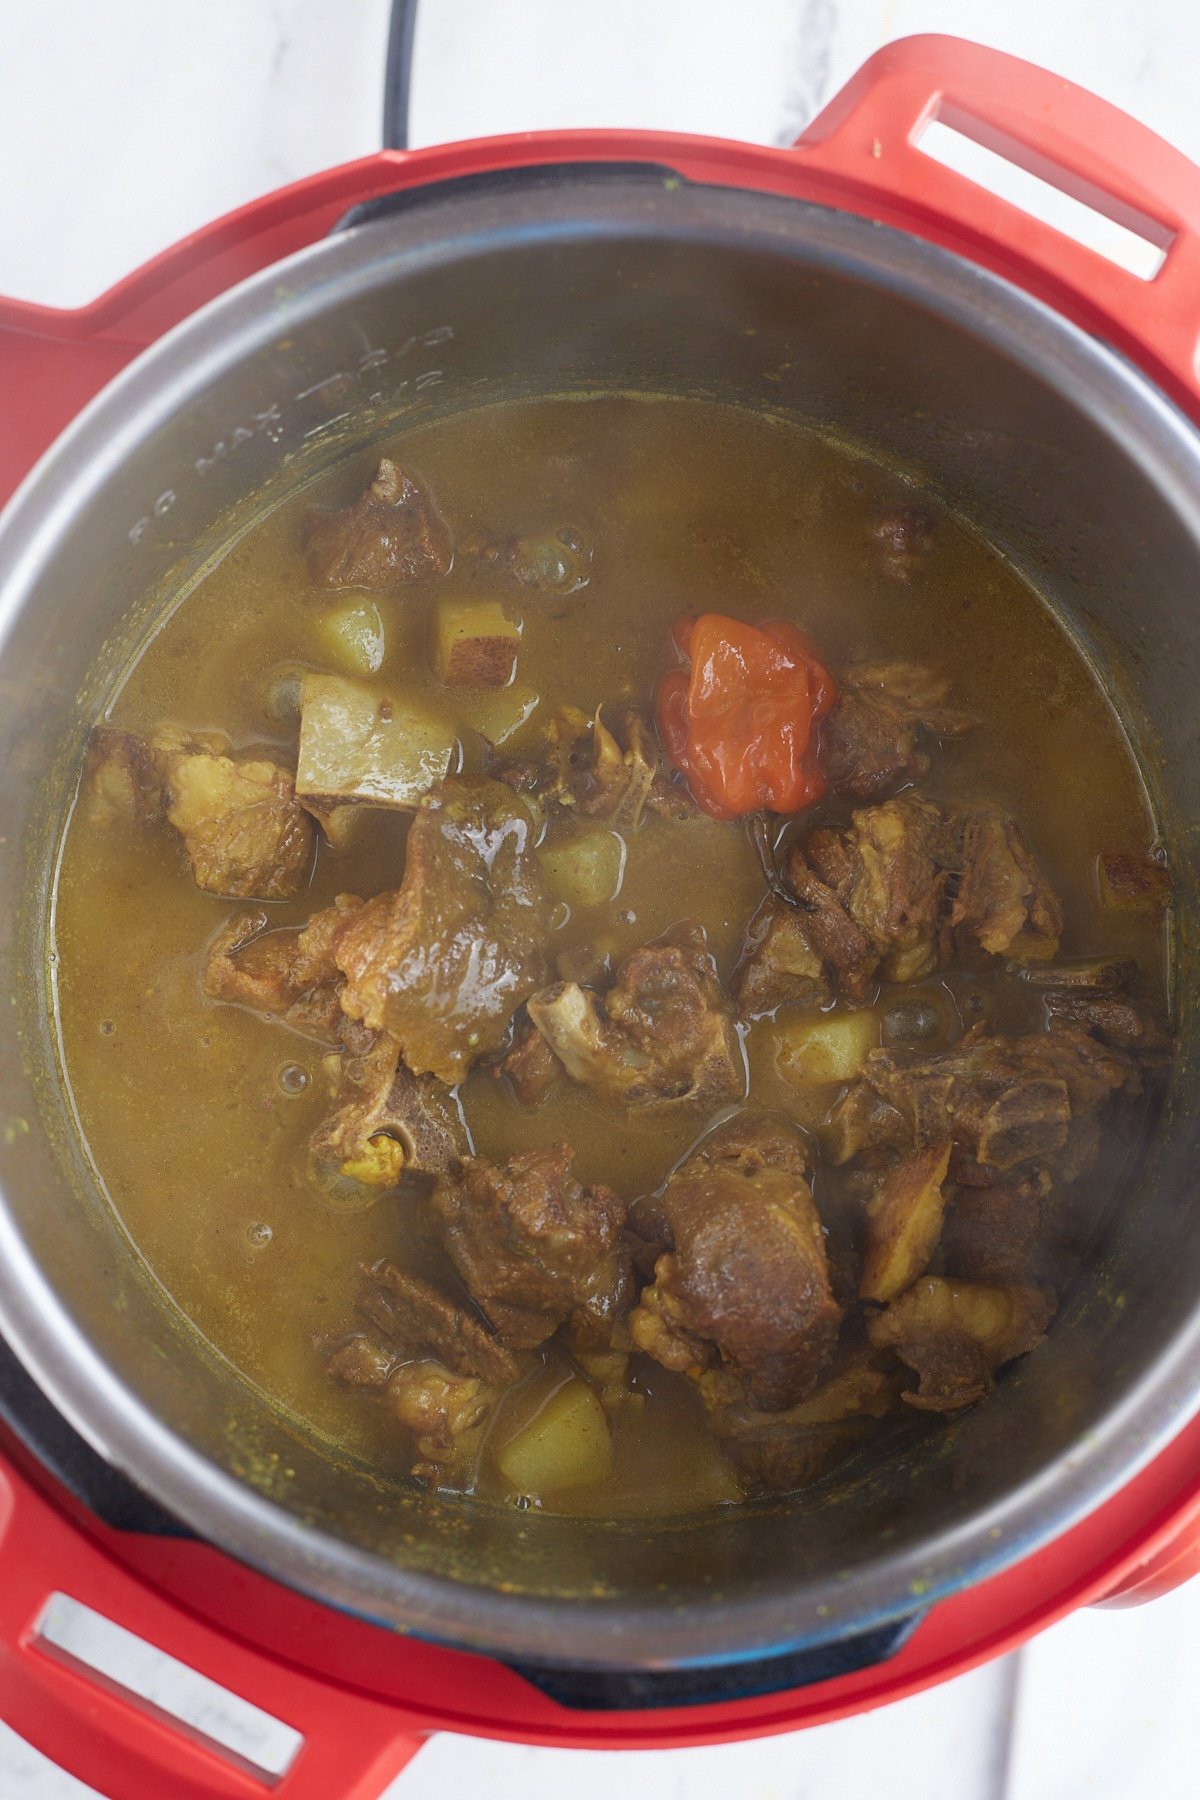
Serve and enjoy.
Making curry goat on the stovetop is similar to making it in the pressure cooker. Follow the above directions, but cook the goat in a large covered pot over low heat for 1.5-2 hours, until tender. Add the chopped potatoes and pepper during the last 20 minutes of cooking.
Season the goat as directed, then brown it in a skillet. Add the onion, garlic, and remaining curry powder to the same pan and sauté briefly. Transfer everything to the slow cooker with the thyme and water, then cook on Low for 6–8 hours, until the goat is tender. Add the potatoes and a whole Scotch bonnet pepper for the last 40 minutes of cooking, until the potatoes are soft. Remove the pepper before serving.
You can typically find goat in your local International market or Caribbean market. It's usually already chopped into pieces for you.
For Jamaican curry goat, you need to use Jamaican curry. For store-bought options, I like to use a combination of Blue Mountain Curry and Betapac. You can also use homemade curry powder. Your goat will taste like whatever brand of curry you use.
Once you add the chopped potatoes and allow the goat to simmer on the stovetop for 10-15 minutes, your curry will thicken a little.
Many people like to serve this dish with rice and peas, but I prefer the goat and the gravy over a nice heap of white rice. Sauteéd Jamaican cabbage and fried dumplings also go along well with this dish.
I sure hope you love this recipe as much as we do.
This post was originally published on July 21, 2021. It has been updated with additional helpful information and tips.